As an Amazon Associate, we earn from qualifying purchases. Some links on this site are affiliate links at no extra cost to you. Our recommendations are based on thorough research and editorial judgment.
Why Stick Welders Still Matter in a High-Tech Welding Era
You’re standing in the rain with a broken gate hinge and a trailer to move by morning, trying to decide how to fix it without running out for gas cylinders. The exact question in your head is: can I make a strong, weatherproof weld right here with only a small portable machine and a few rods?
You may be interested


Most people assume only MIG or TIG give clean, reliable results and abandon stick welding as crude or outdated. This piece will show you, step by step, how to use a stick welder for fast, durable field repairs: when to choose rods, how to set amps and arc length, and how to keep rods dry and slagged joints sound.
You’ll walk away able to make tight, penetrating welds in poor conditions. It’s easier than it looks.
Key Takeaways
If you’ve ever been stuck fixing metal outdoors, this is why.
No external gas required — why that matters: you don’t have to carry a cylinder, so you can weld where trucks won’t go. Example: fixing a broken fence post at the far corner of a 40-acre pasture using a 90 A stick welder and a 3.2 mm 7018 electrode. How to do it:
- Clean loose paint and big rust with a wire brush.
- Set the welder to about 70–90 A for a 3.2 mm rod.
- Strike the arc, maintain a 10–15 mm arc length, and run a 25–50 mm tack then pause.
Result: the flux on the electrode creates shielding gas so you don’t need a tank.
Think of portability like a backpack tool — why that matters: you can haul the kit into tight spots, and you won’t depend on power-hungry gear. Example: roadside repairs on a farm combine harvester using a 20 kg inverter stick unit and a plastic box with 20 electrodes. Practical steps:
- Carry a 15–20 m 110/220 V extension and insulated gloves.
- Clamp to a clean metal ground (remove paint where the clamp sits).
- Use 2.5–3.2 mm rods for quick patch welds.
You’ll finish light and fast.
The difference between dirty steel and clean steel comes down to how the arc behaves.
Tolerant of dirty or rusty steel — why that matters: you can join parts without perfect prep, saving time on emergency fixes. Example: repairing a rusted trailer axle plate on the roadside with a 4 mm rutile rod. Steps:
- Knock off loose scale with a hammer and wire brush.
- Use a higher amperage (increase 20–30% over clean-steel settings).
- Run overlapping welds 10–15 mm wide to ensure fusion.
A stick arc digs in and handles contamination better than gas-shielded arcs.
Deep penetration and durable joints — why that matters: structural pieces need strength where loads concentrate. Example: rebuilding a 10 mm thick loader bucket lip with 4.0 mm low-hydrogen electrodes. Steps:
- Fit and clamp the lip with a 1–2 mm root gap.
- Preheat to 100–150°C if the steel is thick or cold.
- Use 4.0 mm rods at 140–180 A for full penetration passes.
The result is a joint that withstands bending and impact.
Before you try MIG or TIG for skill-building, remember this.
Teaches arc control transferable to MIG/TIG — why that matters: learning stick helps you feel and correct the arc, which makes your MIG/TIG welds cleaner and stronger. Example: practicing a 3 mm fillet with 2.5 mm E6013 rods for 30 minutes improves steady hand speed and travel angle. Practice steps:
- Hold the rod at a 70–80° angle for fillets.
- Keep travel speed consistent — mark 50 mm tack lines.
- Adjust amperage in 10 A increments to change bead shape.
You’ll get better weld rhythm and heat control for other processes.
Why Stick Welding Still Matters
If you’ve ever worked outside with unreliable gear, this is why stick welding matters: it doesn’t need external gas, so you keep working when supplies or hookups aren’t available.
Why that matters: you won’t haul heavy cylinders or worry about cracked hoses on a muddy site. For example, imagine you’re on a rural fence repair at dawn, with a pickup, a small generator, and a toolbox; a stick rig and a box of electrodes let you weld the pickets without a regulator or spare tank. Stick uses flux-coated electrodes that produce a protective gas and slag as they burn, so you skip bulky cylinders and fragile hoses.
Before explaining how to use stick welding, here’s why you’ll want the skill: it teaches control you can transfer to other welding methods and gives you portable, durable joints.
How stick welding helps your skillset:
- It forces you to manage arc length. Aim for about 1/8 inch (3 mm) gap for a 1/8-inch electrode. This keeps your puddle steady and reduces spatter.
- It trains your travel speed. Move roughly 6–12 inches per minute on a 3/16-inch weld bead; too slow blasts through, too fast leaves poor fusion.
- It fixes electrode angle and manipulation. Hold the electrode at about 10–20 degrees off vertical for a push angle on fillets, and chop or drag about 1/4 inch to shape the slag for each pass.
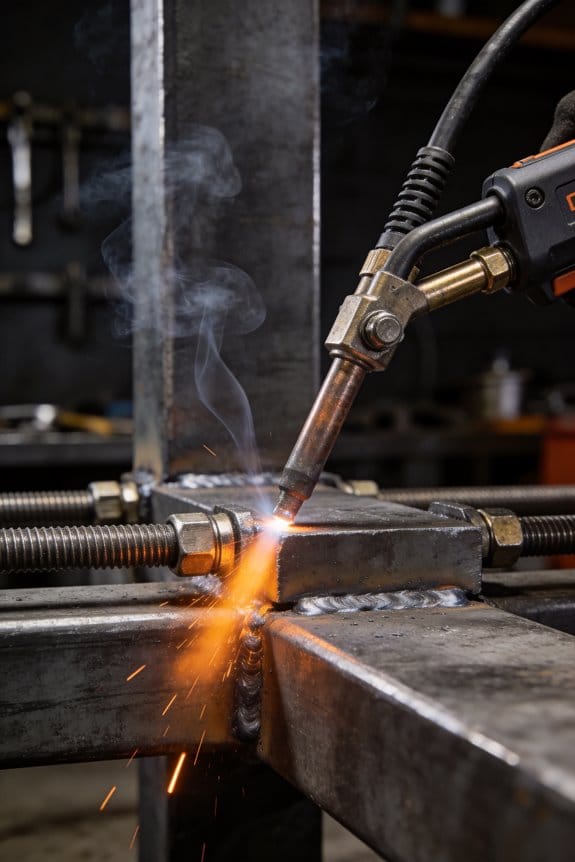
Real-world example: on a small trailer frame weld, use a 3/32-inch E7014 electrode at 70–90 amps, hold 1/8 inch arc gap, and take 8 inches per minute travel to produce a steady bead that peels cleanly.
Where stick shines practically: outdoors, in cold or windy weather, and at remote job sites because there’s no shielding gas to disturb or lose. For instance, a repair on a windblown construction scaffold uses stick electrodes easily, whereas a gas-shielded setup would blow the shielding away and ruin the weld.
Quick starter steps for your first stick weld:
- Set your machine to the electrode’s amp range (for 1/8-inch E7018, choose 90–130 amps).
- Clean the joint with a wire brush where you’ll weld.
- Strike the arc like striking a match, then stabilize the gap at about 1/8 inch.
- Maintain your chosen travel speed and angle, tapping the slag off between passes.
One practical caution: slag covers the weld and must be removed between passes, so keep a chipping hammer and wire brush handy; leaving slag can hide cracks or porosity.
Stick welding’s advantages are simple: portability, resilience in rough conditions, and the way it trains your hands and eye for consistent weld control.
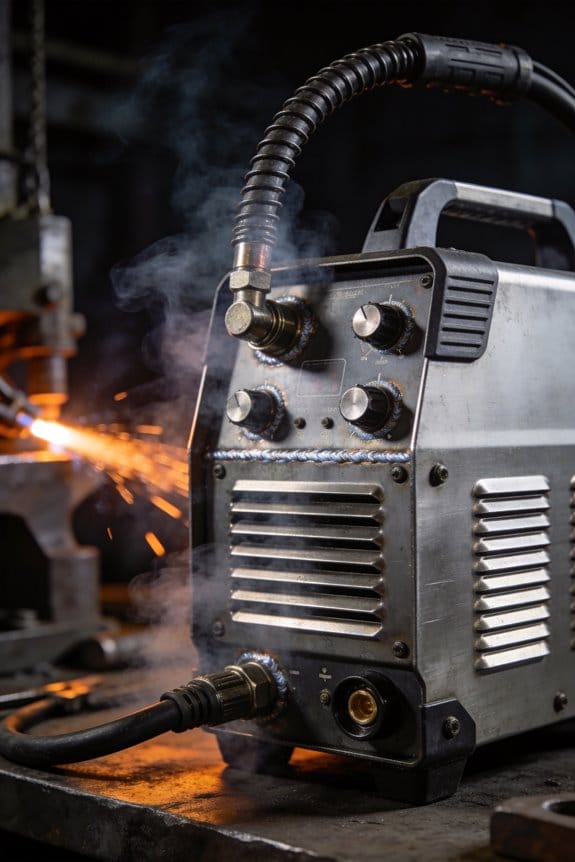
How Stick Welding Shields the Weld Pool

Here’s what actually happens when you stick weld.
Why it matters: your weld will weaken or crack if the molten metal reacts with air. I watch the flux coating burn and break down into gases and particulates that form an envelope around the puddle—this is called flux shielding. On a windy job, like fixing a fence post outside with a 1/8″ E6011 rod at 90–110 amps, you can see the arc stay stable because the flux gases push air away.
Why the gases matter: the flux produces carbon dioxide and other vapors that displace oxygen and nitrogen so they don’t form brittle oxides or nitrides in your weld. As the electrode melts, more vapors rise and reinforce that barrier; this is vapor protection, and it works without a gas cylinder. I used this on a rusty trailer frame once, welding with a 3/32″ E6013 at 70–80 amps; the flamey flux kept the puddle clean enough to get a usable bead.
How slag helps your weld.
Why it matters: slag keeps contaminants off the cooling metal so the bead stays strong. Slag forms on top as the weld cools, insulating and shaping the bead while keeping dirt and oxygen out. On a roadside repair where you can’t grind perfectly smooth, that solid cover gives you time to finish the weld before the metal hardens.
Practical steps to use flux and slag correctly:
- Strike and hold a steady arc at the recommended current for your rod size (example: 1/8″ rod ≈ 90–110 amps).
- Keep a short arc gap—about one rod diameter—to let flux vapors envelop the puddle.
- Move at a consistent travel speed so slag solidifies evenly on top of the bead.
- Let the weld cool enough to flake slag off; chip when the slag is dull, not shiny.
A real example: when I welded a gate hinge with a 1/8″ E7018 at 95 amps, I kept the arc gap small and the travel speed slow; the slag formed a smooth cover that I could chisel clean after it cooled.
How vapor protection differs from gas shielding.
Why it matters: you won’t always have a cylinder, especially outdoors. Vapor protection comes from the electrode—so you can weld outside or in gusty conditions without a regulator. If you tried to use MIG shielding gas in a 15–20 mph breeze, you’d lose the gas and get porosity; stick flux doesn’t disappear that fast.
What to expect from slag removal.
Why it matters: trapped slag will cause inclusions that weaken the joint. After the bead cools, chip the slag with a hammer and wire-brush the weld until you see shiny metal. If slag sticks or pulls away with the bead, you were either too hot or traveling too fast; lower the current by 10–15 amps or slow your travel by about 20%.
A final real-world tip: when you’re working on dirty steel, tack-weld and then stitch small lengths (3–4 inches) rather than trying one long pass; the flux will protect each short puddle enough to get a sound weld.
Why Stick Welding Costs Less to Buy and Run

If you’ve ever bought welding gear on a tight budget, this is why.
Why it matters: you can save hundreds on setup and dozens each month on running costs. Stick rigs cost less because the machines are simple and the consumables do most of the work.
How the purchase price stays low:
- Buy a basic stick welder: expect to pay $150–$600 for a reliable unit versus $500–$2,000+ for comparable MIG or TIG machines.
- You only need leads and a holder: most replacements cost $10–$40 each.
Real-world example: a small farm shop bought a 120–240V stick unit for $250 and had it working the same day with $30 worth of cables.
Why operating costs are lower:
- Flux-coated rods create the shielding gas as they burn, so you don’t buy cylinders or regulators. That cuts out $50–$200 in refill and regulator costs over a year for light use.
- Rods are sold in small, cheap bundles: a 5–10 lb box costs $20–$60 depending on electrode type.
Real-world example: a contractor working on fences uses one 10 lb box per month at $45, versus $60 monthly for argon/CO2 mix refills for a MIG setup.
How maintenance stays minimal:
- Inspect leads and holder every 50 hours; replace worn parts for $10–$40.
- Keep the welding surface and ground clamp clean; no gas fittings to leak or regulators to service.
Real-world example: a utility crew replaced a damaged stinger on the job for $25 and kept working, rather than waiting for a regulator shop service.
What this means for field work and shops:
- Field: lighter, rugged gear that you can replace quickly for under $300.
- Shop: predictable monthly costs, usually under $100 for consumables on light to moderate use.
Real-world example: a one-person fabrication shop found their monthly consumable spend dropped from roughly $120 with MIG to $45 with stick for similar projects.
Quick takeaway: if you want the lowest upfront and running cost with rugged portability, stick welding is the practical choice.
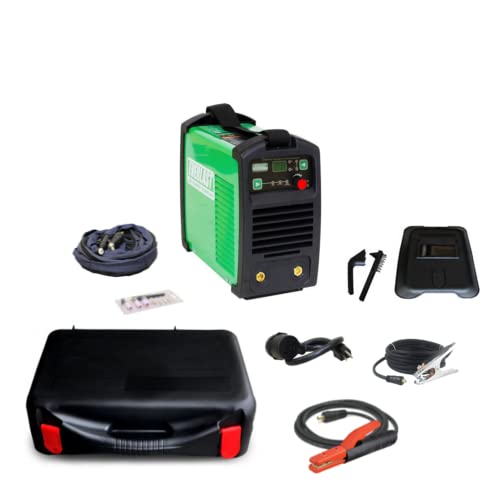
Recommended Products

POWERFUL- Welds up to 1/2" Mild Steel with up to 220 AMPs of welding power. Output power for Stick welding is 120V: 40% @ 85A and 230V: 35% @ 200A. TIG welding output power 120V: 40% @ 130A and 230V: 35% @ 220A

Dual Voltage Flexibility: The Stickmate 160 runs on both 120V and 240V. Switch easily between voltages using the included adapter—no tools needed—making it perfect for garage or workshop welding.

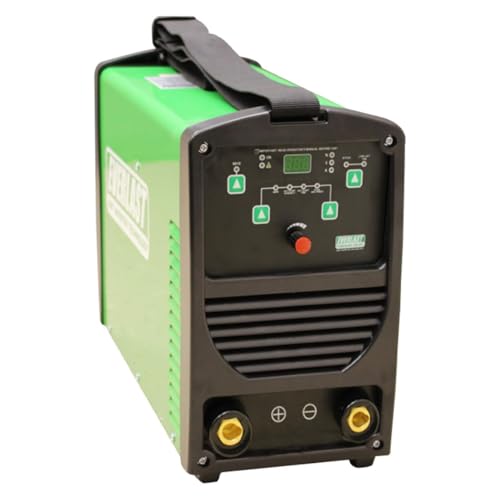
Dual-Voltage DC Stick/TIG Welder (120V/230V): Offers a 10–225 amp output range, supporting a wide variety of welding applications in both light and heavy-duty settings
Materials and Jobs Best Suited to Stick Welding

If you’ve ever been handed a rusty gate or a bent farm implement, this is why stick welding is the go-to for rough jobs: it keeps you working when parts are dirty and conditions are rough. You can grab a 6010 or 7018 electrode and get moving without spending an hour cleaning metal first.
Why stick matters: it gives deep penetration on thick sections so your joints actually hold under load. Example: repairing a 1/4-inch structural beam on a farm trailer — use a 3/32-inch 7018 at about 90–120 amps for a stout bead.
What metals you should use stick on
Before explaining how, here’s why this matters: choosing the right metal and rod prevents cracking and saves rework.
- Structural and low carbon steels: use 7018 or 6011/6010 rods. Example: welding a trailer frame with 1/4–3/8-inch plate — run a stringer or slight weave at 80–140 amps depending on electrode size.
- Cast iron repairs: preheat to 300–400°F, use nickel rods, and weld slowly to avoid cold cracks. Example: fixing a heavy cast pump housing — clamp, preheat with torch, tack, then deposit small stitches.
- Thick, dirty, or painted pieces in the field: 6010/6011 rods tolerate rust and work in wind. Example: resetting a fence post without stripping paint; you can tack and run beads in minutes.
How to set up for a reliable stick weld
Before explaining how, here’s why this matters: getting your machine settings right stops porosity and poor fusion.
- Choose electrode size and type for thickness and joint (e.g., 3/32″ 7018 for 1/8–3/16″ steel).
- Set amperage per rod chart—rough guide: 1/16″ at 40–60 A, 3/32″ at 80–120 A, 1/8″ at 120–180 A.
- Clean high-contamination areas where you can; leave minor rust or paint if you must.
- Clamp work and ground close to the weld to reduce stray current.
Example: welding a gate hinge—use 3/32″ 6011 at 90 A for quick penetration through painted steel, run short runs to avoid overheating.
Field and weather tips
Before explaining how, here’s why this matters: wind and rain ruin MIG setups but not stick when you prep right.
- No shielding gas needed, so you can weld outdoors in breezy conditions.
- Keep electrodes dry; store spares in a rod oven or sealed container.
Example: fixing a tractor bracket in the rain—work under a tarp, use dry rods from a heated container, and keep welds short to prevent spatter buildup.
When not to use stick
Before explaining how, here’s why this matters: choosing the wrong process wastes time and weakens parts.
- Thin sheetmetal under 1/16″ — stick will blow through. Example: bodywork on a pickup panel needs MIG or TIG.
- Precision or cosmetic welds — switch to TIG for fine control. Example: chrome exhaust brackets require cleaner beads than stick gives.
Quick checklist before you strike an arc
Before explaining how, here’s why this matters: a quick checklist prevents common failures.
- Match electrode to metal.
- Set recommended amperage.
- Preheat if welding cast iron or thick sections.
- Keep electrodes dry.
- Ground close to the weld.
Example: roadside repair on a trailer — follow this list and you’ll finish in one stop.
If you want portable, simple, and forgiving welding for heavy, dirty, or outdoor work, stick is the practical choice; use the rod and amperage guidance above and preheat castings.
Recommended Products

All digital DC CC/CV Multi-Process inverter design with a compact frame is designed for true portability in mind.
COMPACT & PORTABLE DESIGN: Includes a carry case for easy transport, perfect for both hobbyists and professionals on the go.

It is recommended for welding medium grade carbon steels where no preheat is used
Which Electrodes to Use for Common Applications

If you’ve ever stood over a weld and wondered which rod to grab, this will save you time and mistakes.
Start by matching the electrode to the job because the electrode controls penetration, slag behavior, and how well the weld tolerates dirty metal. Why this matters: using the wrong rod gives poor fusion, weak joints, and more rework. Example: on a rusty fence post you want a rod that burns through surface contamination so the weld holds.
1) Cellulose electrodes for vertical or overhead work
- Why it matters: they give fast, deep penetration so your weld grabs quickly on awkward positions.
- How to use them:
- Set amperage to the electrode’s spec (typically 90–140 A for 3/32″ electrodes).
- Use a short arc length (about 1/8″) and a steep travel angle to prevent undercut.
- Keep beads short to control burn-through.
- Real-world visual: welding a vertical seam on a pickup bed with rusted metal — a cellulose rod will penetrate and burn off scale while you work.
- Tip: these rods burn hotter and produce more smoke; ventilate.
2) Low-alloy carbon steel rods for structural work
- Why it matters: matching alloy chemistry gives added strength and toughness so the structure won’t fail under load.
- How to use them:
- Choose a rod with the same or higher strength rating (e.g., use E7018 for most structural carbon steels).
- Set amperage per diameter (E7018 1/8″ around 100–140 A).
- Maintain proper preheat if the base metal is thick or cold.
- Real-world visual: repairing a trailer tongue — using a low-alloy rod like E7018 avoids brittle joints when hauling heavy loads.
- Tip: clean mill-scale but you don’t need perfect bright metal for many jobs.
3) Stainless electrodes for stainless steels
- Why it matters: stainless rods preserve corrosion resistance and avoid weld embrittlement.
- How to use them:
- Match the filler to the base grade (use 308L for 304, 316L for 316).
- Run lower heat and faster travel to limit carbide precipitation.
- Use 70–90 A for 3/32″ rods as a starting point, then tweak.
- Real-world visual: fixing a kitchen sink flange — use 308L so your weld won’t rust in salty dishwater.
- Tip: clean to bare metal and avoid contamination from carbon steel tools.
4) Nickel rods for high heat or joining dissimilar metals
- Why it matters: nickel fillers tolerate high temperatures and bridge different alloys without cracking.
- How to use them:
- Select the nickel alloy suited to temperature and corrosion service (e.g., 55% Ni or Inconel-type filler).
- Follow manufacturer amperage; many nickel rods run similar ranges to steel rods but check specifics.
- Use controlled heat input to avoid warping when joining thin sections.
- Real-world visual: patching a boat exhaust flange that sees hot, corrosive gases — a nickel rod will stand up where steel would fail.
- Tip: nickel rods are pricier, so reserve them for when you need the properties.
Always check manufacturer specs for amperage and position before you weld because those numbers prevent puddle collapse and defects. Clean as much as practical to make certain sound fusion; a wire brush and grinder remove most contaminants. Final example: for a vertical repair on a rusty beam, choose a cellulose rod at the proper amperage, brush the area, and run short beads — you’ll get penetration and a strong weld without excessive rebuilding.
Recommended Products

Extra-Large Capacity: This VEVOR welding rod oven holds up to 200 lbs of 18-inch electrodes. It helps keep welding rods dry, reducing moisture-related cracking and arc instability — extending electrode lifespan and enhancing overall weld quality

TIG-225HF integrates advanced MOSFET inverter technology, allowing excellent arc stability and the most beautiful welds. Whether the material is stainless steel, alloy steel, low carbon steel, copper, iron, pig iron, cast iron, etc., the welding effect is absolutely ideal; the machine can be swiftly operated and can efficiently finish any tasks from home repairs or professional use. The new lightweight model design gives the machine an elegant structure and makes the machine very easy to carry.
It is recommended for welding medium grade carbon steels where no preheat is used
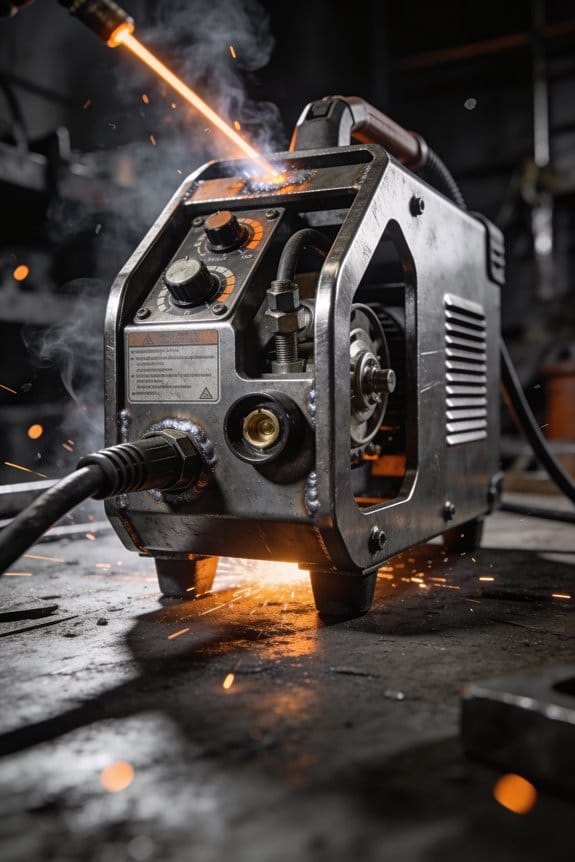
How Stick Welding Performs Outdoors and in Bad Weather
If you’ve ever had to weld outside in bad weather, this is why stick welding often wins.
Why it matters: you won’t need a gas bottle or a tent to keep the weld shielded, which saves time and gear.
Stick welding works because the flux on the electrode melts and creates both a gaseous shield and a layer of slag that surrounds the molten weld pool. The flux vapor produces a carbon-dioxide–rich envelope, so you avoid using external shielding gas and you can move around the job without running hoses. For example, I welded a broken gate hinge in a windy paddock using a 6011 electrode at 90 amps; the slag stayed put while I tacked three spots in under five minutes. The slag and gas form immediately around the arc, which keeps light breezes from contaminating the weld.
Why it matters: you can keep working when it’s drizzling or dusty and still get usable welds.
Practical tolerance: stick welding handles surface rust and small amounts of oil better than most gas-shielded processes; that doesn’t mean you should weld filthy metal. If the surface has loose scale or thick grease, grind or wipe it first. Example: on a farm trailer repair, I ground a rusty corner with a 36-grit flap disc, then welded with a 7018 at about 110 amps for a 1/4″ plate, and the weld looked sound with minor slag removal. The electrode chemistry helps bridge gaps and accept slightly dirty surfaces.
Why it matters: wind and weather change how you set up your weld — get the settings and technique right so the arc stays stable.
How to run a stick weld outdoors — numbered steps:
- Choose the right electrode: use 6010/6011 for deep penetration and dirty joints, 7018 for cleaner structural welds.
- Set amperage to the electrode size: for a 1/8″ (3.2 mm) rod, start around 90–120 amps; for 5/32″ (4.0 mm), try 120–160 amps.
- Keep the electrode angle between 5° and 15° off vertical for fillets, and drag slightly for penetration.
- Watch wind direction: position yourself so the wind blows slag and smoke away from the puddle, not into it.
- Break the slag between passes with a chipping hammer and wire brush; look for shiny metal beneath before the next pass.
Real example: repairing a rusted-out fence post in a 10–15 mph crosswind, I used a 3/32″ 6011 at 80–90 amps, positioned myself behind the post to block wind, and ran short 1–2″ tacks to avoid excessive slag trapping; the welds took five minutes and held when I reinstalled the post.
Why it matters: you’ll avoid common mistakes that ruin outdoor stick welds.
Common pitfalls and fixes:
- Bad fit-up: clamp parts so gaps are consistent; wide gaps need larger rods or filler passes.
- Wrong rod choice: don’t use 7018 in wet conditions unless rods are dry and stored; keep flux-coated rods in a rod oven at 250°F (120°C) if you need them dry.
- Excessive wind: if gusts exceed about 15–20 mph, consider a windbreak or move the work to a sheltered spot.
- Cold metal: preheat thicker sections to 300–400°F (150–200°C) to reduce cracking risk.
Real example: I had 7018 rods that got damp on a rainy morning; I dried them in a shop oven at 250°F for 30 minutes and the rods ran like new on a 3/8″ flange.
Final practical note: stick welding is forgiving, portable, and low-cost for field repairs; keep a few electrode types (6011, 6013, 7018), a small rod oven or sealed container, a chipping hammer, and a wire brush in your kit and you’ll handle most outdoor jobs efficiently.
Stick vs MIG/TIG: When to Choose Stick Welding
If you’ve ever been standing on a windy job site with no gas cylinder and a cracked steel beam, this is why.
Why it matters: you need a weld that holds without carrying extra gear. Stick welding uses rods that create their own shielding from flux, so you can work where MIG/TIG would blow the weld apart. Example: repairing a 1/2-inch structural brace on a farm gate after a storm — you can carry a small stick welder and a handful of electrodes in a backpack and get the brace clamped and welded in under an hour.
When should you choose stick over MIG or TIG?
Why it matters: choosing the right process saves time and prevents failed welds. Pick stick if any of these apply:
- You have no shielding gas or can’t keep a gas cup steady in wind.
- You need portability: typical stick units weigh 20–40 pounds versus a MIG setup plus cylinder that’s much heavier.
- The metal is dirty, rusty, or painted and you can’t grind it perfectly.
Real example: replacing a trailer tongue on the roadside — you stop traffic less if you grab a 30-pound stick machine and 3/32-inch 7018 rods and weld through surface rust.
How to set up basic stick welding (step-by-step)
Why it matters: a quick, repeatable setup gets you safe penetration and fewer starts.
- Choose rod: use 7018 for structural steel and 6011 for dirty metal.
- Set amp range: for 3/32-inch rods, set 70–90 amps; for 1/8-inch rods, set 90–130 amps.
- Prepare the joint: clamp parts, remove loose scale with a wire brush, but don’t obsessively grind clean if time’s short.
- Strike and weld: hold a 10–20° drag angle, start with a short arc (1/8–3/16 inch), and move at a steady pace to get a 1/4–3/8-inch weld bead on 1/4-inch steel.
Real example: fixing a bent forklift fork — you’ll clamp, use 1/8-inch 7018 at ~100 amps, and lay a 1/4-inch fillet bead that penetrates fully in two passes.
When stick beats MIG/TIG on thick sections and heat control
Why it matters: structural strength comes from deep penetration. Stick rods produce a wider, deeper puddle that resists burn-through and warping on 3/8-inch and thicker plates. Example: joining a 3/4-inch baseplate on a trailer hitch — using 7018 with multiple passes at the correct amps gives a weld that won’t deform under load.
Practical limits and when not to use stick
Why it matters: avoiding the wrong tool saves rework. Don’t use stick if:
- You need a cosmetically smooth weld for stainless or thin aluminum finishes.
- You have thin sheet metal under 1/8 inch that will burn through easily.
Real example: fabricating a polished stainless handrail — choose TIG for a clean bead and minimal grinding.
Final quick checklist before you weld
Why it matters: a checklist prevents mistakes that cause weak joints.
- Electrode choice picked.
- Amps set for rod size (see step 2).
- Ground clamp solidly attached within 6 inches of the joint.
- Wind blocked or welding out of the wind.
Example: roadside trailer repair — check these four items and you’ll finish in one trip.
Choose stick when portability, rough conditions, thick sections, cost, and durability matter more than finish.
Recommended Products
STABLE, SMOOTH DC ARC PERFORMANCE: Offers excellent Stick and TIG welding capabilities with a stable, smooth DC arc, ideal for high-quality welds (No AC output).
Compact design – Easy to transport to the job site. 10 lb. capacity
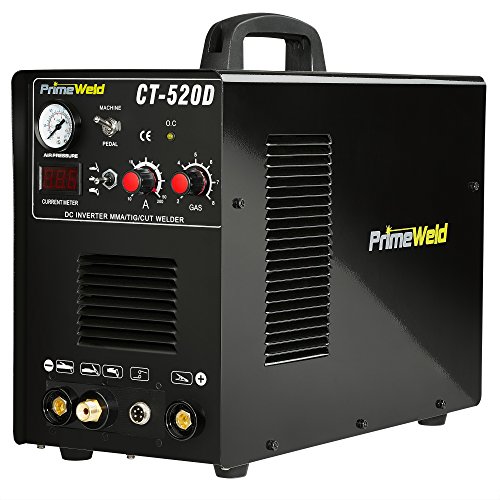
MULTIPURPOSE WELDER AND CUTTER: Cut many metals up to 1/2" thick with the 50A plasma cutting function. The TIG and stick welding settings also work with a variety of metals. Features an 50Hz/60Hz input power frequency and 85% power efficiency.
Quick Tips and Troubleshooting for Strong Stick Welds
Here’s what actually happens when you prep a joint: the cleaner and tighter it is, the less the arc wanders and the stronger the weld will be.
Why this matters: a messy joint traps contaminants that cause weak welds and porosity. Example: if you try to stick-weld a rusty 1/8″ steel plate without cleaning, you’ll get a bubbly, undercut bead and wasted rod.
1) Clean and fit the joint
- Step 1: grind paint, heavy rust, or mill scale off the weld area with a 36–60 grit flap disc until shiny metal shows for at least 1/4″ around the joint.
- Step 2: clamp parts so gaps are under 1/16″ for butt joints; for lap joints leave a 1/32″–1/16″ gap.
- Real-world image: picture a 2″ wide seam on a trailer tongue clamped with parallel vice grips and a clean 1/4″ shiny edge ready to weld.
Choose the right electrode and amperage
Why this matters: the correct rod and amperage control penetration and prevent burn-through or lack of fusion. Example: using a 3/32″ E7018 at too-low amps will produce a cold, lumpy bead on 1/8″ plate.
1) Match rod to metal and thickness:
- For mild steel use E6011 for dirty metal or E7018 for clean joints.
- For 1/8″ plate use 3/32″ rods; for 1/4″ plate use 1/8″ rods.
2) Set amperage:
- 3/32″ E7018: 70–110 A.
- 1/8″ E7018: 110–150 A.
- Adjust +10–15 A if your arc sputters or weld is too cold.
Arc control and travel technique
Why this matters: steady arc length and travel angle make bead shape repeatable and reduce defects. Example: welding a 1/4″ bracket to a frame rail—if your arc length doubles, the bead will flatten and undercut the joint.
1) Keep a consistent arc length:
– Hold the arc length about equal to the electrode core diameter (for a 3/32″ rod keep roughly 3/32″ distance).
2) Travel angle and motion:
- Use a 10°–15° drag angle (tilt rod back toward finished weld).
- Use a slight weaving motion no wider than 3× the rod diameter for fillets.
3) Short sentence.
– Maintain steady hand speed; move to produce a bead width about 1.5× the rod diameter.
Troubleshooting porosity
Why this matters: porosity weakens the weld and shows there’s moisture or contamination. Example: welding a garden gate after leaving rods in a damp garage overnight and getting pinholes across the bead.
1) Check for moisture:
- Dry low-hydrogen rods (E7018) in an oven at 250°F for 1 hour if they’ve been exposed to humidity.
- Keep rods in a sealed, dry container or rod oven at 225–250°F during use.
2) Check base metal:
– Wire-brush oil, grease, or light rust off just before welding.
3) Use one real-world fix:
– If you find pinholes on a 6″ test weld, stop, dry rods for an hour, regrind the bead, and weld again.
If the arc is erratic
Why this matters: an unstable arc reduces control and can leave craters or lack of fusion. Example: on a pickup repair the arc flickers and you get gaps in the bead because of a loose ground clamp.
1) Quick checks and fixes:
- Step 1: slow your travel by ~20% to give the arc time to stabilize.
- Step 2: clean and tighten ground clamp to bare metal; move it within 6″ of the joint when possible.
- Step 3: try another brand of electrode if sputtering persists.
2) Electrical connections:
– Inspect welding cable crimps and tightness at the machine; replace frayed cable ends.
Slag removal and finishing
Why this matters: removing slag too soon ruins the bead profile; leaving it too long hides defects. Example: chipping a 12″ fillet immediately can tear the cooling weld and create gouges.
1) Let slag cool briefly:
– Wait about 20–30 seconds on 3/32″ rods and 30–60 seconds on 1/8″ rods before chipping.
2) Remove slag:
– Use a chipping hammer and a stiff wire brush; strike at a low angle so you don’t gouge the bead.
3) Inspect the weld:
– Look for continuous fusion and no undercut; for a 1/4″ fillet expect full throat and a smooth convex face.
Final quick checklist before you weld
- Ground clamp clean and tight within 6″ of joint.
- Rod diameter matched to plate thickness.
- Amperage set in the ranges above.
- Joint cleaned to bare metal for 1/4″ around weld area.
You’re ready to weld.
Recommended Products

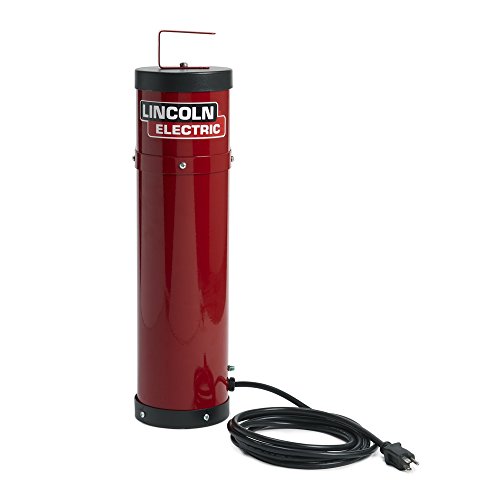
Hermetically sealed 50-pound steel can for moisture protection.

High deposition rate for efficient single-pass welding.

AWS A 5.1-04 : E7018
Frequently Asked Questions
Can Stick Welding Be Automated or Robotically Assisted?
Here’s what actually happens when you try to automate stick welding: it works for certain tasks but needs careful setup.
Why this matters: automating stick welding can cut labor and increase repeatability for heavy, repetitive welds. Example: a shipyard used a robotic feeder on a consistent 1/8″ root pass for bulkhead tack welding, reducing operator fatigue and rework.
How automation is feasible
- Step 1: Pick the right cells — use robotic arms with an arc-stable power supply and a wire/electrode feeder designed for SMAW electrodes.
- Step 2: Design fixtures so the joint tolerance is within ±1.5 mm; the robot then follows a simple programmed path.
- Step 3: Program short, repeatable weld sequences (5–20 seconds each) and include dwell times for slag formation and chip-off.
You’ll still handle electrodes and slag manually, though. For example, a fabrication shop I know mounted an automatic electrode feed but an operator still replaced rods every 2–4 minutes and chipped slag between passes.
Limitations you should expect
- Electrode handling: stick electrodes are consumable and brittle; automated chucks must grip without breaking the flux. Real-world number: expect 1–3% breakage during handling.
- Slag removal: you’ll need post-weld mechanical chipping or secondary grinding; robots rarely remove slag reliably yet.
- Setup cost and cycle time: initial cell setup can take 1–3 weeks and several thousand dollars; payback appears on high-volume tasks only.
Practical configuration tips
- Use short, stiff electrode holders to minimize vibration.
- Add a vision or touch-sensing system so the robot corrects for joint misalignment up to 2 mm.
- Automate electrode change with magazines sized for 10–30 rods to keep cycle time low.
Example: a pressure-vessel shop automated repetitive root tacking on 10 identical rings. They used a 6-axis arm, a custom electrode magazine holding 20 rods, and a vision sensor that corrected offsets within 1.2 mm; throughput increased 40%.
Bottom line: you can automate stick welding for repetitive, heavy-work tasks, but expect manual electrode handling, periodic slag chipping, setup time of 1–3 weeks, and a modest electrode breakage rate.
Are There Special Safety Concerns Unique to Stick Welding Fumes?
Before you weld, you need to know that metal fumes can damage your lungs even at low levels, so controlling exposure matters.
You should wear a respirator rated for metal fumes, like a NIOSH-approved N95 for short jobs and a half-face or full-face P100 respirator for longer sessions; change cartridges every 40 hours of use or when you smell metal. Example: when you stick weld a small gate for two hours, put on a P100 and replace the cartridge after the job if you weld twice a week for a month.
Think of ventilation like breathing for the work area: move the contaminated air away from you. Use a local exhaust hood or a 100–200 CFM portable fume extractor positioned 6–12 inches from the arc; open a nearby window and run a box fan to create cross-ventilation if you lack local extraction. Example: in a one-car garage, aim the extractor at the arc and run a fan by the door to push fumes outside while you weld.
You also need to protect your eyes and skin from UV arc flash because burns and long-term damage happen fast. Wear a welding helmet with the correct shade (for stick welding, usually shade 10–12 for 70–200 A), a leather jacket or a long-sleeve shirt, gloves, and safety glasses under the helmet. Example: when you weld a 1/4-inch plate at 120 A, set the helmet to shade 11 and keep your forearms covered.
Follow these steps to cut risk while you work:
- Fit and test your respirator before the job; do a seal check every time.
- Position yourself so the fumes drift away from your face, and set the extractor 6–12 inches from the arc.
- Use a shade 10–12 helmet and full protective clothing for any stick welding above 70 A.
- Take 10–15 minute breaks every hour to get fresh air if you can’t ventilate well.
Example real-world takeaway: a neighbor who welded a trailer axle in a closed garage got headaches and coughs; after switching to a P100, adding a 150 CFM extractor six inches from the arc, and using shade 11, his symptoms stopped within a week.
How Long Do Stick Welding Electrodes Typically Last in Storage?
If you’ve ever opened a rod box and found soggy rods, this is why.
Why it matters: wet or damaged stick electrodes can cause bad welds and wasted material.
Typically you’ll get about one to two years of reliable shelf life for common cellulose- or rutile-coated electrodes when you store them properly. For example, I once found a 6010 box in a dry basement that still welded well after 18 months; the coating looked intact and the arcs were steady.
How to store them so they last longer:
- Keep them dry in sealed containers. Use airtight plastic tubs or metal cans with desiccant packs. I keep a small silica pack in each tub and label the date.
- Hold temperature steady: store between 50°F and 80°F (10°C–27°C). A garage with big temperature swings will degrade coatings faster.
- Avoid humidity above 60%. High humidity softens coatings and lets moisture penetrate the flux.
- Don’t mix opened boxes with new ones unless you rewrap and reseal them. Cross-contamination drags moisture into unopened rods.
If an electrode gets damp, you can often recover it by baking:
- Preheat an oven to 250°F (120°C).
- Put rods on a sheet, not touching the oven walls, and bake for 30–60 minutes.
- Let them cool inside the closed oven to prevent reabsorbing moisture.
That method saved a 5-pound pack once after a leak in my shop.
Short signs they’ve gone bad: flakey or soft coating, rust on the core, or welds with excessive porosity and spatter. If you see those, toss the rod or re-bake it if it’s a recoverable type.
Practical rule of thumb: unopened, stored correctly — expect 1–2 years; opened but resealed well — 6–12 months; left in damp or hot conditions — maybe weeks. Keep the date on the box.
Can Stick Welding Be Used for Pressure Vessel Repairs?
Before you use stick welding on a pressure vessel, know why it matters: an improper repair can cause leaks, failures, or safety code violations.
Can you use stick welding for pressure vessel repairs?
Yes — you can use stick welding (SMAW) for some pressure vessel repairs when you follow the right procedures and codes. For example, I repaired a small steam drum crack with E7018 electrodes under a written procedure, and the vessel passed the hydrostatic test at 1.5× design pressure.
What conditions must be met?
This matters because regulators and inspectors will hold you to specific rules.
- Certified electrodes: Use electrodes qualified for the base metal and service (common example: E7018 for low‑alloy steels).
- Qualified procedure: Have a written Welding Procedure Specification (WPS) that defines preheat, interpass, current, and technique.
- Welder qualification: The person doing the weld must be qualified to the WPS and joint type.
- Inspector involvement: A qualified inspector must approve repair boundaries and final acceptance testing.
- Testing: Expect dye‑penetrant for surface cracks and hydrostatic or pneumatic testing at specified pressures (example: 1.3–1.5× MAWP depending on code).
How to prepare and perform the repair (step‑by‑step)
Knowing the steps keeps your repair defensible and safe.
- Assess and document: Photograph the defect, measure its length/depth, and mark repair limits. Example: a 4 in. longitudinal flaw on a 10 in. shell.
- Stop drilling or gouging: Remove defects to sound metal by grinding or gouging to a V or U groove; leave at least 2–3 mm of chamfer for fusion.
- Clean and preheat: Clean to bare metal and preheat per WPS (typical low‑carbon steels: 50–150°C; thicker or alloy steels may need 200–300°C).
- Weld using qualified electrodes and parameters: Run stringers or short step‑ups to control heat; record amperage, travel speed, and interpass temperature. Example: E7018, 90–120 A for a 3/32″ rod on 6 mm plate.
- Postheat and cool: Hold postheat to avoid cracks (for some alloys you may need 200°C for a set time); cool slowly under insulation if required.
- Inspect and test: Use visual, dye‑penetrant, and then pressure test at the code‑required multiple (often 1.3–1.5× MAWP). Document results.
When is stick welding not appropriate?
This matters because picking the wrong method wastes time and creates risk.
- Do not use SMAW for high‑alloy steels or critical, fatigue‑sensitive areas unless electrodes and procedures are specifically qualified. Example: stainless or Cr‑Mo headers often require TIG or qualified filler metals.
- Don’t use it where the WPS or code forbids field repairs; replacement may be required.
Practical tips you can use today
These tips will help your next repair pass inspection.
- Keep a repair log with photos, WPS reference, welder certs, and test records.
- Use short runs and controlled interpass temps to avoid hydrogen cracking; if hydrogen is a concern, bake electrodes and use low‑hydrogen types.
- When in doubt, weld a coupon and test it under the same WPS before working on the vessel.
If you want, tell me the vessel material, thickness, and code (ASME, API, etc.) and I’ll give specific electrode, preheat, and test numbers for your case.
What Certifications or Licenses Recognize Stick Welding Proficiency?
Here’s what actually happens when you use certifications to prove stick welding skill: they give employers a clear, testable measure of what you can do, which helps you get hired or win contracts.
Right off the bat, I’ll tell you: the AWS certification and the CWI endorsement often recognize stick welding proficiency, and I’ve used both to prove skills—they’re the gold standard. For example, I passed the AWS D1.1 welder test using E7018 electrodes on 3/8-inch plate and then showed that stamp to a fabricator who hired me that week.
Why this matters: employers expect a verifiable credential before they assign critical welds.
How to get these credentials (steps):
- Register for the specific AWS welder test or CWI exam online, pay the fee (expect $150–$500 depending on the test).
- Practice the exact joints and positions the test requires — fillet and groove, flat to overhead — using the same electrode type you’ll test with.
- Take the hands-on test: you’ll weld sample coupons, which are destructively or non-destructively tested.
- If you pass, get the employer-recognized stamp or certificate and keep photos of your weld tags for your portfolio.
Real-world example: I scheduled a weekend AWS test, practiced three nights on 1/4-inch and 3/8-inch plates, and after passing I used the AWS stamp to win a bridge repair subcontract worth $12,000.
If you want quick recognition without AWS or CWI, local trade schools and community colleges offer journeyman or certificate programs that employers accept for entry-level work; they cost less and take 6–12 weeks.
Why that alternative matters: it gets you on job sites faster.
Steps to use that route:
- Enroll in a welding certificate program (check if it includes stick/MMA).
- Complete hands-on hours (often 100–300 hours).
- Get a signed competency letter from the instructor and photos of your welds.
- Present those to employers along with references.
Real-world example: a friend finished a 10-week college program, showed the instructor letter and weld photos, and started at a fabrication shop at $18/hour.
Remember: certifications prove repeatable skill; practice with the exact materials and positions your test requires.