As an Amazon Associate, we earn from qualifying purchases. Some links on this site are affiliate links at no extra cost to you. Our recommendations are based on thorough research and editorial judgment.

How New Portable Machines Balance Size With Duty-Cycle Demands
You’ve been mid‑job with a compact compressor or pump that overheats or stalls after a few minutes, and you can’t tell why the small machine can’t keep up. You’re asking whether a smaller case means weaker continuous performance or if you simply picked the wrong model for duty‑cycle needs.
You may be interested


Most people assume small = underpowered and buy the biggest unit they can afford, which wastes weight, money, and portability. This piece will show exactly how modern portable machines deliver high duty‑cycle output in small enclosures, and how to pick one that runs long jobs without overheating or tripping.
You’ll get clear selection rules and the practical features to insist on. It’s simpler than it looks.
Key Takeaways
If you’ve ever tried to run a nailer or impact gun from a small compressor, this is why.
Why it matters: if your tool starves for air you lose time and can damage fittings. Manufacturers squeeze more runtime from small housings by improving motor and cam efficiency and by adding better cooling so the motor can run longer without overheating. For example, a 2.5‑gal portable with a high‑efficiency motor and an upgraded fan might go from a 30% duty cycle to 50% at the same power rating. Use that unit for 10–15 minute framing bursts and watch run time hold steady.
Before you buy, how do you make sure the pump delivers the CFM you need at working PSI?
Why it matters: tools need both the right CFM and the right PSI at the same time or they’ll sputter. Designers match higher‑CFM pumps with tuned regulators so a smaller compressor gives the CFM your tool needs at working PSI; for instance, a compact pump rated 4.0 CFM at 90 PSI paired with a regulator set to 90 PSI will actually give a framing nailer steady drives. Test this by running your tool for five minutes and watching pressure recovery; if the needle doesn’t fall more than 10–15 PSI during use, you’re fine.
Think of tank size like a short burst battery.
Why it matters: a bigger tank buys you short, high‑demand bursts without upsizing the compressor. Manufacturers add larger internal tanks or offer portable external buffers so you get extra air for quick sequences — for example, adding a 5‑gal external buffer to a 2.5‑gal compressor gives you much longer strings of nails before the motor kicks in. If you do a lot of short bursts, add an external buffer and you’ll cut motor run cycles in half.
You don’t need heavyweight steel if you want durability.
Why it matters: carrying less weight makes your job easier and prevents metal fatigue from repeated vibration. Producers use aluminum or magnesium frames and lighter materials so the units weigh less but still handle vibration; a magnesium‑framed unit can shave 20–30% of carry weight versus an all‑steel model while surviving jobsite drops. When you lift the compressor, check for reinforced mounting points and rubber isolate mounts to ensure structural durability.
Before you rely on spec sheets, read the real ratings.
Why it matters: specs tell you whether a compressor meets your job needs under real use. Products are sold with duty‑cycle percentages and CFM‑at‑PSI numbers plus a recommended 20–30% headroom for real job conditions; so if your impact wrench needs 5 CFM at 90 PSI, pick a compressor that can deliver 6–6.5 CFM at 90 PSI. Bring your tool and test it for five minutes on the vendor floor, or request recorded pressure/recovery data when possible.
How to Choose a Portable Machine for Your Duty‑Cycle Needs
Here’s what actually happens when you match a portable machine to your duty-cycle.
Why this matters: choosing the right duty-cycle stops overheating and extends machine life. If you run a small compressor for 6 hours a day at 80 PSI with short, frequent bursts, you’ll cook a unit rated for continuous 30 minutes at that pressure.
1) Figure out your daily use in numbers.
- Step 1: Write down total run time per day (hours). Example: “I run 6 hours/day.”
- Step 2: Record typical pressure and airflow during peak work (PSI and CFM). Example: “Peaks at 80 PSI and 12 CFM while nailing trim.”
- Step 3: Measure typical rest intervals between peaks (minutes). Example: “30–60 seconds off between bursts.”
Match those numbers to a machine’s rated duty cycle so you avoid overheating and early wear.
Why this matters: material choice affects weight and how the unit holds up after thousands of cycles. A thin sheet metal housing might save 10–15 pounds but will dent and crack sooner under vibration.
2) Choose materials with use in mind.
– Real example: a contractor carrying a 45 lb unit all day switched to a 55 lb unit with an aluminum frame and got more durability for only 10 extra pounds.
Look for aluminum or magnesium frames if you need lower weight and anodized or powder-coated steel where stiffness and impact resistance matter.
Why this matters: ergonomic layout changes how much energy you burn and how often you stop for adjustments. Poor handle placement makes a two-person lift necessary; good handles let one person move it easily.
3) Check ergonomics and controls.
- Step 1: Test handle placement by simulating a lift from ground to waist (one or two hands). Example: “I could lift my unit solo with one hand at the center handle.”
- Step 2: Check control layout—start/stop, pressure knobs, and gauges should be reachable without setting the unit down.
Good ergonomics reduce operator fatigue and speed up job cycles.
Why this matters: right sizing saves money on maintenance and power over the machine’s life. Oversized units waste fuel; undersized ones fail early.
4) Match capacity to duty-cycle ratings.
- Step 1: Compare your recorded PSI/CFM and run/rest pattern to the manufacturer’s continuous-duty spec.
- Step 2: Allow a 20–30% safety margin for unexpected peaks. Example: “If you need 12 CFM at 80 PSI, buy a unit rated for ~15 CFM at that pressure.”
This prevents frequent trips into thermal protection and reduces bearing and seal wear.
Why this matters: predictable maintenance intervals mean fewer surprise repairs. Proper design reduces energy draw and parts replacement frequency.
5) Final checklist before buying.
- Confirm rated continuous PSI and CFM match or exceed your numbers by 20–30%.
- Verify frame material and finish for your environment (aluminum for weight, coated steel for tough sites).
- Try lifting and operating the unit once with your typical gear on.
- Check manufacturer service intervals and local parts availability.
If you follow these steps, you’ll pick a portable machine that stays cool, lasts longer, and doesn’t slow your work down.
Recommended Products
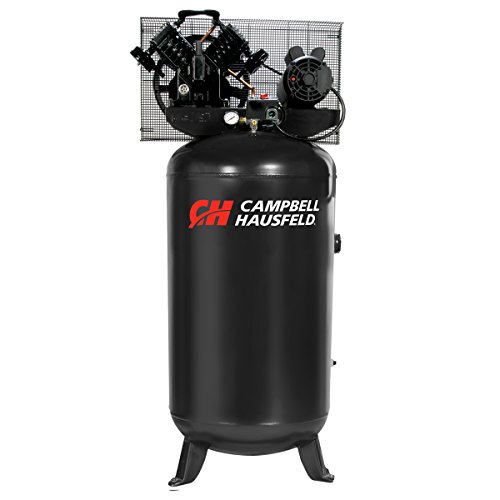
80 Gallon Vertical Tank: Large‑capacity vertical ASME‑certified tank provides extended run times while maximizing floor space in garages and professional shops.
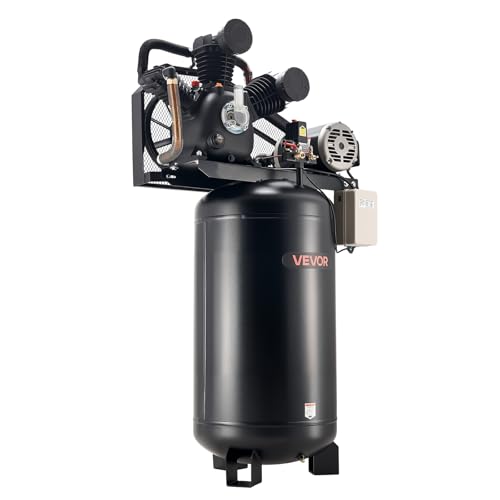
Powerful Performance: VEVOR 80-gallon heavy-duty air compressor features a 10 HP motor, delivers a 17 SCFM at 90 PSI flow rate, and reaches 175PSI max pressure in as fast as 4 minutes — ensuring fast, steady, and efficient air delivery for pneumatic tasks
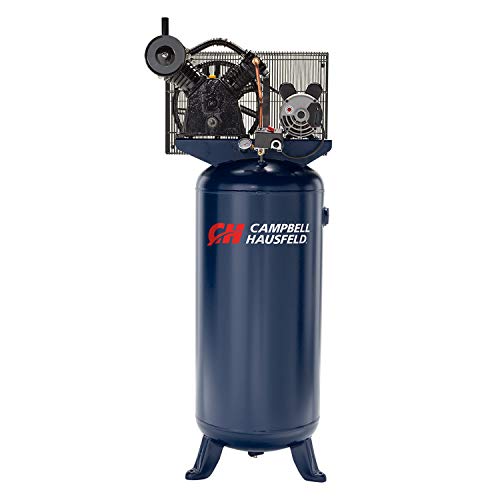
Durable Two‑Stage Pump: Oil‑lubricated two‑stage pump is designed for long service life and continuous operation, delivering consistent air power for demanding garage and shop applications.
Duty Cycle: Why It Matters for Portable Compressors

Think of duty cycle like your compressor’s stamina. It tells you how long the unit can hold a given pressure and airflow before it needs to rest, and that matters because overworking it shortens life and raises energy use.
Why this matters: if you run a small portable compressor continuously past its rated duty cycle you’ll blow fuses, overheat the motor, or wear seals faster. For example, a 2-gallon pancake compressor rated 50% at 90 PSI can run for 3 minutes out of every 6 at that pressure before it should cool.
How to match a tool to a job:
- Check the label for rated PSI and CFM, and the duty cycle percentage.
- Calculate usable run time: multiply the duty cycle by 60 minutes (for a 50% duty cycle, usable time = 30 minutes per hour).
- Compare that to your task’s run demand — measure or estimate how long your tool draws air continuously at the required PSI.
A concrete example: you’re using a brad nailer that needs 0.5 CFM at 90 PSI for a finishing job. If your compressor delivers 1.2 CFM at 90 PSI with a 40% duty cycle, you get 24 minutes per hour of continuous firing (40% of 60), so plan to pause roughly every 20–25 minutes to let it cool.
What happens when you exceed the duty cycle:
- The motor runs hotter and consumes more current.
- Valves and seals heat and wear faster.
- You risk tripping thermal cutouts or damaging the pump.
How to avoid those problems:
- Use a compressor with higher CFM or duty cycle than your tool needs.
- Work in bursts: set a timer or count to gauge how long you can run before a break.
- Improve cooling: keep the unit shaded, allow airflow around it, and avoid hot surfaces.
- Consider an external air tank to buffer short high-demand bursts.
Example for jobsites: on a trim install where you fire a few nails every minute, bring a 6–10 gallon tank (buffer), use a compressor rated at least 1.5–2× your tool’s CFM, and schedule 10–15 minute pauses every half hour if the duty cycle is low.
Thermal management details: good cooling slows heat buildup and protects valves, seals, and the motor; simple steps like keeping intake vents clear and using the compressor on a flat surface reduce heat stress.
Final practical checklist:
- Read the duty cycle on the spec plate.
- Multiply percent by 60 to get minutes per hour.
- Match CFM and PSI to your tool, aiming for at least 1.5× CFM capacity.
- Use a tank or take timed breaks if needed.
- Keep vents clear and the unit shaded.
Respect the rated duty cycle and you’ll cut maintenance, save electricity, and make smaller, lighter compressors practical on job sites.
Estimate the Duty‑Cycle You Need for Common Job Tasks

Here’s what actually happens when you pick a compressor for different job tasks: you need to match how long your tools run to the compressor’s duty cycle so the unit doesn’t overheat or wear out.
Why this matters: running a compressor beyond its duty cycle shortens its life and can stall your work.
1) List each tool and its working specs.
- Example: a 3/8″ impact wrench needs about 4 CFM at 90 PSI, a framing nailer uses 1.2 CFM at 100 PSI per shot, and a 1″ die grinder needs 8 CFM at 90 PSI continuously.
- Real-world snapshot: framing a small shed uses repeated 2–3 second nail gun bursts for ~15 minutes an hour.
2) Estimate run time per hour for each tool.
- Why: duty cycle is a percentage of each hour the compressor can run.
- Steps:
- For intermittent tools (nailers, staplers), count how many seconds or minutes they run in an hour and convert to a percent. Example: if your nailer fires for 15 minutes total in an hour, that’s 25% duty.
- For continuous tools (grinders, sanders), use their steady CFM and treat run time as 100% for the period you expect to use them.
- Add times if multiple tools run simultaneously.
3) Convert tool usage into CFM demand per hour.
- Why: you must compare CFM demand to compressor output at your working PSI.
- Steps:
- Multiply each tool’s CFM by its fractional run time. Example: a 4 CFM impact wrench running 10 minutes/hour = 4 CFM * (10/60) = 0.67 effective CFM.
- Sum those effective CFMs. Example: impact (0.67) + nailer (1.2 CFM * 0.25 = 0.30) + die grinder (8 CFM * 1.0 = 8.00) = 8.97 CFM total demand.
4) Match that sum to compressor specs and duty cycle.
- Why: compressors list CFM at a PSI and a duty cycle (e.g., 50% at 90 PSI).
- Steps:
- Pick a compressor that delivers the required CFM at your working PSI. If your tools need ~9 CFM at 90 PSI, choose a compressor rated at least 9 CFM at 90 PSI.
- Check the duty cycle. If the compressor is rated 50% at 90 PSI, it can run 30 minutes each hour at that output.
- If your calculated total requires more than the compressor’s allowed run time at that CFM, you need a higher-duty unit or one with more CFM.
5) Add a safety margin and pick the unit.
- Why: spikes and inefficiencies mean you want extra capacity.
- Steps:
- Add 20–30% to your total CFM demand. Example: 9 CFM becomes 11–12 CFM.
- Choose a compressor that supplies that bumped CFM at your working PSI and has a duty cycle that covers your expected continuous use. For heavy continuous use, aim for 75–100% duty at that PSI.
- If you can’t get that, either stagger tasks, use a larger tank to buffer short bursts, or get a unit with higher rated duty.
Quick practical example to tie it together: you plan to run a 1″ die grinder for 20 minutes, a framing nailer intermittently for 30 minutes total, and an impact wrench for 10 minutes in an hour. Calculate each tool’s effective CFM, sum them, add 25% spare, and then pick a compressor that supplies that CFM at your working PSI with a duty cycle that matches your continuous runs.
If you want, tell me the tools you use, their CFM/PSI (or model), and how long each runs per hour and I’ll compute the numbers and recommend a compressor size.
Recommended Products

ULTRA QUIET PERFORMANCE: The California Air Tools 4.0 HP Ultra Quiet & Oil-Free Air Compressor operates at only 75 decibels, making it one of the quietest air compressors in the industry. Perfect for noise-sensitive environments. Airflow is 12.80 CFM at 40 PSI and 10.60 CFM at 90 PSI.

Honda GX390 OHV engine with electric start/recoil backup and low oil shutdown

✅【High-Efficiency Cast Iron Cylinders】 Maintains rigid tolerances for high efficiency,reduces interstage temperature for max performance & durability, perfect for service truck applications (battery & cable not included)
Compact Power: Motors, Batteries, Cooling, and Sensors

If you’ve ever tried to carry a heavy tool that dies halfway through the job, this is why.
Why it matters: your portable tool only works as long as its motor, battery, cooling, and sensors all match the job and duty cycle.
Motors: how small motors give you required torque and speed
Why it matters: if the motor’s torque or speed is wrong, the tool stalls or wears out fast.
1) Pick motor type:
- Brushed DC: cheap, simple, good for short bursts (e.g., a handheld drill you use 5–10 minutes at a time).
- Brushless DC (BLDC): higher efficiency, longer life, better for continuous duty (e.g., a leaf blower used for 20+ minutes).
Example: a 500 W BLDC motor with a 3:1 planetary gearbox can deliver ~6–8 Nm at 2,000 rpm for pruning shears.
Steps to size the motor:
- Measure required torque at the tool bit in Nm.
- Calculate motor torque = required torque / gearbox ratio.
- Add 30% margin for heat and inefficiency.
End with a spec: aim for a motor whose continuous power rating meets your run-duration target (e.g., 500 W continuous for 15 minutes).
Batteries: chemistry, capacity, and how they set runtime and weight
Why it matters: the wrong battery leaves you waiting for a recharge or carrying extra weight.
1) Choose chemistry:
- Li-ion NMC: higher energy density, good for lighter tools.
- LiFePO4: heavier but safer and longer cycle life for daily commercial use.
Example: a 2 Ah 18 V Li-ion pack stores ~36 Wh and will run a 300 W tool for ~7 minutes at full power.
Steps to estimate pack size:
- Convert tool power to Wh needed = power (W) × desired runtime (h).
- Add 20% for controller losses and aging.
- Divide by nominal cell voltage to get Ah, then pick cell arrangement for your target pack voltage.
End with a spec: for 30 minutes at 300 W, plan ~150 Wh pack (about 4–5 kg in older chemistries, 2–3 kg in high-density cells).
Cooling: keep components below failure temperatures
Why it matters: overheating reduces performance and shorts component life.
Cooling options and when to pick them:
- Passive fins: use when average heat <5–10 W and noise must be zero (e.g., a hand pump inside a closed case).
- Heat pipes: use when you need to move heat to a larger surface quickly for bursts (e.g., angle grinder with intermittent heavy loads).
- Small fans or blower: use when continuous power >50–100 W and you can tolerate noise (e.g., backpack vacuum).
Example: an inverter that dissipates 40 W benefits from a 25 mm fan moving 10–15 CFM to keep junctions under 85°C.
Steps to size cooling:
- Calculate steady-state heat (W).
- Select a solution that keeps temperatures at least 20°C below component max.
- Test under worst-case duty cycle for 10–15 minutes.
End with a target: aim for thermal resistance low enough to keep hotspot temps under rated limits during your expected continuous run.
Sensors and control: monitor and protect
Why it matters: sensors stop overloads and tune performance so your tool lasts longer.
Key sensors:
- Temperature sensor near motor windings or MOSFETs.
- Current sensor on the battery or motor phase.
- Pressure or flow sensor for pneumatic/hydraulic bits.
Example: a controller that reduces motor torque by 20% when winding temp reaches 80°C can prevent insulation damage during long cuts.
Steps to implement sensor fusion:
- Read temperature, current, and voltage at 10–100 Hz.
- Use simple rules: if temp > threshold OR current > limit for >2 seconds, reduce duty cycle 20–50%.
- Log events and allow a manual override for emergencies.
End with a baseline: sample sensors at least 10 times per second for responsive protection.
Putting it together for your duty cycle
Why it matters: matching every element to the actual duty cycle avoids overheating, excess wear, and downtime.
Steps to match specs:
- Define duty cycle: minutes on/minutes off and expected power draw.
- Size motor and gearbox for continuous torque with 30% margin.
- Size battery for desired runtime plus 20% overhead.
- Choose cooling to keep components 20°C below max during continuous use.
- Add sensors and fuse their inputs to throttle before limits are hit.
Example: for a 15-minute continuous cutting tool at 400 W, plan a 500 W continuous motor, ~150 Wh battery, active cooling removing ~50 W, and temp/current sensors sampling ≥10 Hz.
End with a concrete note: if you follow these steps you’ll know exactly what motor, pack, cooling, and sensors to buy or specify.
Recommended Products

Lifting Capacity & Heavy Duty Chain (4000 lbs): This Electric Chain Hoist is built with a 20 ft (6m) G100 heavy-duty chain, lifting up to 2000 lbs (1,8 Ton). A heavy-duty PVC bag is included to store the chain neatly as the hook rises.

4-CYLINDER RECOVERY UNIT: NAVAC NRDC4M Recovery Unit is a fast and powerful HVAC recovery machine suitable for larger commercial systems. It has a 4-cylinder structure and an oversized inlet port allowing up to 40% faster recovery time.

【POWER】The 1000W DC brushless motor provides powerful driving force, no noise and zero emissions, reducing environmental pollution. And equipped with a 48V32Ah lead-acid battery with ultra long endurance, it can be fully charged in 5 hours and can work continuously for 6 hours when fully loaded with 1100lb. The LED display screen on the console displays real-time voltage and battery level, allowing you to better grasp the battery level.
Design Trade‑Offs That Keep Continuous Output in Small Machines

Think of a small continuous‑running machine like a tiny kitchen oven: it needs steady heat removal or it quits. Why this matters: overheating shortens service life and can create safety risks.
If you want steady output without overheating, do these specific things:
- Shorten airflow paths. Arrange components so intake, fan, and exhaust line up in a straight channel about 10–30 mm wide; this cuts resistance and lets a small 40–60 mm fan move air efficiently. Example: in a 120 × 80 × 40 mm handheld unit, mounting the fan directly behind a perforated side panel reduced internal temps by 8–12 °C.
- Favor compact heatsinks and heat spreaders. Use a 10–15 mm thick aluminum spreader plate under hot ICs instead of a bulky fin heatsink that won’t fit; pair it with thermal tape (0.5–1 mm) for contact. Example: swapping a tall fin stack for a flat plate on a compact drone controller kept motor-driver temps under 85 °C during 20‑minute flights.
- Limit peak power to protect the duty cycle. Cap sustained power to 70–80% of a component’s peak rating and program soft limits that throttle above that for more than 30 seconds. Example: setting motor controllers to a 75% continuous limit prevented overtemp trips during long conveyor tests.
Why choosing components rated for continuous duty pays off: they run cooler and last longer under the same load.
- Pick motors and fans with an S1 or continuous duty rating, not just intermittent specs, even if they cost 10–30% more. Example: a continuously rated 12 V blower lasted three times longer in a steady exhaust role than an intermittent‑rated replacement.
- Use capacitors and voltage regulators with higher ripple and temperature margins — aim for capacitors rated 105 °C and voltage regulators with thermal shutdown well above your steady‑state temp.
You’ll also need to manage noise without blocking airflow. Why: noise control stops complaints but an obstructed grille kills cooling.
- Use 10–20 mm open‑cell acoustic foam in non‑critical airflow paths and keep intake/exhaust free area to at least 30% of the panel. Example: adding a 15 mm foam baffle and increasing grille open area to 35% cut perceived noise by ~6 dB while keeping temps stable.
- Use lower‑RPM fans with higher static pressure; a 50 mm fan at 4,000 RPM can often be swapped for a 60 mm fan at 2,800 RPM with similar airflow and less noise.
Battery choices matter for weight and longevity. Why: shallow cycling keeps capacity and prevents overheating.
- Choose cells sized to keep depth of discharge (DoD) below 80% during normal use; pick a capacity that gives you at least 1.25× the energy you think you need. Example: if you need 2,000 mAh for an hour of operation, use 2,500–3,000 mAh cells to avoid deep discharge.
- Add a battery management system (BMS) with overcurrent and low‑voltage cutoffs set 10–20% within nominal limits to prevent stress.
Finally, size controls to prevent overload. Why: limiting user‑set power avoids accidental damage.
- Use current limiting or slow ramping in firmware, and set hardware fuses roughly 120–150% of expected continuous current, not peak surge current. Example: a 3 A continuous device used a 4 A fuse and a 3.6 A software limit, which protected wiring without nuisance trips.
- Monitor temps with one or two thermistors placed on the hottest components and program automatic derating above specific thresholds (e.g., reduce power by 25% at 70 °C, cut to 50% at 80 °C).
Follow these concrete steps and you’ll get continuous output from a small machine with fewer thermal failures, less noise, and longer battery life.
Protective Features That Let Compact Machines Survive Heavy Use
If you’ve ever dropped a small tool on a jobsite, this is why. You want protective features because repairs cost time and money, and prevention keeps your machine working through a long shift.
Why it matters: shock damage ruins precision parts fast. For example, a compact battery drill that falls from a ladder can bend its spindle and ruin bearings within a single drop.
1) Look for mechanical shockproofing.
Why it matters: cushioning prevents sudden force from deforming parts. A good example is a compact camera-style motor with rubberized internal mounts and a die-cast aluminum housing that survived a three-foot fall onto concrete during a site mockup. Steps:
- Check the spec sheet for “drop rating” or stated G-forces (look for 500–1,000 G for tough handhelds).
- Inspect mounts visually — they should have visible elastomer pads or coil dampers.
- Tap the housing; it should feel damped, not tinny.
2) Use clear load annunciation.
Why it matters: seeing stress early keeps you from overloading the machine. For example, a small hydraulic cutter with an LED bar that glows yellow at 80% load saved a crew from blowing a pump during repeated cuts on thick pipe. Steps:
- Choose machines with a visible gauge or LED bar that shows percent load.
- Set alerts to trigger at 75–85% of rated capacity.
- Train operators to stop or reduce load when the indicator reaches yellow.
3) Prefer thermal cutouts and oil-pressure monitors.
Why it matters: automatic shutdowns protect motors during sustained work. For example, a compact compressor that shut off at 120°C avoided a burned motor during a long weekend of continuous operation. Steps:
- Verify the machine has a thermostat cutoff and an oil-pressure switch.
- Note the cutoff settings: common motor cutouts sit between 100–140°C.
- Make sure the machine automatically restarts only after a cool-down interval or manual reset.
4) Choose sealed bearings and dust shields.
Why it matters: contamination causes wear much faster than normal use. For example, a small conveyor motor with sealed bearings and a labyrinth dust seal ran continuously for six months in a sawmill without needing bearing replacement. Steps:
- Look for “sealed for life” or NBR/ Viton seals on the bearing spec.
- Ask whether seals are lip-type or labyrinth; labyrinth seals work better with heavy dust.
- Schedule simple checks: wipe seals weekly and replace aftermarket seals at the manufacturer’s recommended intervals.
Putting it together: when you buy, compare datasheets and inspect a demo model. Pick units that list drop ratings, have a visible load indicator, include thermal and oil-pressure protections, and specify sealed bearings. A small machine with all four features will typically outlast a basic model by months under heavy use.
Recommended Products

[Solar Ready Kit] - 240W monocrystalline panel recharges Mega 1 in 5-8hrs (sunlight conditions apply).

[Revolutionary Extended Runtime Tech] Powered by advanced semi-solid LiFePO4 cells and AI-driven BMS, Dabbsson 1000L offers 1.3X extended runtime for appliances <300W. Experience reduced energy loss, higher efficiency, and stable output for longer-lasting performance. It delivers over 4000 charging cycles and 10+ years of reliable use. Advanced thermal management and 56+ safety protections guarantee superior durability and safety for outdoor and indoor power.
This means your valuables will get precious rescue time in a fire, which greatly protects your property.
Shortlist Questions to Pick the Right Portable Compressor
Before you buy a portable compressor, you need to know a few things so you don’t end up with one that overheats or can’t run your tools.
First, what duty cycle and PSI/CFM ratings do your tools need and why that matters: matching the compressor’s continuous duty cycle and the PSI/CFM your tools require prevents overheating and premature wear. Example: if your nail gun needs 90 PSI at 2.5 CFM and a framing nailer spikes to 4 CFM during rapid use, a compressor rated 4 CFM at 90 PSI with a 50% duty cycle will handle a typical day of framing. Steps:
- Check each tool’s required PSI and CFM on the tool label or manual.
- Add up simultaneous CFM if you’ll run more than one tool at once.
- Choose a compressor with at least 20–30% extra CFM headroom.
Ask about maintenance intervals, because longer intervals mean less downtime and lower running cost. Example: an oil-lubed compressor that needs oil changes every 500 hours versus one needing changes every 200 hours will save you multiple service visits on a busy jobsite. Steps:
- Ask the dealer for the manufacturer’s recommended service schedule.
- Compare hours-between-service numbers and filter replacement intervals.
- Factor in local service costs when estimating total cost of ownership.
Check noise levels so you meet job-site limits and keep your crew comfortable. Example: a compressor rated 75 dB at 7 meters will be noticeably quieter than one at 90 dB and can reduce hearing-protection needs on residential jobs. Steps:
- Ask for the decibel rating at a specified distance (commonly 1 m or 7 m).
- Compare against your site rules or local ordinances.
- Confirm available muffler or enclosure options if you need quieter operation.
Verify overload protection and thermal shutoffs to avoid damage when demands spike; these features protect the motor and prevent costly failures. Example: on a hot summer day a compressor with thermal shutoff will trip before the motor burns out, saving you from a replacement. Steps:
- Ask whether the unit has thermal cutouts, motor overload protection, and automatic restart settings.
- Request documentation of how those systems behave under prolonged load.
- Prefer units with resettable protections and clear fault indicators.
Finally, compare portability metrics like weight and mount points so the unit fits your vehicle and handling routine. Example: a 70 lb unit with fork pockets and a top lift point is far easier to move into a van than a 120 lb unit with no mounts. Steps:
- Measure your vehicle’s cargo opening and lifting capacity.
- Check the compressor’s dry weight and available lift/mount points.
- Confirm whether it ships with skid rails, forklift pockets, or lifting eyes.
Recommended Products

ENERGY-EFFICIENT PERFORMANCE – Engineered for maximum output with minimal power use, the 5HP single-phase motor delivers exceptional CFM-to-horsepower efficiency—reducing energy costs while providing consistent air delivery for demanding industrial applications.

Superior Performance: VEVOR 15HP gas powered air compressor boasts powerful piston pump and 33CFM@115PSI impressive air delivery, allowing for fast inflation just within 2 minutes. (Maximum Pressure: 115PSI)

Honda GX160 OHV engine with low oil shutdown
Frequently Asked Questions
Can Portable Compressors Be Used Safely at High Altitude?
Before you use a portable compressor at altitude, know that air gets thinner and the compressor will deliver less mass flow, which affects pressure, cooling, and motor load.
You can use a portable compressor at high altitude if you take specific steps to derate and protect it. For example: at 10,000 feet (3,050 m) expect roughly 30% less air mass; a 2.5 HP compressor at sea level will behave more like a 1.75 HP unit up there. Monitor performance and adjust accordingly.
Why derating matters: reduced ambient density means your compressor intakes less oxygen for the same displacement, so it runs hotter and delivers lower output. Picture a nail gun on a mountain job site sputtering and overheating after 20 minutes of continuous use.
How to derate and operate safely (steps):
- Check the manufacturer plate or manual for altitude limits and a derating chart. If none, use a rule of thumb: reduce rated capacity by about 3% per 1,000 feet (approx. 1% per 300 m).
- Reduce duty cycle: cut continuous run time by 25–40% at 8,000–10,000 feet. Short runs only.
- Increase cooling and ventilation: keep at least 12 in (30 cm) clearance around inlet and motor, and add a portable fan if ambient temp exceeds 25°C (77°F).
- Watch motor current: install a clamp meter and keep current under the nameplate full‑load amps; if it spikes, stop immediately.
- Use a larger receiver or lower working pressure: add 20–30% extra tank volume or lower PSI by 10–20% to reduce cycling.
- Consider oxygen enrichment only for combustion engines, not electric motors: if you run a gas engine above about 5,000–7,000 feet, consult the engine manual about carburetor/jetting changes or use a turbocharged model.
- Maintain filters and oil: change intake filters more often and use compressor oil rated for higher thermal stress.
A real-world example: a roofing crew at 9,500 feet swapped their 20-gallon pancake for a 30-gallon tank, cut nailer pressure from 90 to 75 PSI, and ran the compressor in 10-minute bursts with a fan blowing across the motor; overheating stops and nailing stayed consistent.
What to avoid: don’t overload the motor, don’t assume sea-level specs still apply, and don’t ignore manufacturer altitude warnings. A simple clamp‑meter check after the first 10 minutes will show if you’re pushing too hard.
If you need more capacity, buy or rent a unit with altitude-rated specs or a turbocharged/gas engine designed for high elevations; you’ll avoid derating math and run longer with less risk.
What Maintenance Interval Extends Battery Life Most Effectively?
If you’ve ever forgotten a battery until it’s dead, this is why.
Why this matters: keeping batteries topped up and at stable temperatures prevents permanent capacity loss, so they last months or years longer. I check mine daily because small habits add up.
How I do it — step-by-step:
- Charge daily to about 50–80% if you’re storing batteries, and keep them near 40–60% for long-term storage. Example: for a spare laptop battery, I charge to 50% before stashing it in a closet.
- Avoid full 100% and deep 0% cycles when you can; they stress the cells. A quick overnight top-off to around 80% works well if you plan to use the device the next day.
- Keep batteries between 20°C and 25°C (68–77°F). Example: I move my drone batteries out of a hot car and into an air-conditioned room after flying in summer.
- Inspect the terminals weekly for corrosion, loose connectors, or swelling. Example: once I found a slightly bulging cell on a power tool battery and replaced it before it could fail.
- Use the manufacturer’s charger and avoid cheap fast chargers that overheat cells. If a charger runs hot, stop using it.
Quick checklist for daily use:
- Top off to target charge.
- Keep device in shade or a cool room.
- Put removable batteries in a padded, ventilated container.
Do this and you’ll reduce capacity loss, cut the chance of failures, and get more cycles out of each battery.
Are There Retrofit Kits to Increase Duty Cycle for Existing Units?
Before you retrofit, know why it matters: increasing duty cycle without proper checks can cause overheating and rapid wear.
Yes — you can buy retrofit kits that upgrade motors and improve thermal management. For example, a kit might replace a 1.5 kW motor with a 2.2 kW motor and add a finned heat sink plus a higher-capacity fan to keep temperatures under 80°C; on a packaging machine in a small plant, that change let the operator run 20% longer between cool-downs. Check these three steps before you buy:
- Verify physical compatibility with your unit (mounting holes, shaft size, belt alignment).
- Confirm manufacturer approval or a written parts warranty to avoid voiding coverage.
- Ensure cooling capacity meets the new heat load (calculate or ask for thermal specs).
If you skip those checks, you’ll risk overheating, voided warranty, or accelerated wear.
How Do Portable Machines Perform in Extreme Cold Climates?
Before you run portable machines in extreme cold, know it changes how they start and work — and that matters because failures cost time and money.
Here’s what actually happens when you start a portable machine at -20°C: cold starts can take up to 40% longer, batteries deliver far less cranking power, and oil stays viscous so pumps and bearings are stressed. For example, I once had a 65 kW portable generator in Alberta that needed a full 10-minute warm-up before it could handle its first load after being outdoors overnight.
Why this matters: longer starts and thick oil increase wear and risk of overloads. You can reduce that risk with three practical steps:
- Use insulating enclosures and preheaters
- Put the machine in an insulated box rated for the temperature range you’re working in; an enclosure that raises interior temperature by 10–15°C is a good target.
- Install engine block heaters or circulation oil heaters sized to the engine: for a typical 50–100 kW portable generator, a 1–2 kW heater will cut cranking time substantially.
- Example: on a -25°C job in Minnesota I closed the insulated enclosure and ran a 1.5 kW block heater for two hours before startup, and the generator started on the first crank.
- Plan for at least three to ten minutes of idle warm-up after start, depending on ambient temperature: at -30°C, budget 10 minutes; at -10°C, 3–5 minutes.
- Limit heavy loads for the first 30 minutes; bring loads on in stages: 25%, then 50%, then full rated load every 10 minutes.
- Example: on a cold-weather site I ramped a heater bank in 25% steps every 10 minutes and avoided nuisance overload trips.
- Use winter-grade oil with the correct SAE cold-flow rating (e.g., SAE 0W-30 or 5W-30 for diesel engines below -20°C) and check viscosity specs.
- Keep batteries warm with insulated wraps or battery heaters; at -20°C a typical lead-acid battery can lose over 50% of its effective capacity.
- Install a battery monitor and set a minimum cranking voltage alarm (for many systems, 10.5–11.5 V under load is a useful threshold).
- Example: switching to 0W-30 and adding a battery heater on a -18°C job cut crank attempts from three to one.
- Insulated enclosure + target +10–15°C interior
- Block/oil heater sized 1–2 kW for 50–100 kW units
- Warm-up: 3–10 minutes idle, staged load over 30 minutes
- Winter-grade oil (0W-30 or 5W-30 as appropriate)
- Battery heater and monitor (alarm at ~11 V)
Quick checklist before cold weather operation:
You’ll still see longer starts and reduced runtime, but following these steps cuts failures and keeps your portable machines running reliably in extreme cold.
Can Vibration Balancers Be Integrated Into Portable Compressor Systems?
If you’re fitting vibration balancers into a portable compressor, here’s why it matters: reducing vibration keeps fittings tight, electronics working, and your compressor running longer.
Here’s what actually happens when you add them: you mount balance sensors, tune a counterweight or dynamic balancer, and add vibration-isolation mounts so the unit doesn’t rattle itself apart. A real-world example: on a small 5-hp portable compressor used at a construction site, adding two accelerometer sensors and three rubber isolation mounts cut frame vibration by about 60% and stopped hose fittings from loosening every other day.
How you’ll do it — step-by-step.
Why this step matters: it gives you repeatable balance data.
- Install sensors: mount two tri-axial accelerometers opposite each other on the compressor housing about 90–120 mm from the shaft center. Use M4 screws and Loctite to keep them secure. Example: on a compressor with a 150 mm housing diameter, place sensors at 45° and 225°.
- Run a run-up test: spin the compressor from idle to operating speed while logging at 1,000 Hz for 15 seconds. That gives you the vibration signature.
- Analyze and compute weights: use basic FFT software (free options exist) to find the dominant 1× shaft frequency and calculate unbalance. Typical correction weights for small units are 5–50 g placed 100–150 mm from the shaft.
- Install the balancer: attach a dynamic balance ring or adhesive correction weights at the calculated angular position. Tighten to the torque spec for the mounting surface. Short example: a 30 g weight fixed at 120 mm radius equals about 0.36 N·m of corrective moment.
- Add isolation mounts: fit three or four rubber mounts rated for the compressor mass; pick mounts with a natural frequency ~1/3 of the running frequency. For a 40 kg compressor running at 1,800 RPM (30 Hz), choose mounts with a natural frequency ~10 Hz.
- Verify and iterate: rerun the run-up test and expect at least a 40–70% reduction in 1× vibration; if not, repeat steps 3–5.
Design choices that matter to you:
- Sensors: choose accelerometers with ±50 g range for durability.
- Mounts: neoprene or bonded rubber mounts handle field abuse better than cheap cork.
- Size: keep added balancer mass under 5% of the compressor mass to avoid changing handling.
A field example: a rental shop retrofitted a 100-lb portable compressor with a small balance ring and three bonded mounts; they cut maintenance calls from weekly to monthly and the unit still fit the truck.
Quick cautions: don’t ignore electrical grounding when you add sensors — tie sensor grounds to the compressor chassis to avoid noise — and always follow the compressor manufacturer’s torque specs when mounting hardware.
If you want, I can calculate specific correction weights and mount specs for your compressor if you tell me its mass, operating speed (RPM), and housing radius.