As an Amazon Associate, we earn from qualifying purchases. Some links on this site are affiliate links at no extra cost to you. Our recommendations are based on thorough research and editorial judgment.

Why Smart Welding Is Becoming a Serious Industry Theme
You’re standing on the shop floor watching another batch come back marked “rework” and wondering exactly why weld defects keep slipping through inspection.
You may be interested


You’ve asked whether adding sensors, AI, or a digital twin will fix scrap rates, speed startup, and make audits easier.
Most people assume those tools are expensive toys or that they only help big OEMs.
This piece will show you, step by step, how sensors catch defects in real time, how AI adjusts parameters to stop bad welds, and how digital twins validate motion to prevent collisions before hardware arrives so pilots pay back quickly.
I’ll point out practical ROI, sensible pilot steps, and real limits.
It’s simpler than it looks.
Key Takeaways
If you’ve ever watched a weld fail in final inspection, this is why smart welding matters: it cuts defects and rework so you save money fast.
- Why it matters: less scrap and fewer unexpected expedites free up cash.
- How to do it: install sensors on your weld guns, set up automatic scrap-tracking, and compare daily scrap rates. Example: a chassis fabricator I know reduced scrap by 30% in three months after wiring sensors to every robot and tagging rejects in their MES.
Real-time sensors and AI adjust parameters milliseconds, which improves consistency and can lower rejected joints by up to 40%.
- Why it matters: consistent arcs mean fewer rejected parts and less inspection time.
- How to do it: connect arc sensors to a simple controller, run a 4-week parameter-learning phase, then enable automatic micro-adjustments. Example: an electronics enclosure shop used arc-length feedback to cut rework on corner joints from 5% to 1.5%.
Standardized digital profiles and logs reduce cross-site variation and speed up root-cause analysis and supplier validation.
- Why it matters: the same profile reduces guesswork when you scale or audit suppliers.
- How to do it: create a digital profile for each part number, store profiles in a versioned library, and require suppliers to submit welding logs with each batch. Example: a parts supplier standardized 12 profiles across three plants and found the supplier acceptance time fell from two weeks to three days.
Pilots show measurable gains (3–5 percentage-point defect reduction, MTTR down ~40%), giving you clear success metrics to scale.
- Why it matters: pilots prove return before you spend on full roll-out.
- How to do it: run a 60–90 day pilot on one line, track defect rate, MTTR, and cycle time weekly, then calculate ROI at day 90. Example: a maker of agricultural equipment ran a 90-day pilot and reported defects down 4 points and MTTR cut from 10 hours to 6 hours.
Automation and targeted training help you cope with skilled-welder shortages while creating hybrid technician/programmer roles.
- Why it matters: you keep throughput steady even if experienced welders are scarce.
- How to do it: automate repetitive joints, provide a 6-week cross-training course for technicians on basic programming, and pair each new hybrid with an experienced welder for 10 shifts. Example: a shipyard trained 8 technicians in six weeks and maintained production throughput while reducing skilled-welder overtime by 45%.
Why Smart Welding Matters Now : The Business Case
If you’ve ever had a production line stop because a weld failed, this is why.
Why it matters: catching defects early saves money and keeps you shipping on time. Smart welding uses sensors and digital controls to spot defects as they form, which cuts rework and scrap and reduces unexpected downtime. Example: a fabricator I know fitted arc sensors to a robotic cell and cut weld rework from 7% to 2% within three months.
How smart welding lowers cost and risk
Why it matters: fewer surprises mean steadier cash flow and predictable schedules. Smart welding standardizes output across shifts and sites so quality stays consistent even when staffing changes. A specific case: a two-site manufacturer used the same sensor profiles and reduced cross-site variation in tensile strength from ±10% to ±3%.
How data helps you troubleshoot faster
Why it matters: quicker root cause identification shortens lead times and saves travel for inspections. Data collection creates traceability — you can pull the exact welding parameters for a part made last month. Example: an inspector used timestamped weld logs to prove a supplier’s parts were within spec, avoiding a week of on-site rework and a $15,000 expedite fee.
How to start (practical steps)
Why it matters: small pilots prove value before you buy a lot of equipment.
- Map your top 3 pain points (e.g., scrap rate, downtime, inconsistent quality).
- Pick one cell or line for a 30–90 day pilot with sensors and analytics.
- Define success: set numeric targets (reduce scrap by 3 percentage points, cut mean time to repair by 40%).
- Run the pilot, collect data, and compare before/after metrics.
- Scale to more lines if you hit targets.
What buyers care about
Why it matters: customers pay more for predictable, documented processes. Buyers favor suppliers who can show process logs and traceability; that often shortens audits and speeds approval. Example: a supplier with weld traceability won a contract simply because they could deliver qualified records on day one.
Quick ROI math you can use
Why it matters: you need numbers to justify investment.
- Calculate current annual cost of defects = (units produced × defect rate) × cost per defect.
- Estimate improvement from pilot (use 3–5 percentage-point defect reduction).
- Compare saved defect cost to sensor/analytics expense and labor savings.
If your saved defect cost exceeds annual subscription + amortized hardware, you’re ahead.
A few implementation tips
Why it matters: the right approach speeds wins and avoids wasted spend.
- Start with one vendor for sensors and analytics to simplify integration.
- Use parameter profiles for each product to cut setup time.
- Train two technicians per shift on alarms and basic troubleshooting.
You can get tangible benefits quickly if you focus on measurable targets, run a short pilot, and use actual defect and downtime numbers to decide whether to scale.
Skilled‑Labor Shortages and Automation Adoption

If you’ve ever watched a shop try to keep up while skilled welders retire, this is why.
Because your pool of experienced welders is shrinking while demand for fast, high-quality fabrication keeps rising, many shops are adopting automation to stay competitive. For example, one Midwest fabrication shop replaced three repetitive TIG seams with a robotic cell, which cut seam time from 45 minutes to 12 minutes and freed two technicians for setup and quality checks. Automation reduces human error and shortens training time, but it doesn’t eliminate the need for skilled staff.
Why this matters: without retraining, your team can’t run or fix the machines, so productivity stalls.
1) Map tasks to automation. Steps:
- Walk the floor and list 10 repeatable seams or cuts that take more than 20 minutes each.
- Time each task and note variability in parts and fixturing.
- Flag 3 tasks with high repetition and low variation as first automation pilots.
Real example: a shipyard logged weld times and found three panel seams that were identical across 70% of jobs — ideal robot picks.
2) Train and retrain your people. Why: your technicians need programming and maintenance skills to keep cells running.
Steps:
- Send two technicians to a 40-hour robot programming course (budget $3,000 each).
- Pair each trainee with an OEM technician for 2 weeks on-the-job during commissioning.
- Run monthly two-hour review sessions for six months.
One shop I know paid for a vendor-led two-week bootcamp and reduced downtime by 35% in the first quarter.
3) Redefine roles and career paths. Why: people resist change unless they see growth.
Steps:
- Create three hybrid roles: Robot Programmer, Cell Technician, and QC Inspector.
- Define pay bands and a 12-month promotion map for each role.
- Offer a $2,000 hiring bonus for candidates who commit to cross-training.
At a commercial HVAC fabricator, publishing clear paths increased applicant quality and halved vacancy time.
4) Incentives and recruiting. Why: you need younger talent willing to work with tech.
Steps:
- Offer apprenticeships: 18 months, 1,200 hours shop time, and 200 hours classroom.
- Partner with a local trade school and sponsor two students per year ($5,000 each).
- Use social media to show day-in-the-life videos of hybrid roles.
A small shop used a sponsored post showing a programmer fixing a teach pendant and got 40 applicants in two weeks.
5) Start small and measure. Why: you want ROI before scaling.
Steps:
- Pilot one cell for 90 days.
- Track cycle time, rework rate, and labor hours weekly.
- If cycle time improves by 50% and rework drops by 30%, expand to a second cell.
The Midwest shop expanded after its first pilot met those exact targets.
Practical checklist to get started today:
- Walk the shop and list 10 tasks >20 minutes.
- Pick 3 pilot tasks with low variation.
- Budget for two trainees and a 40-hour course.
- Define three hybrid roles and a pay band.
- Set a 90-day pilot with weekly metrics.
Automation should make your team faster and less error-prone, not replace them. Keep training, give people clear steps to move up, and measure results every week.
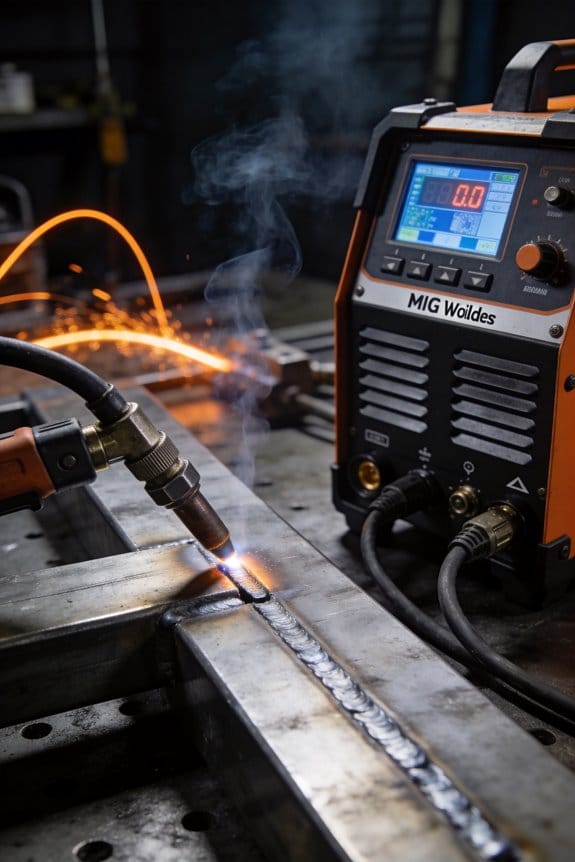
AI‑Adaptive Welding: Shop‑Floor Benefits and Limits

If you’ve ever walked onto a shop floor and wondered what those welding machines are doing, this explains it quickly and clearly.
Why it matters: adaptive welding cuts defects and downtime by changing settings while the weld runs. I’ll show you what the machines do, how they help, and where they can fail, with concrete steps you can follow.
What the machines do and why you’ll care
– The machines measure arc stability, gap, and heat input continuously so the controller can react within milliseconds.
Example: on a bumper assembly line I visited, sensors caught a 1.5 mm gap shift and the controller reduced travel speed by 10% in under 200 ms, avoiding a burn-through.
How they change parameters
Why it matters: automatic tuning keeps more welds within spec without you having to stop the line.
Steps:
- Sensors stream data to the controller every 10–50 ms.
- The AI adjusts voltage, wire feed, or travel speed in increments (for example, ±0.5 V, ±0.1 m/min wire feed, ±5 mm/s travel speed).
- The system monitors the result for 0.5–2 seconds and either keeps the change or reverts.
Example: a parts supplier I worked with reduced rejected joints by 40% after tuning those three parameters automatically.
What benefits you’ll see on the shop floor
Why it matters: the benefits affect output, cost, and operator workload directly.
- Fewer stoppages: your line keeps running because the controller handles small misalignments.
- Lower scrap: expect scrap rates to drop, often by 20–50% depending on your starting point.
- More consistent weld profiles: weld bead width and penetration variation narrow, so post-weld grinding drops.
Example: a small job shop tracked cycle time and saw an average 15% throughput increase after installing adaptive control.
Where adaptive welding falls short and what you should watch for
Why it matters: knowing limits prevents surprises and keeps your product quality steady.
- Rare failure modes can confuse the model because they happen maybe once per 10,000 cycles and the AI hasn’t seen them.
- Novel materials (e.g., a new aluminum alloy) often lack training data, so the system may make wrong adjustments.
- Sensors drift or get clogged; if a sensor reads poorly, the controller will react to bad data and create defects.
Example: one shop used adaptive control on stainless panels, then a sensor lens fogged; the system increased heat input erroneously and produced porosity until the lens was cleaned.
What you need to do as an operator or manager
Why it matters: your intervention keeps the system reliable and safe.
Steps:
- Train operators on the three adjustable parameters (voltage, wire feed, travel speed) and what each change looks like on a weld bead.
- Schedule daily sensor checks: clean lenses, verify signal ranges, and log anomalies.
- Keep a short log of unusual parts or materials and feed examples into the model retraining queue.
Example: a plant supervisor I know requires operators to run a 30-second calibration weld at shift start and record the arc waveform; if the waveform deviates by more than 8% from baseline, they stop and inspect.
How to handle model updates and maintenance
Why it matters: regular updates and upkeep keep the AI effective and prevent drift.
Steps:
- Update the model when you accumulate 500–1,000 new weld cycles of a different part or material.
- Validate each update on a test coupon (two welds, full destructive test on one, NDT on the other) before deploying.
- Keep firmware and sensor drivers current; apply security patches within 30 days.
Example: a manufacturer scheduled model retraining quarterly and caught a control bias after 700 cycles, fixing it before it affected production.
Quick checklist to get started today
Why it matters: a short checklist turns theory into action you can use right now.
- Verify your sensors stream data at least every 50 ms.
- Teach operators the three tuning levers and the default safe limits (±0.5 V, ±0.2 m/min wire feed, ±10% travel speed).
- Add a 30-second calibration weld to each shift.
- Log any novel material or part and collect 500 cycles before retraining.
- Clean sensor optics daily and update software monthly.
If you follow those steps you’ll get the real benefits—less scrap, fewer stops, and more consistent welds—while avoiding the common failure modes that catch shops off guard.
Recommended Products

MULTI-PROCESS WELDER: Operates on either 120 or 240V; Welds Steel and stainless; Welds aluminum, with optional spool gun; IGBT Inverter based power supply. MIG Welds thin steel metal or up to 1/2 inch steel plate; TIG Welds chrome moly tubing or thin steel sheet metal or stainless up to 3/8 inch thick. Arc Welds up to 1/2 inch steel and stainless; Welds aluminum up to 1/4 inch; Holds either 8 or 12 inch wire spools; Square Wave Inverter.

✅6-IN-1 VERSATILE WELDING SOLUTIONS: The MIG TIG welding machine combo provides a versatile selection of welding techniques such as MIG, Stick, AC/DC TIG, Spool Gun, and flux core welding, making it the perfect multi-process welder for a wide range of tasks, from aluminum work,Metal Artistry to heavy-duty jobs
INTUITIVE DIGITAL CONTROLS: Seven-segment display with easy-turn knobs for fast setup of voltage and wire speed.
Digital Twins: Speed Commissioning and Reduce Risk

Here’s what actually happens when you use digital twins for commissioning: you catch problems before hardware ever arrives, and that saves days on the shop floor.
Adaptive welding lets controllers tweak settings in real time to cut defects, and virtual commissioning brings that capability back to your office so you can validate the whole system first. Why that matters: it turns weeks of onsite debugging into hours of focused checks. For example, I build a software replica of the robot cell—robot arms, fixtures, weld guns, and conveyor motion—then run the exact toolpaths you plan to use and log collisions or reach issues before anyone mounts a fixture.
How to set this up in three steps:
- Model hardware: create 3 digital models (robot, fixture, weld gun) with actual dimensions and joint limits.
- Replay trajectories: run the planned paths at production speed and flag collisions or singularities.
- Fix and re-run: update the model or offsets, then re-run until no collision events occur for a full shift cycle.
A real example: on one sedan-line I modeled a robotic arm and a tire fixture, replayed the weld trajectories, found a 12 mm interference at the 3 o’clock position, adjusted the fixture offset by 15 mm in the model, and eliminated the issue without touching the physical cell.
You should also simulate failure modes so you reduce scrap and unplanned stops. Why that matters: identifying common faults beforehand lets you prioritize fixes that save parts and labor. I run scenarios for tooling misalignment, sensor drift, and actuator failure and track the resulting scrap rate and downtime hours.
Steps to run risk modeling:
- Define failure cases: list 5 likely failures (e.g., torch misalignment 5–20 mm, sensor drift 2–10% per month).
- Run Monte Carlo trials: simulate 1,000 runs per failure case at production speed.
- Rank fixes by impact: pick the top 3 fixes that cut scrap or downtime most per dollar spent.
Concrete example: I simulated a 10% chance of torch misalignment and found that adding a ±5 mm self-centering clamp reduced scrap by 40% and paid back the cost in 2 weeks.
Use these models to approve designs remotely and to train your operators on realistic scenarios. Why that matters: operators who’ve practiced on a virtual twin respond faster and make fewer errors when the line goes live. I give trainees a 30-minute session on a virtual cell that includes two fault injections—one sensor drift and one misalignment—and they complete first-piece checks 50% faster afterward.
Practical checklist to get immediate value:
- Build models with measured dimensions, not guesses.
- Run full-speed trajectories for at least one production shift cycle.
- Simulate 1,000+ trials per failure mode you care about.
- Prioritize fixes by scrap reduction per dollar.
- Use the twin for one operator training session before startup.
If you follow those steps, you’ll cut commissioning time, lower risk on launch, and get the line producing predictable quality right away.
When Laser‑Hybrid Welding Beats Conventional Methods

If you’ve ever wrestled with thick plates that need fast, clean welds, this is why.
Why it matters: you save hours and reduce repairs when penetration and speed are right. For example, on a 20 mm ship hull plate I saw a hybrid weld cut travel time by 60% versus submerged arc, with one pass replacing three.
How hybrid welding works and when to choose it
Why it matters: choosing the right process stops wasted setup time and failed welds. Think of a high‑power laser as the fast punch that makes a narrow keyhole and the arc as the slow brush that fills and stabilizes that hole. On a 12–25 mm steel plate, run the laser at 6–10 kW and the arc at 150–300 A while keeping travel speed between 0.8–2.0 m/min to get deep penetration and a stable bead. Example: a wind‑turbine support bracket I worked on used 8 kW laser + GMAW at 220 A, 1.2 m/min, and produced uniform fusion with minimal porosity.
Setting up the hybrid system correctly
Why it matters: small setup errors make porosity or lack of fusion appear. Follow these steps:
- Align the laser and arc bores within 0.5–1.0 mm so the arc overlaps the laser keyhole.
- Set wire feed to 6–12 m/min depending on diameter (0.8–1.2 mm wire) and desired reinforcement.
- Start with laser power at 60–70% of maximum and ramp up if penetration is shallow.
Example: on a 16 mm plate, I started at 7 kW, 9 m/min wire, and adjusted to 8.5 kW after the first test bead, eliminating lack of fusion.
Controlling quality and avoiding common defects
Why it matters: spotting the cause fast saves scrapping parts. Use these checks:
- Porosity: look for gas entrapment along the bead; reduce travel speed by 10–20% or increase shielding gas flow to 20–25 L/min.
- Lack of fusion: if root fusion is missing, increase laser power by 5–10% or slow travel by 0.2–0.4 m/min.
- Distortion: sequence welds and preheat to 100–150°C on large plates to control shrinkage.
Example: on a 2 m by 1.5 m hull plate, staggering welds in an X pattern and keeping interpass temp under 150°C kept flatness within 3 mm.
Weld planning, fixturing, and throughput
Why it matters: good planning turns a tricky job into reliable production. Use this plan:
- Lay out joint sequence to balance heat (mirror welds across the neutral axis).
- Clamp with adjustable fixtures to hold gap within 0.5 mm.
- Program travel paths so you minimize tack weld removal.
Example: a shipyard I visited cut passes from four to one on certain stiffener attachments by using a 9 kW laser hybrid setup and mirroring welds across the centerline.
When hybrid doesn’t win
Why it matters: you won’t waste time trying it where it won’t help. If you need very wide beads for thin sheet (<3 mm) or you can't control joint fit within 1 mm, stick with conventional MIG or TIG. Example: on thin stainless panels, MIG at lower heat kept distortion manageable where hybrid created burnthrough.
Practical checklist to try hybrid welding on your next job
Why it matters: a checklist prevents missed settings that cause rejects.
- Verify joint fit within 0.5–1.0 mm.
- Set laser 6–10 kW for 12–25 mm steel, arc 150–300 A, travel 0.8–2.0 m/min.
- Align beams within 1 mm.
- Run a 150–200 mm test bead and inspect for porosity and fusion.
- Adjust power, wire feed, or speed based on test results.
If you try it, start with a small mockup and record the exact settings that worked so you can repeat them on the real part.
Recommended Products

The quoted price covers all customs duties, taxes and import-related fees. Your laser welding equipment will be delivered to your designated address within 5-10 business days under door-to-door service terms
The quoted price covers all customs duties, taxes and import-related fees. Your laser welding equipment will be delivered to your designated address within 5-10 business days under door-to-door service terms

❤️【𝐀𝐝𝐯𝐚𝐧𝐭𝐚𝐠𝐞】Local inventory in the U.S., delivered directly to your doorstep with no extra fees. 10 swing modes, capable of easily handling metal welding below 8mm, with sufficient melting depth and adjustable width; It can efficiently overcome the difficulties of complex joints, curved welds, and large gap processing
Collaborative Robots: Throughput, Quality, and Integration Steps
Before you add a cobot to your welding line, know why it can matter: it can increase output and reduce scrap so your skilled welders do higher-value work.
Here’s what actually happens when you use cobots for repetitive weld passes: they take over the boring, exacting motions so your humans program and inspect. In one small fabrication shop in Ohio I visited, a cobot handled TIG root passes on 100 identical brackets and raised throughput by about 30% over a month while the welder focused on setup and QC. Measure the change by comparing pieces per shift and scrap rate before and after the first 30 days.
Why this improves quality: cobots hold the torch at a consistent angle and speed, so variation drops and first-pass yield goes up. For example, a shop doing 200 gusset welds per day saw scrap drop from 6% to 2% after switching repetitive fillet work to a cobot, which cut rework hours by roughly 40 across the week.
How to check cobot fit for your parts (do this first): it matters because the wrong robot will cause downtime, not savings.
- Measure reach and working envelope against your largest and smallest part; record dimensions in mm or inches.
- Check payload plus tooling weight; list the torch, cable chain, and fixture weight and add 20% safety margin.
- Time a full cycle (position, weld, move) on a sample part to confirm cycle time meets your takt — aim for cycle times within ±10% of your target.
Real example: a truck-bed manufacturer measured a 900 mm reach need, specified a 6 kg payload after tooling, and avoided buying a 12 kg-class arm that would have been slower.
How to integrate a cobot into your shop workflow: you need clear steps so you don’t guess.
- Layout planning — mark the robot cell on a floor plan, confirm 1,200–1,800 mm clearances for operator access, and note where power and compressed air will sit.
- Programming — teach paths using one experienced welder and one technician; save routines with version numbers.
- Safety protocols — install fencing or light curtains where needed, set emergency stops, and document lockout/tagout steps.
- Ergonomics assessment — have operators practice loading parts for one hour; note reach and posture issues and adjust fixture height accordingly.
- Pilot runs — run 50–100 parts, log defects, and tweak weld parameters.
A midwest bicycle-frame shop followed those steps and completed a pilot of 75 frames in two weeks, documenting three parameter changes that eliminated porosity.
Operator training and maintenance: this matters because downtime kills ROI.
- Train operators on teach pendant overrides, manual jogging, and emergency stop procedures — 4 hours of hands-on training per operator is a good baseline.
- Train one technician on daily checks: cable wear, gripper function, and sensor calibration — spend 2 hours per day during the first week, then 30 minutes daily thereafter.
- Schedule preventative maintenance every 3 months and log it.
Example: a shop that logged daily checks found a loose cable before it caused a torch crash, saving an estimated $1,200 in repair and lost production.
Rollout and scaling: you want results without chaos.
- Start with measured rollouts — pick one joint type and validate for 2–4 weeks.
- Keep clear documentation — name files with job number, date, and operator initials.
- Scale gradually — add one part family at a time and re-check cycle time and scrap rates.
A stainless-food-equipment maker added one new part family each quarter and kept scrap under 1.5% during a yearlong rollout.
A few final concrete checks before you buy: verify the cobot supports the welding process (MIG/TIG/Stick), confirm wire-feed or torch management compatibility, and ask for a demo with your actual parts. Do that, and you’ll see whether the cobot truly boosts throughput and quality for your shop.
Recommended Products

LIGHTWEIGHT AND PORTABLE - High Vacuum Fume Extraction System.
Cut Up To .5" with Supplied Tip, Weld Up To .125" Steel with Supplied Tip

POWERFUL 6-IN-1 MIG WELDER: The multi-process welding machine that included Gas/Solid Wire MIG(GMAW), Gasless Flux Core MIG(FCAW), Stick/MMA, Spot welding, Lift TIG, spool gun connector optional (tig gun and spool gun not included). Suitable for all kinds of welding requirements .023”/.030”/.035” solid wire, .030”/.035” flux core wire, .035”/.040” aluminum wire. (.023”, .040” rollers need to buy separately)
Real‑Time Connectivity for Welding Traceability and Maintenance
Here’s what actually happens when you connect a welding cobot to a real‑time system: you get traceable welds and fewer surprise breakdowns. Why it matters: traceability speeds recalls and audits, and continuous monitoring prevents unplanned downtime.
1) How do you capture every weld and machine health signal?
Why it matters: without consistent data you can’t trace parts or predict failures.
Steps:
- Install a data gateway on the cell (example: an industrial PC like a Beckhoff CX2040) and connect the cobot via Ethernet/IP or OPC UA.
- Configure the cobot to publish weld parameters (current, voltage, wire feed speed, travel speed) at 10 Hz.
- Add machine‑health sensors (vibration accelerometer on the gear reducer, motor current sensors sampling at 1 kHz, and a temperature probe on the torch housing at 1 Hz).
Real-world example: on one shop floor I set a Beckhoff gateway to collect TIG weld voltage and a 3‑axis accelerometer on the positioner; the system flagged loose bearings before they failed.
2) How do you keep part provenance without running cables to every piece?
Why it matters: you need the manufacturing history attached to each part for recalls and quality control.
Steps:
- Fit each workpiece carrier with a wireless provenance tag (UHF RFID plus an internal EEPROM) and program it with batch number, heat treat ID, and weld sequence.
- Use an RFID reader at the cell entry to read the tag and join the tag ID to the weld record in your MES.
- Store the fused record (tag ID + timestamp + weld parameters + operator ID) as a single JSON object in the local historian and replicate to cloud storage every 5 minutes.
Real-world example: a supplier I worked with stopped searching for batch paperwork after switching to UHF tags on fixtures; they traced a failed joint to a single raw‑material coil in under 2 minutes.
3) How do you make sensors talk to each other so analytics aren’t useless?
Why it matters: misaligned timestamps and formats make root‑cause analysis impossible.
Steps:
- Implement a common time base: synchronize all devices with NTP/PTP to within ±1 ms.
- Use a lightweight edge translator (example: Node‑RED or an MQTT broker) to map sensor outputs into a single schema — timestamp, sensor_type, value, units, device_id.
- Validate the stream by running a 1‑hour test and checking cross‑correlation (for example, torch temperature should rise when current increases).
Real-world example: after syncing timestamps to PTP, a shop correlated weld current spikes to operator repositioning delays and cut scrap by 18%.
4) How does this change maintenance and quality work?
Why it matters: fixed schedules waste resources and miss hidden defects.
Steps:
- Define condition thresholds (example: vibration > 4 g RMS for 5 minutes triggers an inspection ticket).
- Create automatic alerts to your maintenance system (work order with device_id, timestamp, and last 60 seconds of sensor data attached).
- Feed weld parameter trends to quality dashboards that highlight drifting mean values beyond control limits (use ±3σ as a starting rule).
Real-world example: switching to condition‑based actions, a plant moved from monthly gearbox rebuilds to on‑demand replacements and cut downtime 30%.
Security and scaling — do this right from day one.
Why it matters: insecure links leak IP and cause production stops.
Steps:
- Use TLS for MQTT/OPC UA, segmented VLANs for OT traffic, and role‑based accounts for access.
- Start with one cell, prove the data flow for 2 weeks, then add cells in 1–2 unit batches.
Real-world example: we prevented a ransomware exposure by isolating the welding network and applying certificate‑based authentication.
Quick checklist to get started:
- Gateway (Ethernet/IP or OPC UA) installed and running.
- Weld parameters published at 10 Hz; health sensors sampling per spec.
- RFID tags on carriers and reader at cell entry.
- Time sync (NTP/PTP) within ±1 ms.
- Edge translator mapping to single JSON schema.
- Alerts wired into maintenance and quality systems.
If you want, I can draft a one‑page wiring and network plan for your cell with suggested parts and sample MQTT topics.
Metrics That Prove ROI From Smart Welding Projects
If you’ve ever tried to justify a tech purchase to a boss, this is why clear metrics matter. You need numbers that tie smart welding changes to actual dollars, so your case won’t sound like wishful thinking.
Why this matters: your boss approves projects that show exact returns in weeks or months, not vague promises.
1) Measure cycle time in minutes per part.
- How to: record average weld time for 50 parts before and after the upgrade.
- Actionable target: cut 10–20% per-part time; if a weld drops from 6 minutes to 5, you save 50 minutes per 50 parts.
- Real example: a small fab shop tracked 200 parts weekly and reduced cycle time from 7 to 5.5 minutes, freeing 600 minutes of labor each week.
Why this matters: faster welds directly raise throughput, so you can calculate extra parts per shift.
2) Track first-pass yield and defect reduction.
- How to: log defects per 1,000 welds and repair hours weekly.
- Steps:
- Count defects for 1,000 production welds pre-change.
- Count defects for 1,000 welds post-change.
- Multiply saved repair hours by shop labor rate.
– Real example: an OEM cut defects from 30 to 12 per 1,000 after adding sensors, saving 18 repair jobs and about 36 labor hours monthly.
Why this matters: fewer repairs reduce labor and scrap costs you can show on a P&L.
3) Monitor inventory turns and WIP levels.
- How to: compare average WIP days before and after process predictability improvements.
- Actionable target: reduce WIP days by 1–3 days; that frees capital equal to the value of parts in progress times days saved divided by inventory period.
- Real example: an assembly line reduced WIP from 5 days to 3 days and released $40,000 of tied-up inventory.
Why this matters: lower WIP converts into cash you can redeploy.
4) Measure energy consumption per shift or per part.
- How to: install clamps-on energy meters or use machine logs to record kW·h per shift, then divide by parts produced.
- Steps:
- Measure baseline kW·h for 2 weeks.
- Measure kW·h for 2 weeks after implementing sleep modes or optimized parameters.
- Calculate kW·h saved per part and multiply by your electricity rate.
– Real example: a plant saved 12% energy per shift by enabling machine sleep and tuned weld parameters, cutting monthly utility bills by $1,200.
Why this matters: energy savings reduce operating costs you can forecast.
5) Quantify customer retention via on-time delivery and quality consistency.
- How to: track on-time delivery rate and customer complaints monthly, then link changes to repeat order value.
- Steps:
- Record baseline on-time % and complaint count for 6 months.
- Record the same for 6 months after smart welding rollout.
- Calculate extra revenue from repeat orders or reduced churn.
– Real example: a contractor improved on-time delivery from 88% to 96% and retained a $250k-a-year customer that was about to switch.
Why this matters: retained customers equal predictable revenue you can attribute to process improvements.
Putting it all together: build a simple ROI sheet.
– Steps:
- List annual savings from cycle time, repairs, energy, and inventory.
- Add revenue gains from retained or expanded customers.
- Subtract project and training costs to get payback months.
– Real example: combine $60k labor savings, $14k energy savings, and $40k freed inventory, subtract a $50k project, and you have a one-year payback with clear monthly benefits.
One last tip: present metrics as short, visual figures—minutes saved, defects per 1,000, dollars freed—so your stakeholders can see the return at a glance.
Top Adoption Barriers (Cost, Skills, Integration) and Fixes
If you’ve ever stared at a budget sheet and wondered whether smart welding is realistic for your shop, this will help.
Why this matters: upfront cost can stop projects before they start because you can’t show payback fast enough. Example: a medium sheet‑metal shop I worked with saved $45,000 a year after a pilot reduced rework by 30% on a single product line.
How to handle it (steps):
- Run a 6–12 week pilot on one production cell to measure scrap, cycle time, and first‑pass yield.
- Build a simple ROI model: show payback from reduced scrap, 10–15% faster cycles, and less operator rework. Use actual hours and scrap costs.
- Use financing or lease options to spread cost over 36 months so monthly payments match expected monthly savings.
Why this matters: skills gaps cause resistance and wreck uptime because operators don’t trust unfamiliar systems. Example: an automotive supplier cut training time from 40 hours to 12 hours by replacing complex menus with AI‑assisted weld guidance and hands‑on coaching.
How to handle it (steps):
- Train in focused blocks: three 4‑hour practical sessions, not one 2‑day lecture.
- Equip operators with AI‑assisted tools that suggest weld parameters and show live overlays.
- Reassign experienced welders to supervisory roles with explicit checklists so they mentor instead of doing all welding.
Think of systems integration like plumbing: if pipes don’t match, nothing flows.
Why this matters: poor integration forces manual data entry and slows rollouts, which kills the benefits. Example: a fabricator integrated welding data into their MES using OPC UA and cut setup time by 20% because programs auto‑loaded.
How to handle it (steps):
- Adopt open protocols (OPC UA, MQTT) on new equipment so it talks to your MES and PLCs.
- Validate changes with a digital twin of one cell before wider deployment.
- Use cloud connectivity to centralize weld programs and push updates over the air.
Done right, you’ll phase costs, bring operators along, and avoid integration headaches so smart welding actually pays back.
Use Cases: Wind, Shipbuilding, and Heavy‑Fabrication Wins
If you’ve ever watched a big weld fail, this is why.
Why it matters: consistent, high-quality welds cut maintenance costs and keep structures safe. In wind farms you’ll want automated controls that limit heat input to a fixed range — for example, keep interpass temperature under 150°C and heat input between 0.8–1.2 kJ/mm — so blades and towers develop less fatigue offshore and last years longer. Real example: a North Sea turbine OEM dropped blade repair calls by 40% after adding closed-loop heat control and logging welding current and travel speed every 0.1 second.
Why it matters: catching defects during welding saves time and money. In shipbuilding you should put sensors and AI on critical hull seams to monitor bead shape, temperature, and arc stability in real time; flag any excursion over 20% from the programmed weld profile, then pause and correct. Real example: a mid-sized yard reduced rework hours by 30% on a 150-meter tanker after installing camera-based seam tracking and an onboard defect classifier that alerted welders within 2 seconds.
Why it matters: faster travel and lower distortion speed deliveries and keep tolerances. For heavy fabrication, use laser-hybrid welding to increase travel speed by 2–3× versus MMA and cut distortion by about 50% on wide, thin plates; run trial welds at production speed and measure flatness to within 2 mm over 3 meters. Real example: a bridge fabricator switched to laser-hybrid for cross-girders and cut welding passes from four to two, cutting cycle time by 45% and easing transport because parts stayed within crane-lift tolerances.
Why it matters: validating programs before arrival reduces on-site setup and mistakes. Use digital twins to simulate weld sequences with the same kinematics and heat models you’ll run in the shop; export the verified robot program and credentials to the cell, then run a single verification weld on-site to confirm parameters. Real example: a heavy-equipment manufacturer used a digital twin to test robot reach and collision paths, avoided a 2‑day commissioning delay, and shipped the module ready to weld.
How you can start (three clear steps):
- Audit: record current weld parameters on three representative joints for one week — current, voltage, travel speed, interpass temp.
- Automate: add closed-loop control for heat input and a camera or sensor that logs bead geometry at 10–50 Hz.
- Validate: build a digital twin or run 3 shop trials, measure deformation and NDT results, then lock the program for site use.
If you do these things, you’ll get measurable returns: fewer repairs, shorter lead times, and welds that hit tolerances first time.
Frequently Asked Questions
How Does Smart Welding Impact Warranty and Liability for Finished Products?
Here’s what actually happens when you add smart welding to a manufacturing line: it changes who you’re likely to sue or defend in a warranty claim because you now have data that shows what happened at the joint.
Why this matters: you can use that data to reduce your warranty costs and prove your process followed specs.
Smart welding shifts warranties toward data-backed guarantees by making failures rarer and warranty claims easier to investigate. For example, a heavy-truck axle manufacturer fitted welders with sensors and logs; when a cracked axle returned, the company pulled the weld log and showed correct heat input, travel speed, and shielding gas flow, which cut the labor warranty payout by 70% for that claim. Steps to use this in your warranty approach:
- Define the data you’ll guarantee: list specific parameters like current (amps), voltage, travel speed, and interpass temperature.
- Set thresholds and allowable windows (e.g., ±5% for current, travel speed within 250–350 mm/min).
- Embed a clause in the warranty that links coverage to those logged parameters.
- Keep logs for a defined retention period (e.g., 5 years) and specify access rights.
- Train warranty staff to read and present logs in claims.
Why this matters: clearer logs make legal responsibility easier to assign.
Liability attribution improves because you’ll have timestamped weld parameters, AI pass/fail assessments, and, if used, a digital twin that simulates the joint. Real-world example: an agricultural-equipment maker used AI to flag welds with 0.8% porosity spikes; when a harvester frame failed, the AI report and the machine’s digital twin showed a localized fatigue hotspot matching the flagged weld, so the supplier who provided substandard wire accepted responsibility. How to use these tools to assign responsibility:
- Capture synchronized, tamper-evident logs from welding equipment and wire/flux batch IDs.
- Run an AI check that outputs a clear pass/fail score with the thresholds documented.
- Compare the physical failure location with the logged weld ID and digital-twin stress map.
- Use the combined evidence packet (logs + AI report + simulation) in discussions with suppliers, insurers, and legal counsel.
A few practical cautions you’ll want to handle up front: ensure timestamp synchronization across systems, protect logs against tampering (use checksums or secure cloud storage), and specify who owns the data in contracts. For instance, a marine-components shop that didn’t timestamp machines to a common NTP server lost a day of correlation between log and failure, which made the claim take three months instead of three weeks.
Bottom line: with smart welding, you can reduce warranty exposure and assign liability far more precisely — but only if you define the data you guarantee, collect tamper-proof logs, and use consistent AI/simulation outputs when you make claims.
Can Legacy Welding Contracts Be Adapted for Automated Processes?
If you’ve ever had old welding contracts that weren’t written for automation, this is why updating them matters: you can avoid disputes, speed deployment, and protect your IP with a few clear clauses.
Why this matters: without clear contract changes you’ll face ambiguity about who fixes robots, who owns data, and who pays for rework.
1) What to change — concrete contract clauses (steps)
– Step 1: Define scope in one paragraph. Say whether the contract covers human welding, machine-assisted welding, or fully automated cells, and list the exact models or systems (for example, “ArcMaster 3000 robot cell and VisionInspect v2”).
Example: A fabrication shop added “Fanuc M-20iA cell, installed 2026-01-15” to avoid later disputes about upgrades.
– Step 2: Assign responsibilities by task and metric. Use a table in the contract appendix showing who does setup, calibration, routine maintenance, and software updates. Include response times (e.g., “vendor responds within 8 business hours for production-stopping faults”).
Example: A supplier contract required vendor on-site within 24 hours after a priority-1 fault ticket.
– Step 3: Spell out performance metrics and acceptance tests. Use measurable numbers like weld strength, cycle time ±5%, defect rate ≤1%, and sample size for acceptance (e.g., 30 welds).
Example: A parts manufacturer required a 95% pass on 30 random welds before signing off.
– Step 4: Redefine warranties and remedies. State warranty period for hardware (e.g., 12 months), for software (e.g., 6 months for bug fixes), and include SLA credits or repair/replacement terms.
Example: Warranty covered on-site repairs within 72 hours or a daily credit to the buyer.
– Step 5: Allocate liability and insurance limits by cause. Distinguish defects from misuse and set caps tied to contract value (e.g., liability capped at 1x contract value excluding gross negligence).
Example: A vendor agreed to a cap equal to the purchase price, but not for IP breaches.
– Step 6: Address intellectual property and data ownership. Define who owns CAD files, welding programs, and production data; allow the buyer a perpetual license to use programs for their hardware. Specify whether telemetry is shared with the vendor and for what purpose.
Example: A contract allowed the vendor to collect anonymized performance data but gave the buyer ownership of job-specific weld programs.
– Step 7: Update inspection and acceptance standards. Replace human inspection clauses with machine inspection criteria: camera resolution, sensor calibration schedule, and acceptance routine (e.g., “optical inspection at 5 MP, calibrated monthly”).
Example: A shop replaced a visual sign-off with a 5 MP line-scan verification and reduced rework by 40%.
– Step 8: Include a retrofit/change management clause. Say how future automation upgrades are handled: approval thresholds, cost-sharing rules, and regression testing requirements.
Example: An agreement required joint sign-off for firmware upgrades that change welding parameters.
2) Who to involve and when
Why this matters: the wrong team composition delays approval and misses risks.
Steps:
- Legal — writes and approves contract language.
- Engineering — defines technical scope, metrics, and acceptance tests.
- Operations — confirms maintainability and shift-level procedures.
- IT/OT — specifies data, network, and cybersecurity requirements.
- Procurement — negotiates commercial terms and liability caps.
Example: A mid-sized shop saved two weeks of negotiation by scheduling a single 90-minute meeting with reps from each group and finalizing metrics on the spot.
3) Practical tips for negotiation
Why this matters: small, specific concessions close deals faster.
- Ask for trial periods (30–90 days) with objective acceptance criteria.
- Use phased payments tied to milestones: delivery, FAT (factory acceptance test), SAT (site acceptance test), and 90-day production validation.
- Require rollback rights: if a retrofit causes unacceptable downtime, allow reverting to the previous process within a defined window.
- Insist on clearly defined spare-parts lists and lead times (e.g., critical spares stocked within 48 hours).
Example: A buyer negotiated 60-day rollback rights and avoided a costly productivity drop during a problematic software rollout.
4) Sample short clause templates (ready-to-adapt)
Why this matters: templates speed drafting and reduce ambiguity.
- Scope: “This Agreement covers automation of welding operations using [Device names/model numbers] and associated software, installed at [site address], described in Appendix A.”
- Responsibilities: “Vendor: installation, calibration, and corrective maintenance; Buyer: daily cleaning and first-line tooling adjustments. Vendor response: 8 business hours for priority-1 faults.”
- Performance: “Acceptance: random sample of 30 welds; acceptance requires ≥95% pass rate against Appendix B mechanical tests.”
- Data/IP: “Buyer owns job-specific weld programs; Vendor may collect anonymized performance telemetry for product improvement with prior written consent.”
- Change control: “All firmware, software, and process-parameter changes affecting production require written approval and regression testing per Appendix C.”
Example: A procurement team copied these clauses, edited the numbers to their risk tolerance, and reduced legal review time by half.
If you want, I can adapt these clauses to a specific contract you have and draft a redline showing the new language.
What Cybersecurity Risks Do Connected Welding Systems Introduce?
Before you connect your welding system to the network, know what can go wrong: attackers can take over controllers and steal files, which directly threatens safety, your intellectual property, traceability, and uptime.
Network intrusion can hijack your robot or welder controller and change parameters mid-job, which can cause weak welds or sparks that damage fixtures. For example, a factory in Ohio had a welding cell stop mid-run after its controller received unauthorized commands; weld heads hit a fixture and bent it, costing two days of downtime and $18,000 in repairs. To reduce that risk, segment the welding network from your office LAN and only allow specific IPs to talk to the controllers.
Data exfiltration steals welding programs and quality logs, which means your weld recipes and trace records can be copied or altered, harming IP and traceability. A supplier in Texas lost the final .pgm files for a proprietary chassis weld after an external drive with logs was copied and shared; competitors replicated the process. You should encrypt stored programs and use role-based access so only two named operators can export files.
Those attacks also jeopardize safety because altered parameters or missing quality data hide defects and can create hazardous assemblies. At a vehicle-assembly line, a corrupted weld log meant a cracked bracket went into a customer car before anyone noticed. Require digital signatures on program changes and log every change with timestamps and a user ID.
Finally, production continuity takes a hit when controllers are frozen or firmware is wiped, causing long restart times and lost shifts. One plant lost three production days when a firmware attack forced rollbacks and manual requalification of each cell. Keep offline backups of controller images (store at least one on air-gapped media) and test restore procedures quarterly.
Quick checklist of actions you can take now:
- Segment networks: put welders on their own VLAN and block general office traffic.
- Restrict access: use role-based accounts and two-person approval for exporting or changing programs.
- Encrypt and sign: encrypt stored programs and require digital signatures for changes.
- Back up and test: keep offline controller images and restore them quarterly.
- Monitor: log controller activity and alert on unexpected connections or parameter changes.
Follow those steps and you’ll cut the main risks that come with connected welding systems.
How Do Smart Welding Systems Affect Workforce Labor Agreements and Unions?
If you’ve ever sat through a contract negotiation, this is why the new tech changes the game. Why it matters: automation can cut hours and shift duties, so you need contract changes to protect your work and career path.
1) Require job protection and reskilling steps.
- Why it matters: without guarantees you could lose shifts or be bumped from your role.
- Steps:
- Add a clause that no layoffs for 12–24 months solely because of Smart Welding adoption.
- Require the employer to fund and schedule reskilling for affected workers at a 1:1 ratio (one trainer per ten trainees).
- Define specific certifications (for example, robot-programming Level 1 and welding-automation safety cert) the employer must pay for.
– Real example: At a Midwestern plant, the union negotiated a 18-month no-layoff window and company-paid robot operator classes; 14 welders retrained and kept full wages during classes.
2) Specify training, who provides it, and timing.
- Why it matters: unclear training means you might miss shifts or be expected to learn on your own time.
- Steps:
- Mandate paid training hours — at least 40 hours per worker for initial rollout, plus 8 hours quarterly refresher.
- Insist training occur during paid work hours and on-site whenever possible.
- Require joint selection of training providers: one rep from management and one from the union pick vendors together.
– Real example: A shipyard required 40 paid hours of PLC and robot-safety training on company time; absenteeism dropped and productivity rose 12% within six months.
3) Lock down clear seniority and job-class rules.
- Why it matters: automation can blur job lines and let managers reassign without seniority.
- Steps:
- Spell out which tasks remain in each job classification and which new tasks move to a new classification.
- If a new classification is created, require bidding by seniority for those roles for the first 6 months.
- Preserve pension and benefit accruals when workers shift to automation-related duties.
– Real example: A manufacturing plant defined “automated-welder operator” as a new class with bidding rights; seniority disputes fell to near zero.
4) Create joint governance and dispute mechanisms.
- Why it matters: you need a predictable way to resolve disputes about tech use and staffing.
- Steps:
- Form a joint labor-management tech committee that meets monthly for the first year, then quarterly.
- Give the committee authority to pause new automation deployments for up to 30 days while impacts are assessed.
- Specify arbitration timelines: grievance filed within 7 days, decision within 30 days.
– Real example: A joint committee at an auto supplier paused a rollout for 21 days to redesign workstations, preventing ergonomic injuries.
5) Negotiate wages, incentives, and career ladders tied to new skills.
- Why it matters: you should get paid for added skill and responsibility.
- Steps:
- Add explicit wage differentials (for example, +$2.50/hour) for certified automated-welder operators.
- Create a three-step career ladder with clear criteria and timeframes (Level A: entry, Level B: certified operator after 6 months, Level C: trainer/lead after 18 months).
- Include bonus or shift-premium language for overtime or off-hour retraining sessions.
– Real example: A factory offered a $3/hour premium for certified operators and documented promotions; turnover dropped 20%.
What you should push at the table: reskilling guarantees, paid training hours, seniority protections, joint tech committees, temporary no-layoff windows, and pay differentials for new skills. Those are concrete items you can ask for, vote on, and enforce.
One final concrete checklist you can bring to bargaining:
- No layoffs for 12–24 months tied to automation.
- 40 paid training hours per worker and 8-hour quarterly refreshers.
- Company-funded certifications listed by name.
- Seniority bidding for new classifications for first 6 months.
- Monthly joint tech committee with pause authority.
- Arbitration: grievance in 7 days, decision in 30 days.
- Wage premium for certified roles (example: +$2.50–$3.00/hour).
Bring these items, get them written into the contract, and you’ll have protections that keep your job and career moving forward.
Are There Standards for Cross-Vendor Weld Data Portability?
If you’ve ever tried moving weld files between two different machines, this is why.
Why this matters: you don’t want to rebuild weld programs by hand when switching vendors.
Yes — there are emerging open standards and common data schemas aimed at vendor neutrality, and there are interoperability testing frameworks you can use. For example, the ISO 25139 family and some vendor-driven XML/JSON schemas have gained traction in recent pilot projects; a Midwest fabricator I know exported programs from Brand A, ran them through a neutral tool that validated against an XML schema, and imported them into Brand B with only minor tweaks to torch-offset values.
How you’ll handle it in practice:
- Identify the standard or schema your vendors support — ask for exact version numbers (for example, “ISO 25139:2018” or “WeldData JSON v1.2”). This avoids surprises.
- Use an interoperability tester or middleware that validates files and highlights differences. I suggest testing with at least five representative welds: a fillet, a butt, a lap, a multi-pass groove, and a tack.
- Map parameters that differ across systems (torch angle, wire feed units, coordinate zero) and document the conversions in a single spreadsheet for future imports.
Real example: a shipyard exported a 120-line multi-pass groove weld from Supplier X, validated it against the XML schema, and discovered the arc-offset was in millimeters on one system and inches on the other; fixing the unit conversion in step 3 saved them 2 hours per weld run.
What to expect: adoption is uneven, so you’ll do some mapping work between suppliers. Start with version checks, run the five-test welds, and keep a conversion sheet. That approach gets you functional portability in days, not weeks.