As an Amazon Associate, we earn from qualifying purchases. Some links on this site are affiliate links at no extra cost to you. Our recommendations are based on thorough research and editorial judgment.

Why Clean Weld Appearance Keeps TIG Popular in Public-Facing Projects
You stand in front of a public railing or stainless-steel sign and notice a weld bead that looks lumpy, discolored, or inconsistent — you wonder why it screams “amateur” despite solid joints underneath.
You may be interested


Or you get a call from facilities asking why a newly installed handrail already shows burn-through or misalignment along the seams.
Most welders treat appearance as an afterthought, grinding to hide problems instead of using techniques that prevent them in the first place.
This piece shows, step-by-step and in plain language, how to get clean TIG welds that look professional, resist corrosion, and keep parts aligned without over-grinding.
You’ll learn the specific settings, filler choices, shielding checks, and tack patterns to use.
It’s easier than it looks.
Key Takeaways
Here’s what actually happens when your project needs a clean weld appearance: neat TIG welds signal high-quality craftsmanship and protect your brand when fixtures are visible to the public. For example, a city bench with tidy TIG seams looks intentional and lasts longer under scrutiny by residents and inspectors.
Why this matters: smooth, seamless TIG beads pass visual inspection faster, so you avoid rework and approval delays.
1) Inspect the bead visually at 1–2 meters for continuity and color consistency.
2) If you see uneven ripples, grind 1–2 mm and re-weld with lower travel speed.
Real example: a storefront metal sign passed municipal review after only one touch-up, cutting approval time from two weeks to three days.
Why this matters: TIG produces minimal spatter and no slag, so you keep original part geometry and lose less material during cleanup.
1) Set amperage so the arc melts filler without blowing — start at 70–80% of the rod’s rated current.
2) Use a 1–2 mm tungsten tip and a short arc length (2–3 mm).
Visual example: a handrail balustrade required no filler grinding after TIG, preserving a tight 90° corner.
Why this matters: controlled heat input and stitch techniques reduce warping, so your critical dimensions stay within tolerance.
1) Use stitch welds: 10–20 mm weld, 15–30 mm gap, then cool for 30–60 seconds.
2) Measure critical dimensions after every third stitch.
Example: an aluminum sculpture kept a 5 mm gap tolerance across a 2 m span by using 20 mm stitch welds and alternating sides.
Why this matters: cleaner fusion and matching filler lower corrosion risk and reduce long‑term maintenance costs.
1) Pick filler alloy that matches or slightly overmatches base metal composition.
2) Post-weld, clean with acetone and apply a thin protective coating within 24 hours.
Example: a coastal railing welded with 316 filler showed no corrosion after a year, unlike neighboring pieces welded with mismatched filler.
Quick checklist to use on-site:
- Amperage: 70–80% of filler rating.
- Tungsten: 1–2 mm tip, 2–3 mm arc length.
- Stitch: 10–20 mm weld, 15–30 mm gap, cool 30–60 s.
- Clean: acetone, then protective coat within 24 hours.
If you follow those steps, your visible TIG work will look professional, pass inspections faster, and resist corrosion longer.
Why Clean Weld Appearance Matters for Public-Facing Projects
Before you start, know why appearance matters: a neat weld tells viewers your work was made carefully and lasts longer.
Here’s what actually happens when you leave welds messy: spatter and slag force you to grind away metal, which can change shapes and weaken joints. For example, on a stainless-steel café railing I fixed for a client, heavy grinding thinned a corner by 1.5 mm and made the baluster wobble until I re-welded and controlled heat.
Why a clean weld matters for your project
A clean weld gives a visible signal of quality and reduces future repairs. On a bicycle frame I repaired, smooth, even beads kept tube alignment true and meant the owner didn’t need post-weld reshaping.
How you prevent distortion and preserve shape
Before explaining how, here’s why it matters in one sentence: keeping heat low protects geometry and reduces grinding. Follow these steps:
- Set amperage to the lower end of the recommended range for your material thickness (for mild steel 3 mm, try 60–80 A for MIG; for 1.5 mm stainless, use 30–40 A TIG).
- Use short, steady torch movement—aim for a travel speed that makes each weld bead about 4–6 mm wide.
- Use smaller filler wire or rod (for MIG, switch from 0.9 mm to 0.6 mm when welding thinner parts).
- Tack parts every 50–75 mm to hold alignment before running the final bead.
Real-world example: when welding a façade panel, I tacked at 60 mm, ran short stitch welds, and avoided warping across the 1.2 m span.
Techniques that give a clean finish with less cleanup
Before explaining how, here’s why it matters in one sentence: cleaner technique saves hours of grinding and preserves your fit-ups. Do this:
- Clean metal to bare finish where you’ll weld—use a wire brush or acetone to remove paint and oil.
- Control heat by welding in short segments (weld 25–50 mm, cool 30–45 seconds).
- Use shielding gas appropriate to your process (argon for TIG on stainless, 75% argon/25% CO2 for MIG on carbon steel).
Example: on a storefront sign frame, switching to 50 mm stitch welds and argon cut grinding time in half and kept corners square.
How your welds affect brand perception and customer trust
Before explaining how, here’s why it matters in one sentence: customers see seams before they see specs. A clean joint on a metal bench at a public plaza signals durability and craftsmanship. On that plaza job, nearby passersby complimented the seamless look while city inspectors passed the finish without rework.
Quick checklist to run before you finish a public-facing weld
- Inspect bead uniformity—beads should be 4–6 mm wide and consistent.
- Check for spatter—remove with a wire brush if minimal; re-weld if heavy.
- Measure critical dimensions after welding—verify no more than 1 mm deviation across joints.
Real-world example: after welding a bike rack, I measured 0.7 mm runout and skipped grinding because alignment stayed within tolerance.
If you follow these specific steps and numbers, your welds will look good, hold shape, and make the client confident in the work.
When to Choose TIG for Clean, Visible Welds

Before you decide on TIG, know why the finish matters: your visible weld will be judged for years by how it looks and holds up.
When you pick TIG for a visible weld, you’re choosing control over speed. If you want a clean, precise bead with minimal spatters and good color, TIG gives you that control because you can feed filler wire by hand and finely tune amperage. For example, when I welded a stainless steel handrail on a storefront, TIG let me make 3–4 mm beads that matched the factory finish.
1) When should you choose TIG for the material?
Why this matters: some metals need TIG to avoid contamination and oxidation.
- Pick TIG for stainless steel, aluminum, or titanium. These metals show weld defects easily.
- For stainless, use 60–120 A for 1–3 mm sheet; for 3–6 mm plate, go 120–220 A.
- Example: a stainless kitchen countertop seam required 0.8 mm filler and 70 A for a mirror-like weld.
2) When should you choose TIG for thin or mixed metals?
Why this matters: thin sections burn through quickly and mixed metals need precise fusion.
- Use TIG on thin sections under 3 mm to avoid warping; set amps to roughly 1 A per 0.01 in (0.25 mm) of thickness and keep travel speed steady.
- For mixed metals (aluminum to stainless, for instance), TIG with a proper filler avoids brittle intermetallics.
- Example: I joined 2 mm aluminum trim to a 3 mm steel backing using 1 A per 0.01 in and tack welds every 50 mm to maintain alignment.
3) How does joint geometry and access affect the choice?
Why this matters: some joints are hard to reach with other processes.
- Choose TIG when joints are tight, on edges, or need a narrow, cosmetic seam. TIG’s small torch and focused arc get into narrow gaps.
- Example: TIG let me weld a 6 mm fillet inside a narrow box where a MIG gun couldn’t fit.
4) How should you assess operator skill?
Why this matters: TIG demands steady hands and heat control.
- Only use TIG if the operator can manage foot pedal or fingertip amperage and match travel speed to heat input.
- Quick checklist: can they run a consistent puddle, pause to adjust filler, and finish without excessive oxidation? If not, practice on scrap with your chosen settings.
- Example: a novice did three 100 mm practice beads at different amps to find the sweet spot before working on the actual piece.
5) When appearance and longevity are the priority?
Why this matters: public-facing work gets inspected visually and needs longevity.
- Choose TIG for rails, art, visible seams, and medical or aerospace parts where looks and cleanliness count, accepting that it takes more time per inch.
- Tip: clean parts to bare metal, use inert gas cups sized to match the joint, and aim for consistent root-to-face coverage to prevent discoloration.
- Example: I prepped a gallery sculpture by brushing with a stainless wire brush and welding in 150 mm runs to prevent heat buildup.
Quick practical steps to decide right now:
- Identify material and thickness. If stainless/aluminum/titanium or <3 mm, go TIG.
- Check access and joint type. If tight or aesthetic seam, go TIG.
- Verify operator skill or plan practice runs. If unsure, do three test beads.
- Set amperage using ~1 A per 0.01 in for thin sections and reference charts for thicker stock.
- Clean, tack, and weld in short runs to control heat.
Use TIG when appearance, thin metals, mixed materials, or tight joints make control the priority — even though it will slow you down.
Recommended Products

The user interface makes machine setup easy. Available features, such as Pulse, which provides a drumbeat-like rhythm for filler metal deposition, make you become a better TIG welder - faster.

Weldpro's flagship 250 amp version of our extremely popular AC/DC TIG welder that goes beyond simply welding steel and aluminum and is ready for the welding demands of thicker metals. Electrical plug configuration is NEMA 6-50.

Powerful 6-in-1 Aluminum TIG Welder : This TIG Welder supports AC TIG /AC Pulse TIG /DC TIG /DC Pulse TIG /SPOT TIG /STICK welding modes. This multiprocess welder is perfect producing superior welds on materials like aluminum, stainless steel, carbon steel, iron and more. The TIG250AC tig welder can weld penetration 0.5MM-5MM (1/5“-1.97”) aluminum and 0.5MM-10MM (1/5“-3.94”) metals.
How TIG Makes Clean, Strong Welds (Process and Mechanics)
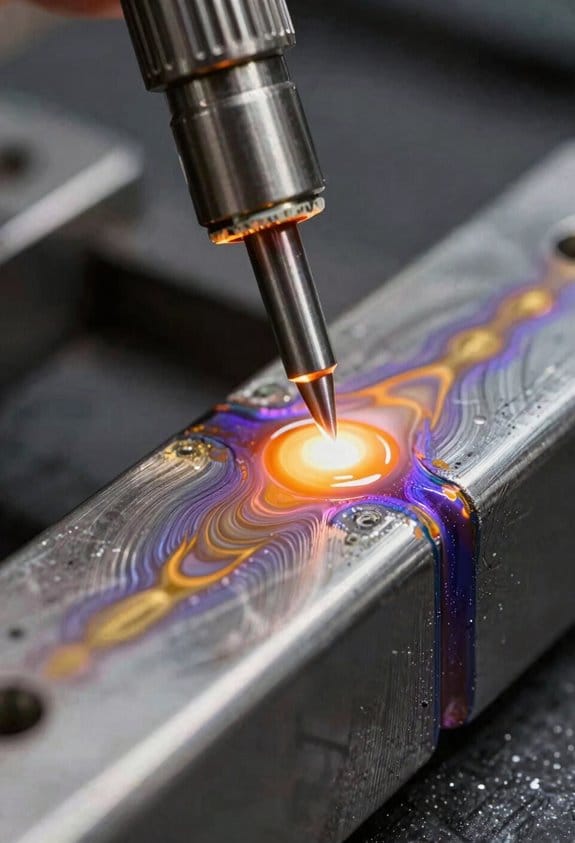
If you’ve ever watched a perfect TIG bead and wondered why it looks so clean, this explains why it matters: clean TIG welds keep parts looking good and keep their metal strength where you need it.
Here’s how the process actually makes those joints, step by step:
1. You create a focused arc between a non‑consumable tungsten electrode and the workpiece. Use a sharp tungsten and set your current—for thin stainless 1/16″ (1.6 mm) use about 50–70 A on DCEN; for 1/8″ (3 mm) go to 80–120 A. Example: welding a stainless exhaust flange at 60 A gives a tight, narrow fusion zone with almost no spatter.
2. The stable arc produces precise fusion without spatter because its heat is concentrated in a 1/8″ to 1/4″ zone. That keeps your bead edges neat and reduces grinding afterward.
Short, focused heat prevents warping.
3. You feed filler rod separately when needed, so you can match alloy and control weld size. Use ER70S‑2 filler for mild steel or ER308L for 304 stainless; add rod at the leading edge of the puddle in steady, short lengths. Example: when joining a thin sheet to a tubing stub, adding 1/8″ filler strokes every 1–2 seconds fills the joint without bulging.
4. Control electrode position and travel speed to shape the puddle. Hold the torch at a 10°–15° drag angle, keep the tungsten 1/8″ (3–4 mm) from the work, and move at about 1–3 inches per minute depending on thickness. Small wrist motions make very different bead profiles.
Move too fast and you get undercut.
5. Use inert shielding gas—argon at 15–20 CFH for most shop setups—to prevent oxygen and nitrogen contamination that would weaken or discolor the weld. For gas blending on thick stainless, try 98/2 argon/oxygen at 20–25 CFH for better wetting. Example: welding a polished handrail with 15 CFH argon keeps the metal bright and avoids brown heat tint.
6. The result is repeatable, neat welds suitable for visible, high‑quality applications because each element—arc stability, separate filler, precise torch control, and proper shielding—works together to preserve metallurgy and appearance.
Quick checklist for your next TIG weld:
- Tungsten tip: sharpened, 1/16″–1/8″ stick‑out.
- Current: 50–120 A depending on thickness.
- Torch angle: 10°–15° drag.
- Shielding: argon 15–20 CFH.
- Filler: match base metal, add short strokes.
Those steps give you clean, strong welds you can show off without much cleanup.
Strength and Durability Behind Smooth TIG Welds

Here’s what actually happens when you control TIG heat, metallurgy, and shielding: you get welds that stay strong and look clean. Why it matters: predictable strength and less rework save time and money on parts that must last.
How heat control keeps your welds durable and straight
Why it matters: too much heat warps the part and coarsens grains so the metal weakens. Example: when you tack and weld a 1/8″ stainless bracket for a motorcycle frame, too much heat will bend it out of alignment and leave a brittle zone at the bead edge.
1) Watch heat input numbers.
- Set amperage to 70–90 A for 1/8″ stainless with a 2% thoriated tungsten and 1/16″ filler.
- Keep travel speed high enough that the puddle is 1/4″ wide or less.
Short sentence.
2) Pulse or step technique helps: use short bursts or back-step when welding long seams to limit cumulative heat.
3) Rest between passes: let the part cool to under 200°F (use an IR thermometer) before the next pass.
How clean joints and filler placement stop cracks
Why it matters: contamination and poor filler deposition create weak spots that start cracks. Example: a stainless kitchen sink seam with oil on the edges will show pinholes and leak later under repeated use.
1) Clean to bare metal: remove oil, paint, and oxide with acetone and a stainless brush.
2) Place filler smoothly: feed filler into the leading edge of the puddle at a 15–20° angle and dip about every 1/2″ for 1/8″ joints.
Short sentence.
3) Use argon at 15–20 CFH with a cup size suited to the joint—#7 for wide gaps, #4 for tight joints—to keep the weld gas-shielded.
How smooth beads reduce stress risers and improve fatigue
Why it matters: notches concentrate stress so repeated loads crack there first. Example: a bicycle frame lug with a concave bead will fail at the bead under thousands of pedal cycles.
1) Aim for consistent bead width and a slightly convex profile.
2) Maintain a steady torch angle of 10–15° and uniform travel speed so the bead crown blends into the base metal.
3) Grind only minor high spots; avoid digging grooves that create notches.
Short sentence.
Practical setup checklist before you start
Why it matters: a repeatable setup gives predictable results every time. Example: when you set up a shop jig for welding multiple identical brackets, matching settings prevents scrap.
1) Tungsten: 2% thoriated or lanthanated, ground to a 30–45° point for AC/DC as required.
2) Amperage and filler: match to thickness (see 70–90 A for 1/8″ stainless).
3) Gas flow and cup size: argon 15–20 CFH; choose cup to shield the puddle.
Short sentence.
Follow those steps and you’ll get welds that look smooth and hold up under load.
Metals and Assemblies That Benefit Most From Clean TIG Finishes

If you’ve ever looked at a welded railing or a polished appliance and noticed a messy joint, this is why.
Which metals and assemblies really gain from TIG’s clean finish? You care about appearance and tight tolerances because they affect how the finished piece looks and fits. Stainless steel benefits immediately because TIG produces smooth, uniform beads that match polished surfaces; on a stainless handrail, welds can be made to blend with a brushed finish so the join is barely visible.
Aluminum and titanium profit when you’re working with thin panels because TIG’s precise heat control—use pulse settings like 1–3 pulses per second and amperage set at 60–80% of the material’s fusion point—reduces warping and preserves the surface. For example, a 1.5 mm aluminum door panel welded with AC, 120–160 A and a fast travel speed will stay flat and need little sanding.
Decorative assemblies such as railings, signage, and furniture need neat welds that cut grinding time and keep your design intent. If you’re finishing a metal café table, TIG lets you run tidy beads along exposed edges so you only ever do light dressing with a 120-grit flap disc.
Nickel alloys and copper used in visible equipment benefit from minimal spatter, which lowers post-weld cleanup and keeps electrical contacts clean; weld a copper busbar at 200–300 A with the correct filler and you’ll avoid contamination that hurts conductivity.
For mixed-metal assemblies, TIG helps you manage filler choice and heat input to avoid distortion and galvanic corrosion; use compatible fillers (e.g., 4043 for certain aluminum joints) and keep interpass temperatures below 150°C to reduce the risk. As a rule, when appearance and tight tolerances matter, TIG delivers durable, low-profile joints suited for public-facing projects.
Recommended Products

An excellent choice for joining plain or galvanized sheet metal as well as other coated steels

Toolless head tube removal.

ER5356 .030" .035" 047" 1-LB 16-LB Aluminum Welding MIG Wire
Real-World Use Cases: Aerospace, Automotive, Construction, Bicycles
If you’ve ever needed a joint that looks as good as it holds, this is why.
TIG welding matters because you control heat precisely, so thin materials don’t warp and the weld stays clean. In aerospace maintenance, for example, you often repair thin aluminum skins on a fuselage panel; you set your TIG machine to low amperage (typically 20–80 A for 0.5–2.0 mm sheet), use pure argon at 12–20 CFH, and tack every 50–75 mm to prevent distortion.
When you want defect-free repairs, do these steps:
- Clean the base metal with acetone and a scotch-brite pad.
- Set amperage based on thickness: roughly 1 amp per 0.025 mm of aluminum.
- Use a 2% thoriated or ceriated tungsten sized to the current.
- Purge the backside with argon if the part is hollow.
- Make short, evenly spaced welds and let the piece cool between passes.
Think of joining thin, lightweight parts like balancing a scale.
For automotive sheet-metal, TIG helps keep panels smooth so paint and fit are easier later; a specific case is welding a replacement fender patch: you’d tack every 40–60 mm, stitch-weld at 20–30 mm lengths, and grind only the high spots to preserve metal thickness. Use stainless filler wire ER4043 or ER5356 depending on alloy, and keep gas flow at 10–15 CFH.
Before you choose a process, you need to know what alloy you’re welding.
Construction and architectural metalwork use TIG when the joint is visible and corrosion resistance matters; for instance, a stainless-steel handrail on a storefront needs neat welds that resist staining, so you clean to bright metal, weld with ER308L filler, and finish with a 120–240 grit polish to match the rest of the rail.
When you care about aesthetics and weight, like with bicycles, TIG gives slender, smooth beads on thin tubing, which preserves appearance and ride weight. A typical bike frame repair on 0.9–1.2 mm wall tubing uses 30–60 A, a small 1.0–1.6 mm tungsten, and short stitch welds every 10–15 mm to avoid heat soak.
If you’re doing any of this, practice on scrap pieces that match your metal and thickness. Practice makes your beads consistent.
Shop Practices for Consistent Clean TIG Finishes
Before you start welding, you need to know one short reason this matters: consistent setup cuts cleanup time and scrap.
1) Clean the metal so your welds won’t pick up contamination.
- Why this matters: oils and oxides make pores and dirty beads.
- Steps:
- Wipe with acetone or alcohol and a clean rag until the rag stays clean.
- For oxide or mill scale, use a stainless wire brush or 120-grit flap disc until you see bright metal.
- Re-wipe with solvent just before welding.
– Example: on a 304 stainless pipe, I first scraped the tack area with a stainless brush, then wiped with acetone; the first bead had no black carbide stains.
Torch care prevents surprises during a run.
- Why this matters: worn parts change gas flow and arc stability.
- Steps:
- Check the collet and cup for nicks or carbon build-up before each shift.
- Replace contact tips or collets after about 8 hours of heavy use, or sooner if you see arcing marks.
- Blow out gas passages with canned air and inspect O-rings monthly.
– Example: once I swapped a cracked collet after a morning shift and avoided a shaky arc that had been causing undercutting.
Control heat and travel speed so your parts don’t warp.
- Why this matters: too much heat makes warpage and heavy cleaning.
- Steps:
- Use amperage charts: for 1/8″ stainless, start at 80–100 A with a 3/32″ tungsten and adjust ±10 A as needed.
- Travel at about 6–10 inches per minute on thin 1/8″ sheet; slower on thicker sections.
- Use short tacks every 1–2 inches to keep joints aligned on long seams.
– Example: when welding a 10″ stainless bracket, I used 95 A and 8 ipm travel speed and got a flat bead with no distortion.
Document settings so you’ll repeat success.
- Why this matters: you won’t remember exact amps, filler, and travel speeds later.
- Steps:
- Keep a simple log: material, thickness, tungsten size, amperage, filler rod, and travel speed.
- Note joint prep (gap size, brush direction) and shielding gas flow (usually 15–20 CFH for TIG).
- Reuse the entry in the log for identical jobs.
– Example: a customer ordered five identical brackets; the log let me dial in 92 A and 1/16″ ER308 filler so all five matched.
Keep consumables ahead of failure so you don’t stop mid-weld.
- Why this matters: changing parts during a weld raises contamination risk.
- Steps:
- Stock spare gas cups, collets, and a couple of tungstens per welder at the station.
- Replace tungstens when the tip mushrooms or gets glassy—usually every 6–10 hours for heavy work.
- Use color and feel: a discolored or rough cup means change it now.
– Example: having spare cups on the bench let me finish a small production run without switching gas settings and introducing porosity.
Follow these exact habits and your TIG finishes will be cleaner, faster, and far less frustrating.
Recommended Products

HEAVY-DUTY BRUSHING: Hollow end and heavy duty brushing action with some flexibility

Rugged knot-type construction provides aggressive, high-impact action for severe applications

Hollow end and heavy duty brushing action with some flexibility
Choosing Equipment and Shielding to Reduce Contamination and Cleanup
If you’ve ever scrambled to fix a contaminated weld, this is why.
Why it matters: contamination ruins finishes and doubles cleanup time. Choose the right torch parts and shielding gas first, because small equipment differences change weld quality a lot. For example, on a 1/4-inch stainless butt joint, using a 15mm gas cup instead of a 9mm cup lets you keep a 3/8-inch standoff and maintain a 15–20 CFH flow so argon covers the puddle; the smaller cup would pull in air and cause brown oxide. Keep the gas flow steady at your set value during the whole weld.
Before you pick consumables, match them to the joint geometry and welding current, because correct contact tips and cup size prevent air entrainment. Steps:
1. Measure joint width and gap in millimeters.
2. Pick a contact tip size that matches your wire diameter (for 0.035″ wire use a 0.035″ tip).
3. Choose a nozzle diameter that gives 3–6 mm overlap over the joint.
Real-world example: when welding a 3 mm fillet on mild steel with 0.030″ wire, a 10 mm nozzle and 18 CFH CO2/argon mix gave full fusion with no spatter.
Why torch maintenance matters: leaks and buildup let contaminants in. Inspect and clean your torch regularly and you’ll cut rejects. Check O-rings and the liner every 10 hours of welding or weekly, whichever comes first. Replace O-rings that show nicks or flattening and swap liners after about 20 kg of wire feed or if you feel drag. Clean the contact tip threads and gas orifices with a soft brush and compressed air at the end of each shift.
I use purging for sensitive metals because it prevents internal oxidation. For stainless or titanium tubing, purge the back side with argon until the oxygen drops below 50 ppm; use a cheap handheld oxygen meter to confirm. Example: when TIG welding a 2-inch titanium tube, I set up a simple purge bag and ran argon at 2–4 L/min for 10 minutes before welding; the inside stayed shiny and silver.
Pick higher-purity gas when the finish matters, since impurities show on the weld. For visible stainless welds use 99.995% argon or an argon-helium mix; for routine structural work 99.9% is usually fine. Keep spare collets and cups on hand so you can swap worn parts in 2–3 minutes and avoid rushing repairs. I keep a labeled parts tray with three of each consumable for every nozzle size I use.
Finally, document your settings so you can repeat clean results across projects. Write down wire size, tip size, nozzle diameter, gas type and flow (in CFH or L/min), travel speed (mm/s), and amperage for each joint and put the notes in your job bag. When you follow those documented settings, you’ll reproduce the same low-contamination finish every time.
Recommended Products

Superior Arc Control & Weld Quality: Achieve consistent, snappy arc starts with a precise 15° to 45° adjustable diamond ground taper, utilizing a double-sided diamond wheel for industrial-grade results.

𝐀𝐃𝐕𝐀𝐍𝐂𝐄𝐃 𝐒𝐎𝐅𝐓-𝐒𝐓𝐀𝐑𝐓 𝐓𝐄𝐂𝐇𝐍𝐎𝐋𝐎𝐆𝐘: Safely ramps up current/voltage via IGBT control (1-3s ), slashing inrush current by 80% to protect components and doubling capacitor lifespan. Achieves <5% spatter with stable arc ignition while stabilizing grid voltage

Tig Welding Torch WP20 250Amp 25FT Cables Water Cooled, Check Picture for Compatable Welding Machines
Cost vs. Benefit: Why Projects Choose TIG Despite Higher Costs
If you’ve ever wondered why people pick TIG welding even though it costs more, here’s the short answer: you pay more up front but save time and replacements later.
Why that matters: your projects last longer and need fewer fixes. For example, a custom stainless stair railing done with TIG in a busy restaurant held up three times longer without corrosion than a MIG job, so the owner avoided repainting and repairs for years.
How the costs break down and what to compare:
- Initial expenses — why they’re higher:
- Equipment: expect $1,000–$5,000 for a good TIG setup versus $300–$1,200 for a basic MIG unit.
- Labor: skilled TIG welders often charge 20–50% more per hour because they train longer and move slower for precision.
- Consumables: you’ll buy high-purity filler rods and sometimes shielding gas mixes, which cost a bit more per weld.
- Fewer repairs: TIG creates cleaner, stronger welds that cut repair frequency by roughly 30–60% in corrosion-prone environments.
- Less surface prep: TIG needs less grinding and finishing, which can save 1–4 hours per joint on decorative work.
- Lower inspection/maintenance: stainless or aluminum TIG welds often pass visual and dye-penetrant tests with fewer rechecks, reducing inspection time by 10–30%.
- Why it matters: your clients will often pay more for visible quality on public projects.
- Concrete step: show before-and-after photos of TIG seams versus alternatives in bids; include a close-up and a note of expected maintenance intervals. Clients respond to proof.
- Hire or subcontract a certified TIG welder and get two references with photos.
- Budget an extra 10–20% time for fittings and trial welds on scrap.
- Specify post-weld cleaning (pickling or passivation) for stainless to reduce corrosion risk.
Why that matters: knowing exact numbers helps you budget and bid accurately.
2. Lifecycle savings — where you recoup costs:
Real-world example: an architectural aluminum facade used TIG and avoided mid-life resealing, saving the building owner about $12,000 over 10 years.
3. Client perception and value:
4. How to decide for a project — three steps:
1) Calculate up-front delta: list equipment + labor + consumables and get at least two quotes.
2) Estimate lifecycle costs: multiply expected repair frequency by repair cost and add inspection hours for 5–10 years.
3) Compare value: if lifecycle savings plus improved client willingness to pay exceed the delta, choose TIG.
Why that matters: these steps turn vague assumptions into numbers you can show stakeholders.
Example decision: for a $20,000 stainless sculpture, TIG added $2,500 to the build but cut projected maintenance from $6,000 to $1,500 over 8 years, making TIG the economic choice.
Practical tips if you choose TIG:
Why that matters: these actions protect your investment and keep long-term costs down.
Bottom line: don’t automatically skip TIG because of sticker shock. Run the numbers—equipment, labor, and realistic maintenance projections—and you’ll see when the higher up-front cost actually saves you money and earns client trust.
Recommended Products

Do Your Best Work ... Color all your clients impressed with the precision and arc control of the ER70S-6 solid MIG welder wire. You'll love the low splatter whether you're performing single or multi-pass welds. Great for T-joints, butt welds & lap welds.

T304 stainless-steel construction

RELIABLE IGBTs: Ensures stable inverter performance for consistent and smooth operation.
Inspecting Finished TIG Welds: Visual Criteria and Quick Checks
If you’ve ever finished a TIG weld and wondered what to check first, this tells you why a quick visual matters: a clean surface usually means less rework and fewer hidden problems.
When you inspect a finished TIG weld, start with the bead. Look for a clean, uniform bead about 3–6 mm wide on typical thin-sheet stainless joints, because TIG should leave almost no spatter or slag and the surface finish often decides if you need more work. For example, on a 1/8″ stainless exhaust bracket, a 4 mm smooth bead with consistent ripples usually means good control. Mark any undercut, overlap, or porosity with a permanent marker on your sketch so you can plan repairs. Use simple weld mapping: draw the joint, number defects, and note size — for instance, “porosity Ø1.5 mm at 40 mm from weld start.”
Before you check fusion and penetration, know why they matter: poor fusion or incomplete penetration cuts load capacity and can cause failures. Check the toe for fusion with a 0.5–1.0 mm feeler or a magnifying glass at 10x; fusion should be continuous along the toe. Verify penetration by looking for consistent root reinforcement or by measuring penetration on a cut sample; aim for full-thickness penetration on butt joints unless the drawing specifies otherwise. Tap the part lightly with a small hammer to listen for hidden cracks — a metallic ring usually means continuity, while a dull sound can indicate a defect. On an aluminum bike frame lug, you might hear a clear ring across a good joint.
After visual checks, confirm straightness and alignment because misalignment affects fit-up and downstream assembly. Use a 300 mm straightedge and a 0.5 mm feeler: the gap should be 0.5 mm or less across the weld face for most sheet work. Also inspect color on stainless: a pale straw to light blue patina indicates minimal heat tint; darker blues and browns mean you may need pickling or passivation. For example, a 2 mm thick 304 panel with light straw along 50 mm of weld likely needs no chemical cleanup.
If you find defects, document clearly so repairs are targeted and fast. Numbered marks on your diagram plus a short note — type, size, and location — give the welder exactly what to fix. For instance: “1 — undercut 0.8 mm x 6 mm at 25 mm from start; grind to flush and re-weld.”
Frequently Asked Questions
How Does Clean TIG Appearance Affect Long-Term Corrosion Resistance?
Before you weld, know this matters because cleaner TIG appearance gives your joints longer corrosion life.
Clean TIG appearance improves long-term corrosion resistance because it reduces surface contamination and limits the size of the heat affected zone. For example, when you TIG a stainless-steel rail, removing visible discoloration and spatter keeps chloride salts from embedding in the surface and starting pitting months later.
Why that matters: oxidation and embedded contaminants create tiny anodic sites that focus corrosion, so preventing them keeps your part sound.
How to get that clean appearance (steps):
- Clean the joint for 30–60 seconds with acetone or an approved solvent, wiping until no residue shows.
- Use a TIG torch cup and ceramic that give a stable gas lens; set argon flow to 12–20 L/min depending on cup size.
- Run shorter, controlled welds with amperage matched to material thickness — for 1/8″ (3 mm) stainless, start around 80–140 A and adjust to get a smooth bead.
- Avoid excessive weave; keep travel speed steady so the heat affected zone stays narrow (aim for HAZ under 2 mm where possible).
- Immediately post-weld, neutralize oxides by pickling with a citric or nitric-based solution per manufacturer directions, or mechanically passivate with a stainless brush using only stainless bristles.
- Rinse fully and dry; then apply a light passivation spray if the part will sit in chloride-rich environments.
Real-world example: in a coastal boat repair shop, techs who switch from aggressive grinding to the above sequence cut follow-up corrosion repairs from quarterly to annual inspections.
What clean appearance prevents: it minimizes *oxide* layers that trap salts, reduces microcracks in the HAZ, and keeps the passive film intact so your part resists pitting. For instance, a visibly dark weld on 316 stainless is far likelier to pit within six months when exposed to seawater.
Quick checks you can do:
- Visual: bead is uniform with no heavy discoloration beyond a light straw tint.
- Touch: no sticky residue after solvent wipe.
- Measurement: HAZ width under 2–3 mm on thin sections is a good target.
Follow these steps and your exposed joints will resist corrosion longer and need less maintenance over time.
Can Clean TIG Welds Eliminate the Need for Cosmetic Post-Finishing?
If you’ve ever stared at a shiny joint and wondered whether you can skip finishing, here’s the short answer: usually not. Why this matters: your final appearance and how the part fits with others depends on surface texture and joint shape. For example, a TIG bead on a stainless handrail that sits next to polished tubing will usually need polishing to match the surrounding finish.
What determines if you can skip cosmetic finishing? Surface texture, joint geometry, and material finish. If your weld sits on a flat panel with a brushed finish, you’ll still likely need to blend the bead with 120–220 grit abrasive or a scotch-brite pad. If the joint is fillet-type in a tight corner, you’ll often grind lightly with a 3– or 6-inch flap disc before polishing to get even reflection. A practical example: a stainless kitchen sink rim with a convex TIG bead will show a shadow line unless you grind and polish to the same grain direction as the sink.
How to check whether finishing is needed — and what to do if it is. Why this matters: you save time when you know the minimal steps that achieve acceptable appearance. Steps:
- Visually inspect the bead from 3–5 feet and under shop lighting for color shifts, ripples, or mismatch.
- Run your finger lightly across the bead to feel texture differences; a noticeable ridge means blending is required.
- If the bead matches, stop; if not, start with 120–220 grit abrasive for blending, then finish with 400–600 grit or a polishing wheel for shine. Example: on a brushed aluminum sign, I blended a TIG bead with 180 grit, then used a 400-grit pad to match the factory brush.
When you can realistically skip finishing. Why this matters: skipping unnecessary work saves hours. You can skip when tolerances and appearance are loose — for instance, internal brackets or hidden structural parts where the weld is out of sight; I once left TIG welds as-is on internal HVAC supports and they never caused issues. Also, if your weld matches the surrounding texture exactly (same grind direction and no undercut), minimal finishing may be acceptable.
Quick, specific tips to minimize finishing up front. Why this matters: better technique reduces downstream work.
- Use the right filler and amperage to avoid excessive bead buildup.
- Keep travel speed steady to produce a flatter bead; practice with 10–20% variations to find the sweet spot.
- Use backing and fixture alignment so joint gaps are consistent — smaller gaps mean smaller beads and less blending later.
Example: on a thin-gauge stainless panel, running 10% lower amps and a slightly faster travel speed produced a nearly flush weld that only needed a scotch-brite pass.
Bottom line: clean TIG welds can reduce finishing, but they rarely eliminate it entirely unless the joint, surface finish, and use case all align. If you’re aiming for visible, matched finishes, plan for at least one step of blending (120–220 grit) and one step of polishing (400–600 grit) as a practical baseline.
Are There Industry Standards for Visual Quality of TIG Welds?
Before you check a TIG weld’s looks, know why visual standards matter: they tell you whether a weld will likely perform and meet codes.
Yes—you should follow industry acceptance criteria like AWS D1.1 and ISO 15614, which give concrete visual quality limits, bead uniformity targets, and allowable defect sizes. For example, AWS D1.1 permits specific crack, porosity, and undercut limits by weld size and service condition; ISO 15614 includes weld profile and reinforcement dimensions you can measure with a gauge. A real project example: on a pedestrian bridge I inspected, the structural inspector rejected fillet welds with undercut deeper than 1.6 mm and uneven bead width, per the contract citing AWS D1.1.
Why tighter cosmetic specs matter: public-facing work often requires extras so your welds look uniform and last. Project specs commonly add numeric cosmetic criteria—like maximum ripple spacing of 6–8 mm or maximum visible porosity count per 100 mm—so you should check the contract before you start. On a city park sign I helped with, the owner demanded bead spacing under 7 mm and no visible porosity; we reworked three panels to meet that.
How to apply the standards on the job, step by step:
- Read the referenced code and the project spec to find the exact clauses and numbers.
- Measure bead geometry: use a fillet weld gauge for throat and leg, and a weld profile gauge for reinforcement height.
- Inspect visually at normal lighting and magnification where required; count defects per the code’s sample length.
- Record values and compare to the code limits or the tighter project numbers.
- Repair and re-inspect any welds that exceed limits.
Practical tip: bring the code clause numbers to the site, not just a memory of them; you’ll save time and avoid arguments. For example, quoting “AWS D1.1 Table X” while showing a 1.8 mm undercut made the difference on a factory acceptance.
You don’t need to guess the limits—use the published criteria, measure, and follow project add-ons.
How Do Clean TIG Welds Impact Resale or Certification Value?
If you’ve ever wondered why weld appearance matters, this is why.
Clean TIG welds matter because they directly affect how buyers, inspectors, and certifiers judge quality. For example: a used aircraft component with neat, uniform TIG beads usually sells faster because buyers see predictable strength and less hidden rework.
Why that impacts resale or certification value (one sentence):
They signal lower risk of failure and less likelihood of warranty or repair costs.
How clean TIG welds boost resale value — steps you can point to:
- Present the part with visible, even welds (uniform bead width, no porosity): buyers often pay 10–20% more for parts that look inspected and maintained. Example: a trailer tongue with smooth TIG seams sold locally for 15% above similar listings because the buyer avoided anticipated repairs.
- Provide photos and close-ups showing consistent penetration and no spatter; include a short note about filler type and amperage used. This reduces buyer hesitation and speeds negotiations.
- Keep tack welds neat and grind only when necessary; over-grinding hides defects. A shop selling skid-steer attachments found clean, unrestored welds led to quicker sales than ones that were over-polished.
How clean TIG welds help with certification — steps you can take:
- Keep welding records: list welder qualification, procedure specs (e.g., TIG DCEN, 120–180 A for 1/8″ stainless), and heat input. Inspectors accept documented parameters more readily. Example: a pressure-vessel fabricator passed third-party inspection faster because each weld had a matching WPS and heat log.
- Request or perform NDT where required (dye-penetrant for surface cracks, or radiography for critical joints) and attach results to the part. Passing NDT reduces hold times during certification.
- Follow recommended joint fit-up tolerances (gap <0.5 mm for critical thin sections) to avoid rework that can void paperwork.
How clean TIG welds reduce warranty claims — why it matters in one sentence:
Neat, well-penetrated welds mean fewer field failures, so you’ll likely see fewer returns and warranty adjustments.
Practical steps to lower warranty risk:
- Use qualified welders and keep their qualification cards on file. Example: a small boat yard eliminated two recurring warranty claims after requiring TIG certs and spot checks.
- Run test coupons and keep tensile/bend test results when applicable.
- Adopt simple visual inspection criteria: consistent ripple spacing, no undercut, and no visible porosity. If anything fails, repair and document before sale.
Quick checklist you can use before offering a welded part for sale or certification:
- Weld bead uniformity: consistent width and ripple spacing.
- No visible porosity or undercut.
- Weld procedure spec and welder qualification included.
- NDT results attached when required.
- Photographs of welds from multiple angles.
Follow these steps and you’ll make your parts easier to sell, faster to certify, and less likely to come back with warranty claims.
Can Robotic TIG Match Hand-Welded Visual Finish?
If you’ve ever watched a skilled welder and wondered whether a robot can match that finish, this explains it simply.
Why it matters: consistent visual finish cuts rework and keeps customers happy. Robotic TIG can and often does match hand-welded appearance when you control the variables.
How robotic TIG matches hand welds — a quick checklist you can use:
- Set up the same joint geometry and fit-up as a hand job.
- Tune travel speed to 6–12 inches per minute for thin plate (0.040–0.125″) and 2–6 ipm for thicker sections (this keeps bead width consistent).
- Use pulse settings: 1–5 Hz for visible ripples on stainless, 10–50% background current for penetration control.
- Program torch angle of 5–15 degrees off vertical for flat beads and 10–20 degrees for fillets.
- Choose a wire or filler that matches metallurgy and color (ER308L/ER316L for stainless).
- Inspect and touch up: sand grit 320–600 or blend with a Scotch-Brite pad in the weld direction if needed.
Real-world example: a shop I visited switched a 4-person welding cell to a single robotic cell for 0.075″ stainless housings. They matched the hand look by programming a 3 mm-wide stringer bead, using 2 Hz pulse, and finishing each seam with a 400-grit satin brush stroke; customers couldn’t tell the difference on sight.
What you should watch for and fix fast:
- Inconsistent fit-up: gaps over 0.020″ change bead shape; clamp or tack every 2–3 inches.
- Dirty surfaces: oil or mill scale makes dull, discolored beads; clean with acetone and a wire brush.
- Torch wear or wrong gas flow: replace cups regularly and set argon at 15–20 CFH for TIG.
Real-world example: a contractor ran parts with a 0.030″ root gap and got undercut; after switching to 0.010″ gaps and adding a single run tack at each end, bead uniformity improved dramatically.
When you’ll still need a human:
- Complex visual blending on curved art pieces often needs a hand finish because small hand-file and sanding strokes are visible and subjective.
- Occasional touch-ups: humans remove tiny heat tint or feather transitions with file and polish.
Real-world example: a fabricator making custom kitchen backsplashes used robots for all layout welds but had an artisan blend seams by hand for brushed patterns — the robot did 95% of the work and the artisan spent 10–15 minutes per part.
Bottom line: if you control joint fit-up, program travel speed and pulse, and plan light hand finishing for tricky areas, your robotic TIG will deliver visual results that match hand welds.


