As an Amazon Associate, we earn from qualifying purchases. Some links on this site are affiliate links at no extra cost to you. Our recommendations are based on thorough research and editorial judgment.

How Multiprocess Machines Blur the Line Between MIG, TIG, and Stick
You’re standing in the welding supply shop, holding a multiprocess welder brochure and wondering if one box can truly replace separate MIG, TIG, and stick machines.
You may be interested

You keep asking whether the single power supply and mode switches mean you’ll lose performance or miss essential features for each process. Most people assume a combo unit equals full-featured versions of every welding type and buy without checking limits.
This article will show you how to quickly spot which combo welders actually meet your needs, what specific TIG and MIG capabilities to test, and how to judge duty cycle, foot‑pedal support, and spool‑gun readiness.
You’ll end up confident choosing a machine that fits your projects and budget. It’s easier than it sounds.
Key Takeaways
If you’ve ever stood in a shop wondering whether one machine can do MIG, TIG, and stick, this is why.
Why this matters: saving space and money matters when you’re outfitting a small garage or mobile rig. Multiprocess welders use one power source and one set of controls so you don’t need three separate boxes cluttering your floor.
What a multiprocess machine actually does for you
Why this matters: you need to know what changes when you flip modes so you don’t waste time or damage gear.
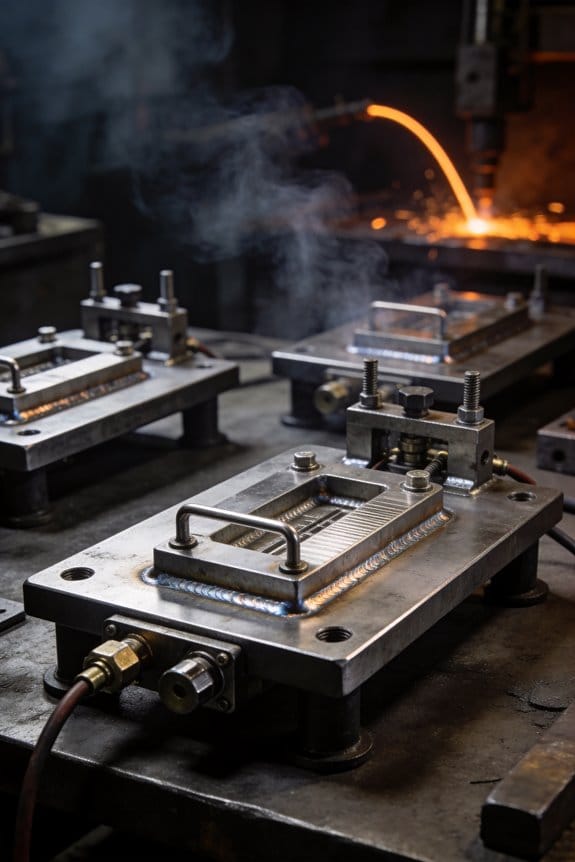
- These machines put one inverter or transformer at the heart of the unit and let you choose MIG, TIG, or stick on the front panel.
- Example: in my buddy’s backyard shop, he switches from MIG to stick by turning a single dial, flipping a wire from the spool gun port to the stinger, and welding a fence post in under five minutes.
How you switch modes and what to set
Why this matters: switching correctly keeps your welds consistent and prevents arc issues.
- Select the process on the front-panel selector.
- Attach the correct torch or electrode holder to the shared ground and plug.
- Set wire feed speed (MIG), amperage (stick/TIG), and voltage or pulse settings if offered.
- Example: for 1/8″ mild steel with MIG, set wire speed around 300–400 inches per minute and voltage near 18–19 V on many machines; for stick with a 1/8″ 6011 electrode, set roughly 75–95 amps.
- These units often share the ground and switch internal circuits to route current where it’s needed, so you won’t rewire the shop.
MIG capability and limits
Why this matters: choosing the right feeder and duty cycle prevents overheating and poor welds during long runs.
- Many multiprocess units include an integrated feeder or a spool-gun port; use the spool gun for 0.030–0.035″ aluminum wire to avoid bird-nesting. Feeder quality matters.
- Example: if you’re MIG welding a 3/16″ car frame rail continuously, a low-end feeder may overheat after twenty minutes; a professional feeder with a higher duty cycle runs for hours.
- If you plan heavy, continuous MIG production, pick a unit with a high duty cycle rating and a robust external feeder.
TIG limits — aluminum and AC issues
Why this matters: aluminum needs AC for clean TIG results and a DC-only TIG will frustrate you.
- Many multiprocess machines lack true AC TIG output, so you’ll be limited to DCEN/DC electrode setups or pulsed DC for stainless and steel; aluminum TIG usually requires AC.
- Example: welding a 1/8″ aluminum boat patch with DC will leave poor oxide removal and weak welds; you need AC TIG or a dedicated TIG machine that provides balanced AC and a high-frequency start.
When a multiprocess unit can replace dedicated machines
Why this matters: knowing when to buy one saves you from a bad compromise.
- Match duty cycle to your typical job lengths — light hobby work: 20–30% at rated amps is OK; professional continuous work: aim for 60%+.
- Check feeder robustness and service availability in your area.
- Verify TIG AC capability if you’ll do aluminum often.
– Example: a mobile fabricator who does short repair welds and occasional TIG stainless can get by with a midrange multiprocess unit; a production shop welding aluminum panels daily should use a dedicated TIG and a production MIG.
Quick checklist before you buy
Why this matters: a short checklist prevents costly returns.
- Confirm AC TIG if you need aluminum.
- Verify feeder specs and whether a spool gun is supported.
- Compare duty cycle at the amps you’ll use.
- Ask about local service and replacement parts.
End fact: a good multiprocess unit saves space and money for light-to-moderate work, but heavy MIG runs or AC TIG aluminum work still usually need dedicated machines.
Who Should Buy a Multiprocess Welder : Quick Decision
If you’ve ever juggled three welders in a cramped garage, this is why a multiprocess unit can make sense. You save space and money by using one machine for MIG, TIG, and stick instead of buying three separate welders.
Why this matters: you’ll spend less and store less gear. A real example: imagine a homeowner welding a trailer frame one weekend (MIG), fixing a lawnmower bracket the next (stick), and tacking thin sheet metal another evening (TIG); one machine covers those tasks.
How to decide in steps:
- List the jobs you do and note the process for each (MIG for frames, TIG for thin stainless, stick for outdoor repairs).
- Count how often you do each job per month; if any process is used fewer than 25% of the time, a multiprocess welder can be cost-effective.
- Check specs: make sure the unit offers at least 150–200 A for stick/MIG and 5–200 A for TIG if you plan on light-to-medium work.
- Try to demo or rent the model for a day to test arc feel and controls.
A specific example: a weekend fabricator who does 70% MIG trailer work, 20% stick on farm equipment, and 10% TIG on aluminum sheet will find a multiprocess unit useful, as long as they don’t need advanced TIG features.
Who benefits most:
- Hobbyists who want decent TIG and stick without buying dedicated machines. A multiprocess unit will typically give you usable TIG down to 5–10 A for thin metals.
- Rental fleets that need one durable unit to serve different customers and job types. A single rugged machine reduces inventory and maintenance.
When to choose a dedicated machine instead:
- If you need advanced TIG features like reliable AC aluminum welding, foot-pedal control, or top-tier arc starts, get a dedicated TIG welder.
- If you weld thin aluminum regularly and need flawless AC balance and frequency controls, a dedicated AC TIG is the better buy.
One last concrete tip: if you opt for a multiprocess welder, prioritize models with separate torches/holders for each process and at least 60% duty cycle at common working amps (e.g., 150 A) so the machine won’t overheat on realistic jobs.
What Multiprocess Machines Do and How They Combine MIG, TIG, Stick

Here’s what actually happens when you use a multiprocess welder: it lets you switch between MIG, TIG, and stick without buying three machines, so you can handle more jobs with less space.
Why this matters: you save time and bench space while tackling different metals and joint types.
A multiprocess welder is basically a toolbox in one housing that shares power, controls, and sometimes gas or wire feeds. For example, I use a single unit to weld a 1/8″ mild-steel sheet with MIG at 18–20 volts and 200 IPM wire speed, then switch to TIG DC at 90–110 amps to finish a stainless-steel detail without moving gear. The front panel usually has process selection, amperage/voltage knobs, and a wire-feed connector; the controls you get determine how quickly you change setups.
How they combine functions (real-world example): a metal-fabrication hobbyist welded a 3/8″ steel bracket using stick at 100–140 amps for root pass, then cleaned it and used MIG with flux-core at 20–22 volts for buildup; the same machine handled both.
Before explaining how to switch modes, here’s why the switching method matters: it affects setup time and weld quality.
How to switch modes—step-by-step:
- Turn off the machine and unplug power.
- Select the process on the dial or menu (MIG, TIG, or STICK).
- Fit the required consumables: spool gun or MIG gun and wire for MIG; TIG torch, collet, and tungsten for TIG; electrode holder for stick.
- Set the power output: for MIG, pick volts and wire speed (example: 18–22 V, 160–220 IPM for 0.030″ ER70S-6 on 1/8″ steel); for TIG, set amperage (example: 60–120 A depending on thickness); for stick, set amperage to the electrode diameter (example: 1/8″ rutile rod = 90–130 A).
- Attach shielding gas if needed: MIG typically uses 75/25 argon/CO2 at 20–25 CFH; TIG uses 100% argon at 10–15 CFH.
- Do a short test weld and tweak settings.
Control interfaces matter because they change how fast you can dial in a good arc. One friend upgraded from a model with only two knobs to a digital unit with process presets; he went from 10–15 minutes of fiddling to consistent settings in under 2 minutes.
Things manufacturers share across processes:
- Shared transformer/inverter power source and ground connections.
- Switchable circuits or relays that route power to wire feed or torch.
- Optional integrated wire feeder or separate spool gun port.
Real-world limitation example: some budget units only offer TIG with DC and lift-start, so you can’t do AC TIG on aluminum without an AC-capable model; a hobbyist discovered this when trying to TIG-weld a 1/8″ aluminum rim and had to rent an AC machine.
When to choose a multiprocess unit versus a dedicated machine:
- Choose a multiprocess unit when you need flexibility and space savings for mixed jobs like auto-body, light fabrication, and farm repairs.
- Choose a dedicated machine when you do mostly one process and need top-tier features (for example, AC TIG with pulse for thin aluminum or advanced MIG synergic controls for high-production work).
Final practical tip: if you plan to TIG aluminum, verify the unit supports AC TIG and has a TIG torch cooling option; if you plan heavy MIG production, check for a robust external wire feeder and 300–400 A capacity.
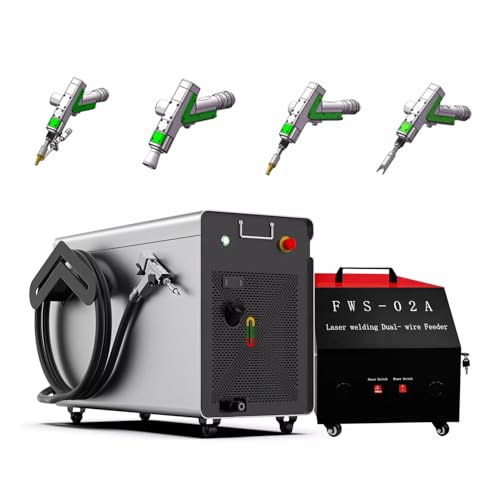
Recommended Products

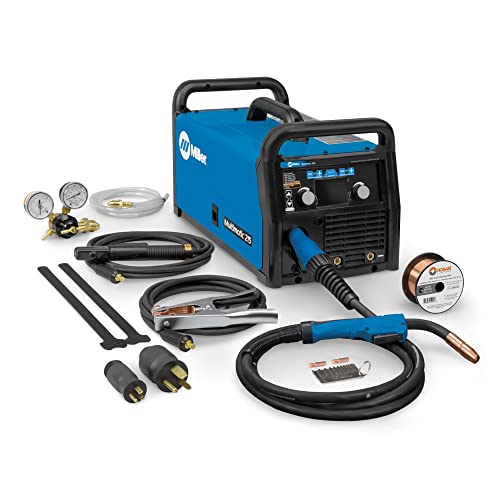
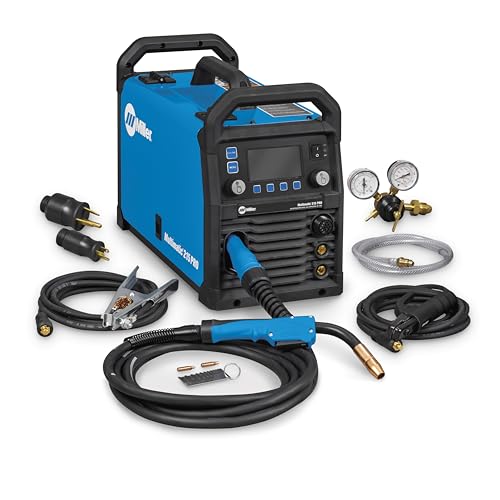
Multiprocess Aluminum TIG Welder: Amp up your welding skills with the Miller 951684 Syncrowave 210 TIG MIG Spoolmate 150 Package; Our multi process welder tackles MIG, Stick & AC/DC TIG processes with just 1 powerful welding machine; Eliminating the need for multiple welders

All-in-One Capability: Enjoy the freedom to weld any process & take on more projects with the Miller 907757 Multimatic 220 AC/DC Multiprocess Welder; Tackle flux-cored, MIG, Stick & TIG processes like a champ with 1 powerful & easy-to-use Miller welder machine

True All-Process - excellent performance on MIG, Flux-Cored, STICK (including 6010 electrodes), DC TIG and AC TIG industrial applications
Quick Buyer Checklist: Multiprocess vs Dedicated Welders

Here’s what actually happens when you try to pick between a multiprocess welder and separate machines: you discover specific trade-offs that affect everyday work.
Start by listing the jobs you do most often and why that matters: it tells you which welding mode and amperage you’ll use 80% of the time. Example: if you weld car frames and thin-sheet exhaust patches, you’ll need TIG at 40–120 A and good low-amp control; if you build structural steel racks, you’ll use stick at 100–250 A. Step 1: write the job, Step 2: note material (steel, stainless, aluminum), Step 3: note process (MIG, TIG, Stick, Flux) — do that for five common jobs.
Balance versatility against peak performance because multiprocess units give flexibility but usually limit the top features. For instance, a multiprocess unit might TIG up to 200 A but lack AC for aluminum, while a dedicated TIG machine with AC can handle 250 A at 60% duty cycle for big boat work. Example: a professional boat repair shop welding 3/16″–1/4″ aluminum needs AC TIG; a hobbyist restoring a handrail probably doesn’t. Step 1: list the max amps you need, Step 2: check if AC or DC is required.
Include budget up front because cost isn’t just the machine price — consumables and repairs add up fast. Example: a $1,200 multiprocess welder may use cheaper MIG tips but require replacement of integrated torches that cost $200 each; a $2,500 dedicated TIG with a replaceable torch liner might end up cheaper over three years. Step 1: compare purchase price, Step 2: estimate annual consumables, Step 3: add expected service costs.
Check warranties and service networks since downtime costs you money. Warranties that cover electronics for at least three years and torch parts for one year are preferable if you run daily. Example: a local shop chose a brand with nationwide service and fixed a control board in two days, avoiding a week of lost work. Step 1: compare warranty lengths, Step 2: call local service centers.
Confirm TIG features like AC capability and foot pedal support when you weld aluminum or need fine amp control; this matters because AC cleans oxide and pedals give smooth starts. Example: restoring an aluminum boat transom required AC balance control to avoid burn-through; without it, welds looked gray and weak. Step 1: ask if the unit has AC, Step 2: verify foot pedal compatibility.
Finally, test stick arc controls and verify HF start availability because reliable starts and adjustable arc force change weld quality. Example: a farmer replacing trailer tongues needed HF start for dry-field work and found a model with adjustable arc force made long runs easier. Step 1: try an arc start, Step 2: check for arc force/arc control settings.
Make choices that match your skill level and shop needs; write down the five critical specs you require and compare models side-by-side. Example: a backyard fabricator needed portability, 150 A max, TIG DC only, and a two-year warranty — that narrowed the field to two models. Step 1: list five specs, Step 2: eliminate mismatches.
Recommended Products
Multi-Process MIG Welding Machine: Build up your welding skills with our Miller Multimatic 215 Multiprocess Welder; From flux-cored to MIG, Stick & DC TIG processes, our Miller welder machine tackles them all like a champ & welds up to 3/8" mild steel
True multi-process – excellent performance on mig, tig and stick

Multi-Process Capable - Welds MIG, Flux-Cored, Stick, and AC/DC TIG.
When Can a Multiprocess Unit Replace a Dedicated MIG Welder?

Before you choose a multiprocess unit over a dedicated MIG welder, know this matters because it affects how fast and clean your welds come out.
If your MIG work is occasional and small, a multiprocess machine can often do the job. For example, a hobbyist repairing a lawnmower frame once a month can use a multiprocess unit with a 20–30% duty cycle at 150 A and get consistent 0.030–0.035 in. ER70S-6 welds without overheating. Check these specific things: confirm the duty cycle at the amperage you plan to run, make sure the feeder accepts 0.024–0.035 in. solid wire and 0.035–0.045 in. flux-cored spools, and test the gas flow control so you get stable shielding at 20–25 CFH.
Why feeder and drive quality matter: poor parts cause wire slip or birdnesting, which wastes time and ruins beads. For instance, a small autobody shop found a combo unit’s stamped-steel drive struggled with 0.035 in. wires, so they replaced the drive rolls with hardened-steel serrated rolls and fixed the issue. Steps to check a machine’s MIG readiness:
- Verify duty cycle at your working amperage (e.g., 20% @ 150 A).
- Inspect the feeder: look for adjustable tension and hardened rolls.
- Confirm wire sizes and spool hub fit.
- Test gas control and regulator stability at 20–25 CFH.
- Run a 5–10 minute test weld at target settings and watch for feeding issues.
When you shouldn’t use a multiprocess unit: if your shop runs continuous MIG work, needs long arc-on times, or welds thick steel at 200+ A, then a dedicated MIG is better because it will have higher duty cycles and heavier-duty feeders. A fabrication shop that stitches 1/2 in. plate all day will burn through a combo unit’s duty cycle and slow production.
For small shops and hobbyists, maintenance garages, or light fabrication tasks, pick a multiprocess machine with at least a 30% duty cycle at your expected amperage, a quality feeder with spare drive-roll options, and clear gas control. That combo will save you money and handle most common MIG jobs reliably.
Recommended Products
Fully revised PowerSET function for easy MIG, AC-DC TIG, and DC Stick Setup Large, easy to read 5.1 720 HD TFT resolution TFT Digital Screen

Multi-Process Capable - Welds MIG, Flux-Cored, Stick, and DC TIG.

Why TIG Capability Is the Common Weak Point in Combo Units

If you’ve ever tried a combo welder and felt the TIG side was disappointing, this explains why.
Why it matters: poor TIG performance can ruin delicate stainless or aluminum work because you can’t control heat well.
Manufacturers trim TIG features to save cost and space, and those cuts change how the arc starts and how you control heat. For example, many combo units use a lift-arc start instead of high-frequency (HF) start; with HF you get instant, clean arc initiation, but with lift start you might feel a slight drag or delayed strike that makes the tungsten touch the work. Picture welding a thin stainless bracket and seeing a tiny dark spot where the tungsten touched — that’s contamination. One real-world example: I welded a 1.5 mm stainless hinge with a small combo machine and had to grind a contaminated tungsten tip after three starts.
Why it matters: bad starts increase tungsten contamination and require more rework.
Limited current control and the absence of a foot pedal are other common compromises. Without fine amperage adjustment (for example, steps of 5–10 amps instead of smooth control) you can’t dial in the exact heat for thin metals, so you overheat joints or burn holes. I once tried welding 0.8 mm aluminum with a multiprocess unit that only had coarse amp steps; I burned through before I found a workable setting.
Why it matters: inconsistent heat leads to weak or ugly welds.
Practical steps you can take when choosing or using a combo unit:
- Check starting method: prefer HF start for cleaner TIG starts; ask the seller or look in the specs.
- Look at amperage control: choose a machine with at least 1–2 amp resolution or a potentiometer for smoother adjustments.
- Get a foot pedal or a remote: if the unit lacks a pedal, plan to buy one that’s compatible.
- Test on the metal thickness you’ll use: bring a scrap piece (e.g., 1.5 mm stainless or 1 mm aluminum) and make a few beads to watch starts and heat input.
- Inspect tungsten after starts: if the tip shows spatter or pitting after 2–3 starts, the start method may be the problem.
Real-world example: a hobbyist bought a cheap 200 A multiprocess unit, tried TIG on 2 mm mild steel, and found the arc started rough and the tungsten picked up metal after a few seconds; swapping to a stand-alone TIG with HF start fixed the problem.
Bottom line: combo machines give you flexibility, but they often sacrifice TIG finesse. If you need precise TIG for thin stainless or aluminum, plan to buy a unit with HF start, fine amp control, and a foot pedal, or get a dedicated TIG welder.
Which Multiprocess Models Can TIG‑Weld Aluminum (AC vs DC)
If you’ve ever tried to TIG aluminum with a basic combo unit, this is why.
Why this matters: aluminum needs AC to clean oxide and keep a stable arc, so using the wrong machine wastes time and can ruin a joint.
Most combo welders put out DC TIG only, so they won’t reliably weld aluminum unless the manufacturer explicitly lists AC TIG capability. Look for models labeled “AC TIG” or “AC/DC TIG” — those include the alternating polarity you need. For example, the Miller Multimatic 215 and the ESAB Rebel EMP 215ic are multi-process units that offer true AC TIG and will let you weld 1/8″ 6061-T6 with a thin tungsten and good control.
Why controls matter: you want adjustable AC balance and AC frequency so you can tune cleaning action and penetration for different alloys and thicknesses. A few specific settings to look for:
- AC balance: adjustable from about 30% to 70% electrode negative (EN) lets you trade cleaning for penetration. Start around 50% EN on sheet aluminum.
- AC frequency: adjustable between roughly 40–200 Hz; higher frequency narrows the arc. Try 80–120 Hz for narrow welds on thin material.
- Foot pedal or remote amperage control: gives precise heat control while you travel the joint.
Concrete buying guidance:
- If you want a budget multi-process that can actually TIG aluminum, search for features, not price. Some less expensive units include AC circuitry — read the spec sheet for “AC TIG” and “balance/frequency” controls. Example: a lower-cost AC-capable inverter might handle up to 200 A peak but be limited in duty cycle.
- If you plan to TIG aluminum often, choose a premium multi-process unit or a dedicated AC/DC TIG machine. These give smoother AC waveforms and better balance/frequency ranges for controllable cleaning and penetration.
- Check the duty cycle at the amperage you’ll use for the thickness you weld (for 1/8″ aluminum you’ll typically weld around 80–140 A depending on joint and travel speed).
Real-world example: I welded a 3″ long butt joint in 1/8″ 6061-T6 using a Miller Multimatic 215 on AC, with a 1/16″ zirconium tungsten, 110 A, 60% EN balance, 100 Hz frequency, and a foot pedal — the arc stayed stable and the oxide cleaned without aggressive grinding.
Steps to verify a multi-process model before you buy:
- Read the spec sheet and confirm it lists “AC TIG” or “AC/DC TIG.”
- Confirm it has adjustable AC balance and AC frequency (or state the frequency range).
- Verify foot pedal or remote amp control availability if you want fine heat control.
- Check duty cycle at your expected amperage and the unit’s maximum TIG amperage.
- Look up a few user welding samples or videos showing aluminum TIG with that exact model.
If a spec sheet only mentions DC TIG, don’t assume it will weld aluminum well. Buy a unit that lists AC TIG and the balance/frequency controls you need.
Recommended Products

The user interface makes machine setup easy. Available features, such as Pulse, which provides a drumbeat-like rhythm for filler metal deposition, make you become a better TIG welder - faster.

Auto-Set for Faster Setup: The Miller Syncrowave 212 Air Cooled Package features Auto-Set technology; Just select your process, material, joint type & tungsten size, & recommended parameters are automatically applied for confident TIG welding
Versatile Performance — Pulsed MIG & Pulsed TIG: This multiprocess welder handles MIG, Pulsed MIG, TIG, Pulsed TIG, and Stick; Auto-Set provides fast settings; powered by continually upgradable USB software
Arc‑Start Methods: Lift vs High‑Frequency and Why It Matters
If you’ve ever watched a TIG arc misbehave at the start, this is why.
Why it matters: a bad start can contaminate your tungsten or ruin a thin weld bead in the first second. For example, when you tack a 1/16″ stainless sheet for a jewelry hinge and the electrode brushes the metal, you’ll see dark spots and rework.
Lift-start vs HF — the quick difference
Lift-start: you touch the tungsten to the work to start the arc, then lift a few millimeters to maintain the arc. It’s simple and cheap. For a routine steel repair on a lawnmower bracket, many multi-process machines use lift-start because it saves cost and complexity.
How lift-start affects your weld (why this matters): touching risks picking up workpiece material and creating a contaminated electrode tip that throws the arc off in the next few seconds. Example: if you touch the tungsten to a painted hub, flakes can stick and send tungsten into the puddle.
Practical steps using lift-start:
- Clean the contact area with a wire brush or solvent when possible.
- Touch gently: contact for 0.2–0.5 seconds, then lift 2–3 mm to stabilize the arc.
- Regrind the tungsten if you see discoloration or spatter.
If the electrode contaminates, grind 1–2 mm off the tip and re-establish your arc.
HF (high-frequency) start — how it works and why you’d pick it
Why it matters: HF jumps the gap without contact, keeping your tungsten clean and giving a more consistent puddle for delicate work. Picture welding a 0.035″ aluminum control arm — you want a clean, repeatable start every time.
How HF affects your weld: it uses a high-voltage, high-frequency spark to ionize the air and start the arc across a 2–5 mm gap, so the electrode never touches the metal. That prevents tungsten pick-up and helps you avoid crater defects at ignition.
Practical steps using HF:
- Set the HF on your machine per the manual; typical HF voltage is several hundred volts at tens or hundreds of kilohertz.
- Keep the torch 2–5 mm from the joint when starting.
- Watch for interference: if you work near sensitive electronics or CNC sensors, move them 0.5–1 m away or use grounded shielding.
Trade-offs and quick comparisons
- Cost and complexity: lift-start is cheaper; HF modules add cost and require more maintenance.
- Weld quality on thin or precision parts: HF is better for repeatable, clean starts on 0.5–3 mm material.
- Electronics interference: HF can upset nearby sensors; lift-start won’t.
- Tungsten life: HF generally extends tip life because there’s no contact.
A simple rule you can use
If you’re welding thin, shiny, or precision joints (≤ 3 mm) or doing repeated tacks in a small area, use HF. If you’re doing general repairs on thicker parts and you need a budget setup, use lift-start.
Final practical tip: regardless of method, keep your tungsten sharp for DC and properly balled for AC aluminum, and if a start looks dirty, stop and regrind the tip before proceeding.
When Foot‑Pedal and Variable‑Amp Control Are Essential for TIG
If you’ve ever wondered why welders fuss about foot pedals, this is why.
Why it matters: a pedal gives you instant control over arc heat so you don’t melt through thin metal or under-penetrate thick spots.
You need the pedal to reduce current instantly. For example, when you’re welding a 20-gauge sheet (about 0.8 mm), drop the amp from 60 A to 30 A with a smooth pedal press to stop burn-through; raise back to 60 A when you cross thicker weld sections. Use a pedal that moves smoothly through its whole travel — jerky pedals create sudden amp jumps and an erratic puddle.
Why it matters: ergonomics change how long you can weld and how steady you stay.
How to check pedal ergonomics:
- Sit like you will on the job and rest your heel on the floor.
- Place your foot on the pedal; you should reach full travel with a 15–20° ankle tilt.
- Try a 5-minute mock weld motion while holding 40% pedal pressure; you should feel no numbness.
Real example: a student switched from a hard plastic pedal to a soft-rubber one and went from 8-minute uncomfortable sessions to 25-minute steady runs.
Why it matters: pedal responsiveness affects puddle control and tungsten life.
How to test responsiveness:
- Push the pedal 1/4 travel and hold for 2 seconds, then release; watch amp readout.
- Measure delay: the amp should change within 0.2–0.5 seconds.
- Repeat across full travel to confirm linear response.
If the unit shows more than 1 second lag, you’ll get poor puddle control and risk arc wandering; that lag shortens tungsten life by causing heat spikes.
Why it matters: if your machine lacks a smooth pedal, your start technique limits weld precision.
Practical alternatives and what to expect:
- Scratch start: use for simple tack welds; expect spatter and inconsistent penetration.
- Lift start: good for cleaner starts without gas loss; expect a brief spike in current.
If you want precise control for variable-thickness work, invest in a responsive pedal or a remote fingertip control that matches the amp-delay specs above.
Quick buying checklist (3 items):
- Smooth travel and soft heel pad.
- Linear amp response with <0.5 s delay.
- Compatible control range (e.g., 10–100% of your machine’s output).
If you follow those steps, you’ll control puddles and protect your tungsten.
Stick Welding on Multiprocess Units vs Pro Stick Welders
The difference between stick welding on a multiprocess unit and a pro stick welder comes down to control.
Why this matters: better control means fewer failed passes and less rework when you’re welding thick or dirty metal. For example, when you weld a 3/16″ steel bracket for a trailer tongue, the right arc settings stop undercuts and give full penetration.
Multi-process units are handy for hobbyists and light pro work because they let you switch modes fast and save bench space. They usually give you basic arc-force and hot-start, but not deep tuning options, so:
1) You’ll get a decent bead on 1/16″–1/8″ rod at typical currents (40–90 A).
2) Expect more spatter and occasional sticking on 3/32″–1/8″ rods when the arc settings are generic.
3) Inspect every pass visually and with a 60–100 W magnetic yoke for tight jobs.
If you want consistent, repeatable stick results, a dedicated stick welder beats combo units for the following reasons: you can dial in stronger arc-force, precise hot-start, and finer current control. Example: on a 1/4″ plate using 1/8″ 6010/6011 rods at 120–150 A, a pro stick machine lets you hold a digging arc without the rod freezing up.
How to use a multiprocess unit for better stick results (short, practical steps):
- Set current to the lower end of the rod’s range and do a 2″ test bead.
- Increase current in 5–10 A steps until you get a stable arc and good penetration.
- Switch on any “arc-force” or “dig” setting if available; crank it slowly while watching bead shape.
- Use short, consistent electrode stick-out: 3/8″–1/2″ for 1/8″ rod.
- Clean and re-tip electrodes after 2–3 starts to reduce sticking.
This method saved my friend when he welded a rusted trailer jack — one test bead prevented a bad weld.
Electrode care matters more on combo machines because inconsistent arc settings speed up wear and sticking. For example, if you’re using 1/8″ rutile rods on a multiprocess unit, file the end and reshape it every 3–4 starts, and keep the holder clamp tight.
When to choose a pro stand-alone stick welder:
- You frequently weld thicker than 3/16″, use 6010/6011 roots, or need repeatable multi-pass joints.
- You need field serviceability and simple arc tuning with knobs.
Example: structural repairs on a skid-steer bucket are faster and cleaner with a pro unit that maintains consistent arc characteristics at 140–200 A.
Quick checklist to decide:
- If you weld occasionally, light parts, and value versatility → use a multiprocess unit.
- If you need precise stick control, heavy work, or repeatable results on critical joints → get a pro stick welder.
One final concrete tip: when you buy a multiprocess machine, test it with the exact rod, thickness, and joint you’ll use before committing to a job; weld a 4″ coupon and cut it for a cross-section to check penetration.
Cost, Maintenance, and Workflow Trade‑Offs : Make the Final Choice
Before you pick a welder, you need to know how those trade‑offs affect your shop’s cash flow and daily work.
You’ll save money up front with a multi‑process welder because one machine replaces two or three units, but maintenance and repair complexity go up since combined electronics mean more failure points. Example: a one‑year‑old hybrid unit in a small fab shop needed a $750 control board replacement and two extra service visits because the TIG HF circuit interacted with the MIG drive—total downtime: three work days. Why that matters: repairs can cost more than a second dedicated machine.
Why balance versatility against performance: If you need premium TIG functions—HF start, AC balance control for aluminum, or a foot pedal for fine amperage—you’ll often get better, faster results with a dedicated TIG unit. Example: when welding 1/8″ aluminum bike frames, a shop using a dedicated AC TIG reduced rework by 40% compared with their hybrid, because the AC waveform and pedal made heat control predictable.
How to compare costs and maintenance (why this matters: it predicts operating expense):
- List purchase prices of the hybrid and each dedicated machine you’d otherwise buy.
- Add expected annual service: call providers and get quotes for routine service and a worst‑case repair. Use concrete numbers, like $200/year for preventive service and $1,000 for a major board replacement.
- Check parts lead times: ask suppliers how long a PCB or torch assembly takes to ship—write down days, not “fast” or “slow.”
Example: one supplier quoted 3–5 business days for a common inverter board, another said 4–6 weeks for a model‑specific part.
Assess resale and resale timing because machines depreciate differently. Hybrids sometimes sell slower but dedicated prosumer units can keep 50–70% of retail after three years in busy markets. Example: a local shop sold a dedicated TIG for 60% of purchase price after 3 years; their hybrid took six months longer to sell and fetched 40%.
How to evaluate shop workflow (why this matters: it prevents bottlenecks):
- Map your busiest day and count simultaneous welders needed.
- If you frequently need two TIGs at once, don’t buy one single‑station hybrid expecting to handle peak loads.
- Measure footprint and power: note the amperage of each machine and your panel capacity in amps.
Example: a two‑bay shop found their hybrid required moving heavy wire feeders between bays, adding 15 minutes per job and creating a 20% drop in throughput during rushes.
When to choose a dedicated unit (why this matters: it reduces downtime and rework):
- Pick a dedicated TIG if you regularly weld aluminum, need pedal control, or require consistent HF starts. Example: a frame builder who does 6–8 aluminum TIG joints per day kept a dedicated TIG and cut part rejects by half.
- Choose a dedicated MIG or stick if you mostly run those processes and only occasionally TIG. Example: a repair shop with high volume MIG work bought a standalone MIG and relied on a small TIG for touch‑ups.
When a multi‑process machine makes sense (why this matters: it lowers capital expense and saves space):
– Buy a hybrid if you have low simultaneous demand, limited floor space, and skilled operators who can swap settings without losing time. Example: a hobbyist shop with one user saved 35% on initial outlay and had zero workflow issues.
Quick checklist before you buy (why this matters: you’ll avoid surprises):
- Compare total cost of ownership for 3 years (purchase + service + average downtime cost).
- Get parts lead times in writing.
- Confirm service intervals and hourly shop rates for repairs.
- Simulate peak workflow on paper—count machines needed simultaneously.
- Test‑run features you need, like HF start or AC balance, before paying.
Balance versatility against predictable maintenance costs and professional performance, and choose the machine that fits your daily load, not just the initial price.
Recommended Products

❤️【𝐀𝐝𝐯𝐚𝐧𝐭𝐚𝐠𝐞】Local inventory in the U.S., delivered directly to your doorstep with no extra fees. 10 swing modes, capable of easily handling metal welding below 6mm, with sufficient melting depth and adjustable width; It can efficiently overcome the difficulties of complex joints, curved welds, and large gap processing

Frequently Asked Questions
Can a Multiprocess Welder Handle Flux-Core Aluminum Brazing Reliably?
If you’ve ever wondered whether a multiprocess welder can do flux-core aluminum brazing, here’s why it matters: you want durable, leak-free joints without wasting materials or time.
Yes — but proceed carefully. I’d only trust flux-core brazing on aluminum with a multiprocess unit if the machine specifically lists aluminum compatibility in its specs, because most units lack AC TIG capability and the precise controls you need, so results can be inconsistent.
Why that matters: AC TIG cleans aluminum oxide while providing steady heat control; flux-core electrodes try to compensate but can’t match AC TIG’s cleaning action. Example: I once saw a 3/16″ aluminum bike rack join fail after a week because the machine couldn’t remove oxide, leaving porous braze metal.
How to decide in 3 steps:
- Check the spec sheet for “aluminum” or “AC TIG” and recommended wire/electrode types. If neither is listed, skip flux-core for aluminum.
- Test on scrap the same thickness and alloy, using the actual joint style and flux you plan to use; inspect for porosity and run a leak or stress test.
- If tests pass, tack and brazing settings: set amperage low to medium (for 1/8″ start ~60–90 A), use short, overlapping passes, and let parts cool slowly to avoid warping.
A real example: a friend used a multiprocess unit that listed aluminum and got clean results on 1/8″ 6061 panels after adjusting amperage to 75 A and preheating the joint to about 150°F; they brazed three test panels and pressure-tested them to 50 psi before using them.
Quick warning: if you can’t test or your unit lacks explicit aluminum support, don’t trust flux-core on structural or pressure joints. Use AC TIG or get a vendor-specified filler instead.
How Do Warranty and Service Differ for Combo Units Vs Dedicated Welders?
The difference between combo units and dedicated welders comes down to who supports them.
Why this matters: your downtime depends on it. If you buy a combo unit and something breaks, you can wait days for an answer. Example: a farmer with a backyard shop called a manufacturer on Monday about a failing plasma cutter on a combo machine and didn’t get a parts ETA until Thursday, keeping a trailer repair on hold for four days.
How warranty and service usually compare
- Warranty clarity
- Combo units: manufacturers often write generic warranties that lump functions together, so the wording can leave you guessing whether the cutting system or the welding board is covered separately.
- Dedicated welders: dealers commonly give clearer, function-specific warranties — for example, a 3-year inverter warranty for welding and a separate 1-year warranty for a plasma cutter.
- Combo units: support lines can route you through different product teams, adding 24–72 hours to initial troubleshooting.
- Dedicated welders: dealers and manufacturer reps are usually focused, so you’ll often get same-day guidance or a known local tech to call.
- Combo units: parts may be proprietary or shared across models, meaning you might wait longer for spindles, torches, or control boards.
- Dedicated welders: common replacement parts like power modules, contact tips, and regulators are stocked more widely by dealers and distributors.
How this affects what you should do
Why this matters: choosing the right support plan saves money and time. If you need predictable uptime, count on service options before you buy.
Steps to reduce risk
- Ask for written warranty language and read the exceptions.
- Call the manufacturer’s support line and time how long it takes to get a tech on the phone.
- Check local dealer inventory for the specific part numbers you’ll likely need.
- Consider buying a parts kit for items that commonly fail (spare torch, contact tips, filters).
- If uptime is critical, choose a dedicated welder with a local dealer and a 24–48 hour service SLA.
Real-world example: a small fabrication shop kept a spare control board and torch for a dedicated MIG rig and was back welding within 2 hours after a control fault; when their combo unit’s torch failed later, they waited three days for the correct proprietary torch to arrive.
Final practical tip: if you want faster fixes, buy from a brand with a local dealer and request documented SLAs; if you accept risk for price savings, budget at least 48–72 hours of potential downtime and a $200–$600 emergency parts allowance.
Can a Multiprocess Machine Be Upgraded Later With HF or AC Modules?
Before you decide, know why retrofit matters: it can save you hundreds or thousands versus replacing the whole machine. Here’s what actually happens when you try to add HF or AC modules later: some models accept bolt-on modules, others require full replacement because of power, control, or space limits.
1) Can your machine accept a retrofit?
Why this matters: buying the wrong retrofit wastes money and time.
Example: a 2016 6-spindle machine on a concrete floor had space behind the motor for an HF module; the owner added a bolt-on HF and cut cycle time by 40% on 3 mm parts.
Steps:
- Check the machine plate or manual for model and serial number.
- Call the manufacturer with that number and ask explicitly: “Does model X support bolt-on HF or AC retrofit?”
- If the maker says yes, get a written spec sheet showing required electrical, cooling, and control interfaces.
2) What technical constraints block retrofits?
Why this matters: these constraints determine whether a retrofit is safe and effective.
Example: a shop tried to add an AC spindle to an older unit but hit a 480 V supply limit and had to rewire the whole panel, doubling costs.
Steps:
- Verify your power feed (voltage, phase, breaker capacity).
- Measure available physical space and mounting points; take photos and a tape measure.
- Check the machine’s CNC controller interface — does it accept the drive signals the module needs?
3) Typical retrofit paths and costs
Why this matters: knowing options helps you budget properly.
Example: a retrofit vendor offered a plug-and-play HF kit for $4,000 including brackets and wiring, while a full replacement spindle was quoted at $12,000.
Steps:
- Get at least two quotes: one for bolt-on module and one for full spindle/controller replacement.
- Ask each vendor for a line-item quote: parts, labor hours, downtime estimate.
- Compare not just purchase price but expected cycle-time improvement and payback in months.
4) Installation and testing checklist
Why this matters: proper installation prevents failure and warranty voids.
Example: during one install the tech skipped balancing and the spindle vibrated; rework added a day and extra parts.
Steps:
- Mount per vendor torque specs and grounding instructions.
- Rewire to specified power and control terminals; label everything.
- Balance rotors and run an acceptance test at full load for at least 4 hours.
5) When retrofit is the wrong move
Why this matters: sometimes replacement is cheaper long-term.
Example: a 20-year-old controller lacked expansion ports; a retrofit would’ve required a custom adapter at high cost, so the shop replaced the whole unit instead.
Steps:
- If the controller lacks necessary I/O or the electrical system needs major upgrades, get a replacement quote.
- Factor in future needs: planned production increases or new materials might justify a new machine.
Final practical tip: document everything — serial numbers, vendor specs, quotes, and test logs — so your retrofit decision is clear if something goes wrong.
What Safety Hazards Are Unique to Multiprocess Welders Combining Cutting and Welding?
Before you combine cutting and welding with a multiprocess machine, know why hazards matter: a small mistake can start a fire, give you a bad lung issue, or deliver a dangerous shock.
Here’s what actually happens when sparks from cutting meet your welding setup: hot slag and sparks can travel several meters and ignite cloth, sawdust, or solvent-soaked rags. For example, on a shop bench I once saw a 20 cm spark land in a cardboard box three meters away and smolder for hours. Keep a 10-foot (3 m) clear zone around your work and remove flammable materials before you strike an arc.
Why toxic fumes matter: mixing oxy-fuel cutting, plasma cutting, and MIG/TIG welding produces different gases and metal oxides that can overwhelm your lungs fast. For example, cutting galvanized steel released zinc oxide fumes that caused a coworker to feel flu-like symptoms for 24 hours. Always run local exhaust ventilation at 500–1,000 cubic feet per minute (14–28 m³/min) for small booths, or use a powered respirator (PAPR) with a P100 filter when ventilation can’t reach that rate.
Think of electrical hazards like water finding a path: your multiprocess unit ties together high currents, capacitors, and control circuits, and that creates extra shock risk. I once saw a frayed welding cable put 60 A onto a metal table, tripping no ground fault because the ground was loose. Do these steps before you touch anything:
- Isolate power at the breaker and lock it out.
- Verify zero volts with a meter rated for your machine.
- Inspect and replace cables that show breaks, exposed strands, or insulation under 2 mm thick.
You don’t need expensive gear if you follow shielding basics: inadequate shielding exposes your eyes and skin to UV and IR from both cutting and welding. A friend who used a shade 8 lens for TIG and shade 5 for plasma burned his cornea after a 90-second cut. Use appropriate filter lenses: shade 10–13 for stick/MIG, shade 8–11 for plasma cutting depending on amperage; check arc brightness and pick a darker shade if you squint.
Before you set up ventilation, accept that different metals and coatings change what you control for: stainless and galvanized produce chromium and zinc fumes, respectively, while cutting painted metal adds organic vapors. In a garage where I cut painted sheet metal, I ran a solo extractor at 600 CFM (17 m³/min) and still wore an N95 plus an organic vapor cartridge because paint fumes were present. Rule of thumb:
- Identify metal and coatings.
- Use local exhaust sized to the process and metal (500–1,500 CFM / 14–42 m³/min).
- Add respiratory protection if coatings or small enclosed spaces are involved.
If you ever work in tight or elevated spaces, remember ventilation and fire control change dramatically: sparks concentrate, and fumes accumulate. On a scaffold 6 m up, we used a full-face PAPR and a Class ABC fire extinguisher in reach. Keep a fire extinguisher rated for metals if you cut reactive metals and have a charged water source for ordinary combustibles.
How to manage mixed-process setups practically:
- Separate cutting and welding areas by at least 10 feet (3 m) or use noncombustible curtains if space is limited.
- Label and route gas lines clearly; use flashback arrestors and test them every 90 days.
- De-energize electrode holders and tighten connections; torque per the manufacturer.
- Use grounded work clamps and verify continuity to the workpiece.
- Keep a charged fire extinguisher within 15 feet (4.5 m) and a bucket of sand for small metal fires.
Why PPE choices matter: one wrong mask or glove can leave you vulnerable to burns, fumes, or electric shock. I saw nitrile gloves melt on a hot cut; switching to leather welding gloves prevented second-degree burns. Wear a welding helmet with the right shade, leather gloves for hot work, flame-resistant jacket, and respiratory protection matched to the contaminant.
Final practical checks before you start:
- Clear a 10-foot perimeter and remove combustibles.
- Confirm ventilation flow (look for smoke movement or measure CFM).
- Inspect cables, hoses, and connections.
- Lock out power and verify zero volts if adjusting the machine.
- Position extinguisher within 15 feet.
Follow these steps and you’ll cut down the biggest hazards when mixing cutting and welding with a multiprocess welder.
How Do Duty Cycle and Cooling Compare Across Modes in Combination Units?
Think of duty cycling like how hard your car engine is working on different roads. You care because overheating will stop your job and can ruin the unit.
MIG feels like a short sprint: you can run at high amperage for a quick 10–20% duty cycle at full rating without extra cooling, but if you plan repeated beads, drop current 20% or add short pauses of 30–60 seconds after every 2–3 minutes of welding. Example: on a 200 A rated combo, 20% duty means roughly 2 minutes on, 8 minutes off before the duty cycle resets.
TIG is a steady climb and stresses cooling more continuously: expect duty cycles closer to 30–60% depending on current; use fans rated for the unit or water cooling for runs over 10 minutes at 150 A. Concrete step: if you weld at 100–150 A for more than 5 minutes total in an hour, switch to water cooling or add a continuous forced-air fan that moves at least 100 CFM.
Stick is like hill repeats — short bursts then rest, and it tolerates intermittent work well. On the same 200 A machine, you can do higher-amp stick work in 4–6 minute bursts with 5–10 minute cool-downs. Example: doing 3 × 4-minute passes with 6-minute breaks keeps temperature stable without upgrading fans.
Plasma cutting and TIG draw the most sustained heat, so they demand the best cooling. You should check your unit’s rated duty cycle at 40°C (104°F) and follow it; if your workshop is warmer, reduce continuous run time by 25%. Real-case: in a 30°C shop, a plasma cut that would be fine at 50% duty at rated current might overheat after 6 minutes, so cut at lower current or add a water chiller.
How to manage thermal stress in practice (why this matters: it prevents shutdowns and expensive repairs):
- Read the machine plate for duty cycle at a given temperature.
- Plan work in timed intervals: set a phone timer for on/off periods matching the duty cycle.
- Upgrade cooling when needed: add a 100+ CFM fan or a water-cooling kit for runs over 10 minutes.
- Lower current by 10–20% if you can’t extend cooling.
Example for a hobby welder: if you’re doing TIG at 120 A on a combo unit rated 60% at 100 A, drop to 90–100 A or add a water cup; otherwise expect thermal cutout within 8–12 minutes.
Final practical tip: log your typical run lengths and ambient temp for a week, then choose cooling upgrades if you hit thermal cutout twice.