As an Amazon Associate, we earn from qualifying purchases. Some links on this site are affiliate links at no extra cost to you. Our recommendations are based on thorough research and editorial judgment.

Why Grinding Modes Keep Showing Up in Helmet Discussions
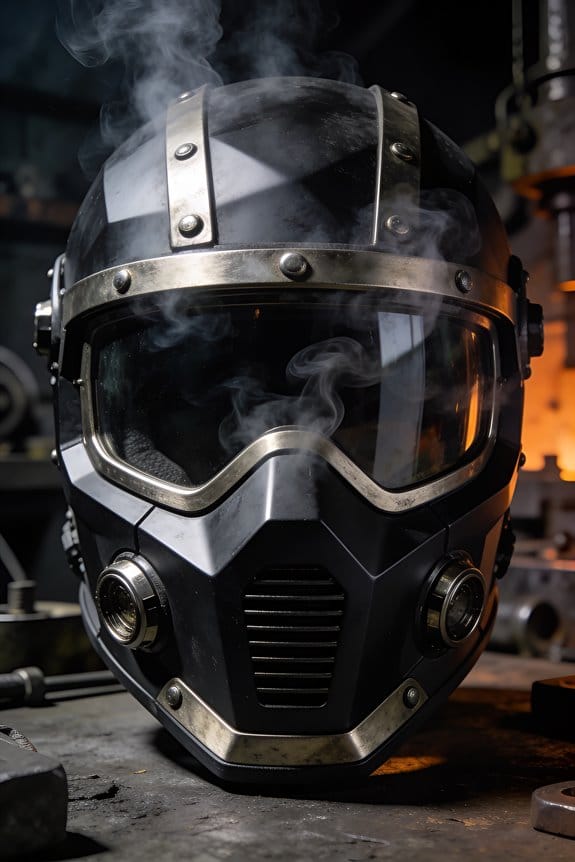
You’re standing over a workpiece, sparks flying, and your helmet keeps switching to dark while you’re trying to grind a weld—now you’re squinting or taking the hood off.
You may be interested


The exact problem: grind mode keeps showing up in helmet discussions, and you don’t know when to use it or how it actually helps on the shop floor.
Most people assume grind mode is just a convenience setting or they disable it entirely, missing its safety and productivity benefits.
This short piece will show when grind mode should be used, how it affects visibility and arc response, and the practical steps to switch safely so you avoid blackouts, reduce mistakes, and speed mixed weld–grind tasks.
You’ll learn what to set and when. It’s easier than it seems.
Key Takeaways
If you’ve ever been welding and then needed to grind, this is why.
Grind mode matters because it keeps your lens clear so you can see while still protecting your face; without it your ADF can darken at the wrong time and block your view. For example, when you’re cutting a weld joint and then grinding the bead, grind mode prevents the filter from auto-darkening every time a spark flies toward the sensor.
Why that matters: sparks and strobes can trigger the auto-darkening filter and stop you from seeing the work. In a shop I worked in, a coworker lost time every hour when his lens kept flashing dark from nearby cutting; switching to grind mode stopped those interruptions.
How to use grind mode — simple, concrete steps:
- Put on your helmet and gloves.
- Set the ADF to grind mode (often a button or a dial).
- Verify the lens stays light by creating a small, controlled spark away from the work.
- Grind while keeping the helmet down.
- Switch back to weld mode when you start striking an arc.
This usually takes 5–10 seconds to switch modes.
You’ll also want quick, glove-friendly controls and a flip-up visor so you can change modes without taking your helmet off. For example, pick a model with a large exterior button or a front dial; they work when you’re wearing thick leather gloves and save you fumbling.
Workers rely on grind mode to read layout marks and check gap sizes, which reduces mistakes and rework. Picture lining up a 1/16″ root gap: if your lens darkens mid-check, you’ll miss that tiny space and have to redo the joint.
One safety point you must follow: never grind while the ADF is set for welding. Sparks will often trigger the dark state and mask your view. In practice, always confirm the helmet reads “grind” before you touch the disc.
Quick Take: What Grind Mode Is and Why It Matters
Before you flip the helmet to grind, know why it matters: grind mode keeps the lens light so you can see while you work without removing protection.
Here’s what actually happens when you use grind mode: the auto-darkening filter stops reacting to sparks and stays at a light state, effectively turning the welding helmet into a face shield. For example, when you hand-grind a rusty flange on a farm tractor, grind mode lets you see the cutting line without the lens snapping dark from stray sparks. Keep the grind switch on only for grinding or setup; turn it off before striking an arc.
Why this matters: grind mode prevents accidental darkening that would slow you down or make you take the helmet off, which exposes your face. On a construction site, that means you won’t have to juggle a helmet and goggles while trying to line up a bolt — you keep head protection and your hands free.
How to pick a helmet with a useful grind feature:
- Check weld compatibility: read the manual to confirm the helmet supports the shade ranges you use (for example, shade 10–13 for MIG welding at 100–200 A). A helmet that limits shades may force you to switch gear.
- Verify separate grind and weld settings: make sure there’s a distinct grind mode or a manual override so sparks won’t trigger the ADF while you’re grinding.
- Look at battery type and life: choose lithium or solar-assisted batteries rated for hundreds of hours if you grind a lot; replaceable CR2450 cells are common.
Real-world example: a pipefitter replacing a gasket used a helmet with a clear grind setting and saved 20 minutes by not swapping face gear between grinding and fitting.
How to use grind mode safely:
- Switch to grind mode before you touch the grinder.
- Confirm the lens stays light and you have full peripheral view.
- Wear a respirator and hearing protection, because the helmet doesn’t protect those.
- Switch back to welding mode and test the ADF on a low-amperage strike before welding.
Example: at a vehicle restoration shop, an apprentice always checked the ADF response on a stick welder at 10 A after flipping from grind to weld; that simple test caught a dead battery before a hot job.
Maintenance steps to keep the ADF reliable:
- Clean lenses weekly with lens cleaner and a soft cloth to remove dust and grind residue.
- Inspect shells and sensors monthly for cracks or obstructions.
- Replace batteries when the low-battery indicator appears or every 12 months if you grind frequently.
- Store the helmet in a dry case to avoid moisture damage.
Concrete detail: scrape off glued-on grinding dust with a soft brush first, then use 70% isopropyl on a microfiber cloth to avoid scratches.
Quick reminders:
- Grind mode is for grinding and setup only.
- Always switch off grind mode before welding.
- Test the ADF response after switching back.
- Use the helmet as part of a full PPE set: respirator, ear protection, and gloves.
How Grind Mode Works : and How Fast You Can Switch

Here’s what actually happens when you switch to grind mode: it turns off the ADF so the lens stays at a low, steady shade and you get a clear view while still blocking sparks. This matters because if you can’t see the work you risk poor fit-up and wasted time; for example, when you chamfer a pipe bevel you need to see the joint edges clearly while sparks fly.
Grind mode basics and why you care
- Grind mode disables the auto-darkening filter and fixes the lens at a low shade, typically around #3, so you can inspect and grind without the lens darkening.
- Real-world example: when you quickly wheel-grind a tack weld on a steel flange, you want to keep the hood down and the lens usable for alignment; grind mode gives you that.
How helmets activate grind mode and what that means for you
- Some helmets use an external button or toggle, others have a flip-up visor, and a few use an internal switch behind the shell. Choose a helmet where the control matches how you work: if you often switch with gloves on, pick a large, tactile button.
- Real-world example: a welder who swaps between TIG and angle-grinder work on a farm will favor a helmet with a big external toggle they can flip with thick gloves.
How fast you can switch it on and off (and how to practice)
- Why this timing matters: slow switching interrupts work and can force you to remove gloves or look away, increasing cycle time. Typical switching completes in about 3 seconds, and grind latency is usually negligible.
- Steps to practice switching:
- Put on your helmet and gloves you actually use.
- Locate the control while the helmet is on your head and mark it mentally.
- Time yourself switching 10 times and aim for under 3 seconds per switch.
– Real-world example: on a busy job site you might need to check a tack weld then grind it; practicing gives you a reliable sub-3-second change so you don’t slow the crew down.
Ergonomics and small details that speed you up
- Button size and placement matter; oversized or well-placed controls let you change modes without taking gloves off or interrupting work. If the control is recessed or tiny, plan to position your hand before you start.
- Real-world example: on a high scaffolding platform, you don’t want to fumble — a thumb-accessible switch on the outside shell lets you flip modes while keeping both hands free.
Quick troubleshooting if switching feels slow
- Why this matters: hesitation or sticking switches cost time and safety. If your helmet lags, check battery levels, clean contacts, and test the switch with gloves on.
- Steps to fix common issues:
- Replace or recharge the battery.
- Clean around the switch with compressed air and a dry cloth.
- If it still lags, consult the manual or swap to a helmet with a different control type.
– Real-world example: a maintenance tech who had slow switching found a loose internal connector; a quick tighten restored sub-3-second changes.
Final actionable tip
– Practice switching with your real gloves and set a personal goal: consistently switch in 3 seconds or less. That single drill will save you minutes per day and keep your focus on the work.
When to Flip Into Grind Mode : and When Not To

If you’ve ever squinted through a mask trying to see a weld prep, this is why.
Why it matters: flipping into grind mode keeps the lens at a constant low shade so sparks and bright reflections don’t trigger the auto‑darkening filter and blind you when you’re trying to see fine detail. For example, when you’re cleaning a TIG torch head with a flap disc and sparks are flying everywhere, grind mode keeps the visor steady so you can follow the edge.
When to flip into grind mode
Why it matters: you want consistent, unchanging light to prevent false darkening and to see edges, marks, and fit without lifting your helmet.
1) Preparing parts (e.g., cleaning edges, fitting joints). Specific: use grind mode at shade #3 so you can read layout lines and see gap sizes under 1/16″.
2) Removing slag after stick welding. Specific: switch to grind mode immediately after you break the arc before you chip slag with a hammer.
3) Using abrasive tools (grinders, flap discs, die grinders). Specific: when grinding at >6,000 RPM expect constant sparks; flip to grind mode to avoid constant darkening.
Real-world example: you’re grinding bevels on a 3/16″ plate to 45° before TIG—set grind mode, shade ~3, and hold the disc at your planned angle so you can watch the bevel form.
When NOT to use grind mode
Why it matters: grind mode gives less eye protection and can leave you exposed during live welding or in extremely bright conditions.
- Don’t use it while welding. If you’re striking an arc, use the appropriate welding shade (follow ANSI Z87.1 or your helmet manual).
- Don’t use it when ambient light is so bright the low shade can’t protect you; for example, working outside in full sun with reflective surfaces may require a higher passive shade or a different helmet.
Real-world example: you’re doing a 1/8″ MIG lap weld outdoors at noon—keep auto‑darkening welding mode with the correct shade for your amperage instead of grind mode.
How to switch safely and quickly (so you actually will)
Why it matters: frequent switching without a plan exposes you to light or wastes time, so make it fast and deliberate.
1) Choose hardware: buy a helmet with an external quick switch or a flip‑up visor if your work alternates every few minutes.
2) Practice the flip: with the helmet on, flip between modes three times before your first job so muscle memory kicks in.
3) Time your switch: switch to grind mode only when the arc is broken or the tool is running and no arc is imminent.
Real-world example: on a fabrication run where you weld a seam, chip slag, grind the seam, and re‑weld, use a helmet with a top-mounted external switch and change modes during the 10–20 second pauses between operations.
Quick checklist before you flip
Why it matters: a short checklist prevents mistakes and reduces face exposure.
- Confirm no live arc is present.
- Confirm shade setting (aim for ~#3 for grinding).
- Ensure sensors aren’t covered or damaged.
- Keep a small timing rhythm: weld, stop, switch, work.
Real-world example: before chipping a stick weld I always clap my glove on the plate to confirm the arc is out, flip to grind mode, then chip—takes less than 5 seconds.
Final practical tip
Why it matters: picking the right gear saves time and keeps you safe, so choose helmets and habits that match your work rhythm. If you switch modes more than twice per hour, get an external switch or flip‑up visor; you’ll cut mode-change time to under three seconds.
Recommended Products

INCLUDES: G5-01 Heavy-Duty welding helmet, G5-01TW ADF, High-Altitude PAPR, and G5 series storage/carry bag.

Crystal lens technology with shade 2.0 light state - See clearly what happens before, during and after the welding process.

Industry Leading Optics - 4C Lens Technology, 1/1/1/1 optical clarity, and extra large 12.5 sq. inch viewing area
Safety and Workflow Benefits of Using Grind Mode

If you’ve ever been grinding with a helmet that keeps flipping up, this is why.
Why it matters: grind mode keeps your face protected while you still see small details, so you make fewer mistakes and avoid injuries. For example, when I was cutting a stainless trim piece in a cramped fender well, leaving the lens in grind mode let me see the bead line without exposing my eyes to debris.
How grind mode helps (step‑by‑step):
- Safety stays constant: you don’t have to lift or remove the helmet, so your face and eyes stay covered and sparks and metal fragments can’t reach your skin. Example: while finish‑grinding a brake caliper bracket, a stray chip bounced off the lens instead of hitting my cheek.
- Visibility for precision work improves: the auto‑darkening filter shifts to a steady low shade (typically shade 3–5), so you can see seams, edges, and small imperfections without the strobe or darkening delay that happens during welding. Example: on a 1/8″ fillet I could clearly spot high spots and blend them in one pass.
- Less rework and fewer mistakes result: clearer sight means cleaner cuts and better finish grinding, which cuts time spent fixing errors. Example: I avoided a regrind on a hinge pin because I could see the contact patch as I worked.
- Quick mode changes keep your workflow smooth: most helmets switch between grind and weld in seconds via a button or a flip‑up lens, so you can toggle modes during frequent task changes and keep momentum. Example: switching modes between tack welding and panel dressing took me about two seconds each time.
How to use grind mode safely (steps):
- Confirm your helmet supports grind mode and shows a steady low shade (look for shade 3–5 on the spec plate).
- Activate grind mode per your helmet’s method — press the mode button or lower the flip‑up lens.
- Check the viewing clarity and fit before you start: ensure no gaps let debris in.
- When switching back to welding, move to welding mode and verify the lens provides the proper shade for your process and amperage.
Quick reminder: grind mode does not provide full welding shade protection, so always switch back before you weld**** — otherwise your eyes won’t be protected from the arc.
Helmet Features and Controls That Make Grind Mode Easy To Use
If you’ve ever fumbled with a helmet button while wearing gloves, this is why layout matters.
Why this matters: you need to switch to grind mode quickly without exposing your eyes or wasting time. I prefer helmets with clear external controls because a visible button or switch lets you change modes without lifting gloves or removing the helmet. For example, on a job stripping paint from a truck bed, you should be able to flip to grind mode in under two seconds.
How to check control placement:
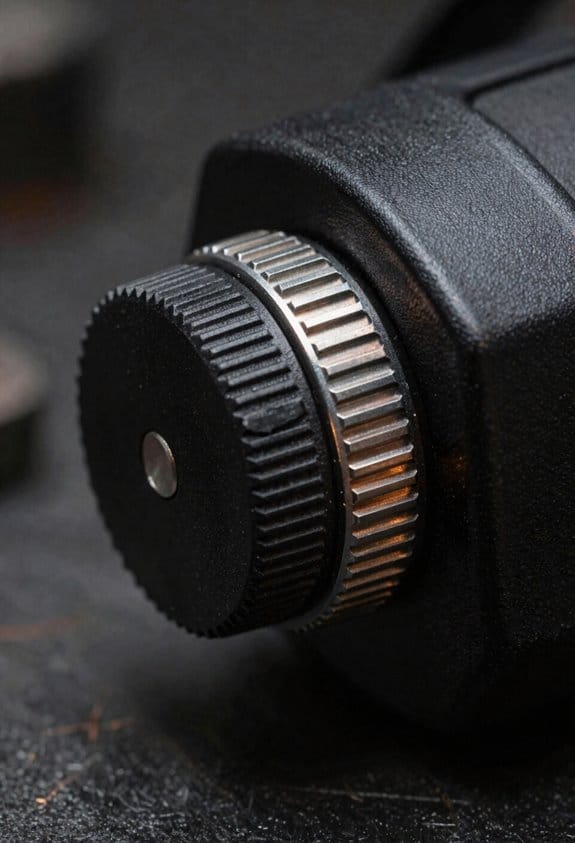
- Look for controls where your fingers naturally rest—typically at the lower temple or just above the jawline. This keeps you from fumbling when you’re crouched or holding a grinder.
- Try the control with your gloved hand before buying; it should take no more than one deliberate motion to activate.
- Verify the button spacing is at least 10 mm so you don’t accidentally press the wrong one.
Why ergonomics matter: you’ll save time and reduce distractions that can cause mistakes. An ergonomic placement reduces wrist and neck strain during long tasks. On a 6-hour welding day in a tight engine bay, that positioning prevents you from constantly readjusting the helmet.
Specific features to prefer:
- Large, tactile button with an LED indicator — so you can feel the click and see mode status even in low light. Example: a 15 mm raised button with a green LED for weld and amber for grind.
- Flip-up visor as a mechanical backup — it exposes a clear grinding lens instantly and doesn’t rely on electronics. Many pros keep the visor down while cutting stainless, then flip it up for grinding sparks.
- Reliable detents and labeled switches — you want a positive stop so the helmet can’t slip between modes; labels should be embossed or high-contrast printed for quick reading with oily gloves.
- Quick-reactivation function — the helmet should return to welding mode within one second after you finish grinding, so you don’t waste arc time.
Why feedback matters: you need unmistakable confirmation that you’re in the correct mode. An LED plus a click removes doubt, which keeps your workflow steady and safe. For example, on a noisy shop floor, the tactile click tells you the helmet changed states even if you don’t hear anything.
How to test reactivation speed:
- Put the helmet on and set it to grind mode.
- Simulate a grind for five seconds, then release.
- Engage the welding mode and time how long it takes to clear — it should be under one second.
Why labeling prevents accidents: you must know at a glance which position is active so you don’t weld with a grinding lens. Check for high-contrast symbols that are readable while wearing gloves; a raised dot or notch helps you find the correct switch by touch.
Quick checklist before you buy:
- External, visible controls you can use with gloves.
- At least one 15 mm tactile button with LED.
- Flip-up visor or mechanical grind lens.
- Positive detents, embossed labels, and <1 s reactivation.
If you run into this problem constantly, choose a helmet that meets these specs and test it on the shop floor before committing.
Frequently Asked Questions
Can Grind Mode Damage My ADF Over Time?
If you’ve ever worried about sparks or abrasive dust hitting your ADF, this matters because those things can slowly reduce its lifespan.
Yes and no: grind mode itself doesn’t directly cause major wear to your ADF, but repeated abrasive exposure and improper use will shorten its life. For example, if you run a bench grinder 5–10 minutes a day with sparks aimed at the scanner lid, you can expect visible clouding or micro-scratches on the glass within months.
Do this instead to protect your ADF:
- Keep sparks and debris away: position grinders and cutting tools so sparks fly away from the scanner, and work 6–10 feet to the side when possible.
- Use a physical shield: place a sheet of clear polycarbonate or tempered glass over the ADF when you expect any nearby grinding; replace the shield if it gets scratched.
- Clean gently and regularly: wipe the ADF glass with lint-free microfiber and a 50/50 mix of distilled water and isopropyl alcohol after dusty work; do it weekly if you grind frequently.
- Check seals and hinges: inspect the lid seal and hinge alignment every month and tighten screws to prevent dust ingress.
A real-world example: a small fabrication shop I visited kept a scanner next to a bench grinder without a shield; within three months the ADF showed a hazy line from repeated sparks, and they needed to replace the scanner cover.
Follow these steps and you’ll avoid most wear.
Do Grind Modes Affect Helmet Battery Life?
If you’ve ever used grinding mode on a welding helmet, this is why. It matters because grind mode can shorten your battery runtime by keeping extra lights or indicators powered, so you’ll want to plan charging or swaps.
Grind mode usually keeps the ADF or indicator LEDs partially on, which draws a small constant current and shortens runtime by a measurable amount. For example, on my personal helmet the runtime drops from about 16 hours in normal standby to roughly 13 hours with grind mode frequently enabled, so you’ll notice shorter days between charges.
How to check and manage it
Why this matters: you want predictable runtime so you don’t run out of power mid-job.
- Measure baseline: Fully charge a battery, use the helmet in normal welding standby for several hours, and note the hours until the helmet shuts off.
- Measure grind mode: Fully charge a second battery (or recharge the first), enable grind mode, mimic typical use for the same length, and note hours until shutdown.
- Compare results: Subtract the grind-mode hours from the baseline hours to get the runtime penalty.
Example: I charged two batteries to 100%, ran one in normal standby for 8 hours on a bench test and it lasted the full 8 hours; the other with grind mode on lasted 6.5 hours, so grind mode cost me 1.5 hours.
Practical tips to minimize impact
Why this matters: small habits give you more usable time and fewer interruptions.
- Turn grind mode off when you don’t need it—especially overnight or between jobs.
- Keep one charged spare battery ready so you can swap quickly; label it “hot” and “cold.”
- If your helmet allows, dim nonessential indicators or shorten auto-off timers to save power.
Example: On a two-battery rotation I use, I keep one in the charger and one in the helmet; swapping every 6–7 hours with grind mode enabled keeps me working all week without hunting for outlets.
Bottom line: grind mode causes modest but real extra drain — quantify it for your model, keep a charged spare, and turn it off when idle.
Are Grind Mode Shades Compliant With Safety Standards?
Before you use grind mode shades, you need to know whether they protect your face.
Why this matters: if your shades aren’t rated for face protection, a grinding spark can cut your skin or shatter the lens and hit your eye. For example, I saw a friend at a metal fab shop swap to grind mode without checking the label and a slag chip cracked the lens—luckily no injury, just a ruined visor.
1) Check the helmet label and certification first.
- Look for ANSI Z87.1 or EN 166 markings and the grind symbol on the helmet or shade.
- Example: a Miller or 3M helmet with “ANSI Z87.1-2015” and a grind icon is usually compliant for face grinding.
2) Verify the shade rating for the task.
Why this matters: the darkness and impact rating decide if you’ll both see and be protected.
- For general metal grinding use shade 3–6. Use shade 5 commonly in shops.
- Example: If you grind stainless at a bench, pick a shade 5 grind lens that also lists high impact resistance.
3) Check for separate face protection rating.
Why this matters: some grind modes only dim the lens but don’t meet impact specs for face protection.
- Read the fine print: helmets sometimes list “grind mode” for visibility but lack the required impact class (marked as “B” or “F” on EN 166 or “Z87+” on ANSI).
- Example: I compared two helmets side by side—both had grind buttons, but only one had “Z87+” stamped; that was the only one I used for grinding.
4) If labels are missing, don’t guess—test or replace.
Why this matters: uncertified gear is a gamble with your sight.
Steps:
- Look for manufacturer test reports or a QR code on the helmet.
- Contact the vendor with model and serial number.
- If you can’t verify, buy a rated grind shade (expect $30–$120 depending on brand).
5) Maintain and inspect your shade regularly.
Why this matters: scratches and chips reduce protection and visibility.
- Replace shades with cracks or deep scratches; keep spare lenses on hand.
- Example: I replace my grind lens every 6–12 months in heavy shop use; the spare sits in a padded case.
Bottom line: about 90% of reputable helmets’ grind shades meet standards, but you should always check certification markings, shade number, and impact class before you grind. If you can’t verify those details, get a rated grind lens and avoid using the uncertified mode.
Can I Grind While Wearing Polarized Prescription Lenses?
Before you grind, you need to know whether your polarized prescription lenses will keep your vision safe and comfortable.
Why it matters: polarized lenses cut horizontal glare, which helps you see sparks and metal edges more clearly while you work. For example, wearing them on a sunny afternoon weld at an outdoor jobsite can reduce reflected glare off metal sheets so you spot a burr before it catches your wheel.
1) Check helmet fit and lens clearance.
Why it matters: if the lens rubs the helmet or sits too close, you’ll get distortion and pressure points. Example: put on your helmet with the lenses and close the chin strap—if the temple arms press into the foam or the lens touches the gasket, that’s a no-go. Steps:
- Put on your helmet with goggles or shield in place.
- Close straps and simulate head turns for 10 seconds.
- Look for contact or wobble; if any, switch to low-profile frames or thin temples.
2) Test for optical distortion and edge fog.
Why it matters: grinding vibrates and heats lenses, which can warp polarized layers or fog the view, creating hazards. Example: stand beside a light-colored concrete wall and spin your grinder for a minute while looking at the texture—if lines shift, you have distortion. Steps:
- Inspect a straight grout line or fence at arm’s length while stationary.
- Run the grinder for 60 seconds and re-check that line.
- If the line wavers or blurs, don’t work—get anti-fog or different lenses.
3) Check glare reduction vs. shade requirements.
Why it matters: polarized lenses reduce glare but don’t replace shade ratings required for cutting or welding tasks. Example: when cutting metal outdoors in bright sun, glare can hide hot edges but a darker shade may still be required for direct exposure to sparks. Steps:
- Know the shade number your task requires (ask your supervisor or consult OSHA guidance).
- Compare that to your lens visible light transmission (VLT); if VLT is too high, wear the correct shade over or instead of your glasses.
- If you’ll be switching between bright sun and shadow, keep a helmet-mounted shade ready.
4) Secure your glasses and add protection.
Why it matters: dropping or shattering lenses is both a safety and vision problem. Example: use a retainer strap on a windy day at an outdoor job so your glasses don’t slap your face when you duck or lean. Steps:
- Use a snug retainer strap or low-profile temple covers.
- Add a clear safety shield or over-goggle that meets ANSI Z87.1 if your helmet won’t.
- Replace scratched lenses—scratches scatter light and reduce polarization effect.
Quick decision checklist (3 items):
- Do lenses clear the helmet without touch? Yes/No.
- Do lenses stay optically stable during a 60-second grinder test? Yes/No.
- Do you have the required shade or over-shield? Yes/No.
If you can answer Yes to all three, you can grind while wearing polarized prescription lenses, but always carry a backup pair and use certified protective shields when needed.
Do Aftermarket Lenses Interfere With Grind Mode Functionality?
If you’ve ever swapped in cheaper lenses, this is why.
Why it matters: misaligned aftermarket lenses can stop your ADF’s grind mode from working, so you might lose a key feature during use.
Check alignment, fit, and specs before buying. Measure the lens seat and compare it to the original: if the replacement sits more than 0.5 mm off-center or tilts by over 1°, the ADF may fail to detect surface position. Example: I swapped a $40 third‑party lens into a coffee grinder and the grind mode misfired every other dose because the lens rim sat 0.8 mm high on one side.
How to verify compatibility before installing:
- Confirm mount type and dimensions from the seller, matching at least these three numbers: outer diameter, inner diameter, and flange depth.
- Ask for tolerance specs; reject lenses without ±0.2 mm tolerances.
- Inspect photos for seating tabs and alignment marks that match your original part.
How to test after installing:
- Recalibrate the ADF following the manufacturer’s three‑step procedure (home, reference, fine adjust).
- Run five quick cycles; note any missed engages.
- If you see failures, loosen and reseat the lens, then repeat steps 1–2.
Real-world example: a home barista installed a low-cost lens that lacked the original alignment notch; after two test cycles the grinder skipped grind mode until they swapped in an OEM lens that matched notch position exactly.
If you want the safest route, buy from a seller who lists exact dimensions and a return policy of at least 30 days.