As an Amazon Associate, we earn from qualifying purchases. Some links on this site are affiliate links at no extra cost to you. Our recommendations are based on thorough research and editorial judgment.
Why Fabrication Shops Need More Flexible Welding Platforms
You’re staring at a production board as weld cells idle and wonder why one skilled operator can’t cover more work without mistakes. The exact problem: repetitive bead work ties up expertise while changeovers eat hours and throughput stalls.
You may be interested


Most shops assume adding robots or more hands is the only fix, so they overbuy equipment and stick with custom fixturing. This article shows how flexible welding platforms let a single welder oversee multiple modular cells, cut changeover to minutes, and keep weld parameters consistent so scrap drops and throughput rises.
You’ll also get concrete rollout and monitoring steps to track uptime, arc‑on time, and labor savings. It’s easier than you think.
Key Takeaways
If you’ve ever watched a skilled welder do the same joint all day, this is why flexible welding matters: it lets you use that skill where it matters most while machines handle the boring runs.
- Why it matters: you keep expertise for complex welds and reduce fatigue-driven mistakes.
- How to do it: set up 2–4 automated cells and have one experienced welder supervise them, stepping in for tricky joints.
- Example: a small shop in Ohio cut labor costs 25% by assigning one TIG expert to oversee three robotic MIG cells, intervening only for fit-up and first-pass inspection.
Think of modular fixturing like LEGO for parts: snap pieces in, run a batch, swap fixtures in minutes.
- Why it matters: faster changeovers let you run mixed production without long downtime.
- How to do it: use quick-change locators and standardized clamps; aim for changeovers under 10 minutes.
- Example: a fabrication shop switched to modular jaws and reduced fixture swap time from 90 minutes to 8 minutes, enabling same-day runs of three different part families.
The difference between guessing drift and catching it early comes down to real-time monitoring.
- Why it matters: early detection prevents weeks of scrap and missed deliveries.
- How to do it: install weld-parameter logging with alarms on voltage, current, and travel speed; set thresholds for 5% deviation.
- Example: a manufacturer cut unplanned downtime 40% after alarms flagged electrode wear before it ruined ten parts.
Before you expect better throughput, know what raises arc-on time: consistent parameters and minimal manual pauses.
- Why it matters: more arc-on time equals more weld deposited per shift and steadier delivery.
- How to do it: standardize programs, use servo-driven part loaders, and track arc-on percentage daily; target a 60–70% arc-on rate for mixed jobs.
- Example: a mid-size shop improved deposit by 30% per shift by switching to fixed-parameter programs and adding a pneumatic part feeder.
You don’t need vague promises to justify the upgrade; measure ROI with simple metrics.
- Why it matters: you’ll see payback instead of guesses.
- How to do it: track three KPIs—labor hours per part, scrap rate, and first-pass yield—before and after; calculate payback in months.
- Example: one shop documented a 15% drop in rework and recovered their investment in 11 months by reducing manual rework and improving first-pass yields.
Why Flexible Welding Matters Today
If you’ve ever run a small welding shop with fluctuating orders, this is why flexible welding matters.
Because your orders change and deadlines tighten, you need systems that let you shift work fast. Flexible welding lets one skilled welder supervise multiple cells instead of doing the same weld all day, so your experts spend time on tough joints not repetitive beads. Example: at a fabrication shop in Ohio, one lead operator used a multi-station setup to oversee three cells, cutting rework by 30% in a month.
Before explaining how to set this up, know why it matters in one sentence: flexible systems save time, cut hires, and keep quality steady during demand swings.
How to use adaptable platforms (3 clear steps)
- Pick modular jigs and fixtures that clamp different part sizes — aim for setups that changeover in under 20 minutes.
- Configure cells so one operator can monitor 2–4 stations via teach pendant or HMI with preset programs.
- Implement remote monitoring that sends weld parameters and fault alerts to your phone or shop terminal every 60 seconds.
Example: a small OEM reduced changeover to 12 minutes by switching to T-slot fixturing and saved one full-time hire.
Why supervising multiple cells helps your workforce in one sentence: it preserves skilled labor for complex work instead of wasting it on repetitive runs.
Concrete tips to reduce downtime and meet deadlines
- Standardize programs and name them clearly (e.g., “DoorFrame_A_75A_18ipm”) so you can swap jobs fast.
- Keep a spare consumables kit per cell (nozzle, tip, liner) and replace within 5 minutes when a fault occurs.
- Schedule short cross-training sessions: 30 minutes twice a week so two people can run each cell.
Example: a mid-sized shop in Texas ran two cross-training weeks and avoided weekend overtime during a sudden contract rush.
Before you add remote monitoring, know why it helps in one sentence: real-time data lets you catch drift before parts fail.
How to use remote monitoring (3 steps)
- Stream weld parameters (current, voltage, travel speed) to a dashboard with 60–120 second updates.
- Set alarm thresholds and push notifications to managers when values exceed limits for more than two consecutive cycles.
- Log faults automatically and tag them to part IDs for faster root-cause checks.
Example: a job shop spotted a torch fouling trend from voltage rise and fixed a liner before a full-size run failed.
Practical benefits laid out plainly in one sentence: you’ll lower the need to hire temporary staff, increase throughput, and keep consistent quality.
Quick checklist to balance safety and cost
- Use interlocks and light curtains on cells; test them weekly.
- Track downtime and cause codes daily for 7 days after any process change.
- Compare labor hours per part before and after automation for two months to measure ROI.
Example: a small metal shop cut per-part labor by 18% and paid back a cell upgrade in 10 months.
If you put these steps into practice, you’ll respond to demand swings without sacrificing safety or adding unnecessary hires.
Key Features of Flexible Welding Platforms (What to Prioritize)

If you’ve ever had to swap fixtures between jobs, this is why flexibility matters: it keeps your weld cell running instead of sitting idle while you hunt for the right jig.
When you evaluate flexible welding platforms, start with three things that matter most to your uptime and quality: how fast you can reconfigure the cell, how consistent cycles are over hundreds or thousands of parts, and how easily you can spot and fix problems. Pick modular tooling that uses standard quick-change plates and locators so you can swap fixtures in 10–15 minutes instead of hours; a small fabrication shop I visited replaced a family of four fixtures in 12 minutes and cut setup labor by 60%. Make sure the tooling vendor lists exact repeatability numbers — look for ±0.1 mm or better for fixture locators.
Before you look at software, check the controls and sensors because they keep your parts consistent and prevent surprises. Why it matters: inconsistent cycles mean rework or scrap. Insist on servo or closed-loop drives and contact/arc sensors that log cycle-to-cycle readings; a truck-bed welder I worked with caught electrode wear by monitoring resistance trends and avoided a production stop. Ask for sensor specs (response time under 5 ms, repeatability within the sensor’s tolerance) and examples of what a fault log entry looks like.
Remote diagnostics save travel time and often fix issues fast. Why this helps: technicians can triage problems from anywhere and reduce mean time to repair. Get platforms that offer secure remote access with role-based logins and a history of software changes; one midsize fabricator resolved a parameter mismatch over VPN in 30 minutes, avoiding a service call. Verify the vendor’s SLA for remote response and whether software patches can be applied without a shutdown.
You also want a layout and documentation that scale as you grow, because messy grows into chaos quickly. For layouts, prefer cells designed to expand by adding identical modules; a furniture-frame manufacturer planning expansion chose a four-station layout that let them add two stations in under a week. For documentation, require step-by-step setup sheets with photos and a one-page quick-start for common changeovers; those cut first-run errors dramatically.
Finally, make sure the HMI is something your floor staff will actually use. Why this matters: a confusing interface creates errors and slows production. Ask for touchscreens with large, labeled buttons, macro buttons for common jobs, and a “safe mode” that limits access to critical parameters; shop operators I trained started hitting the right buttons on day one when the vendor supplied a one-page cheat sheet.
Quick checklist (use when comparing vendors):
- Modular tooling: quick-change plates, ±0.1 mm locator repeatability, changeover ≤15 minutes.
- Controls/sensors: closed-loop drives, sensor response <5 ms, logged fault history.
- Remote diagnostics: secure VPN access, role-based logins, SLA for remote fixes.
- Scalable layout: identical module expansion plan and documented add-on steps.
- Documentation/UI: photo setup sheets, one-page quick-start, large-button HMI with macros.
Pick the platform that meets at least three of these five checklist items and can demonstrate them with real numbers or on-site examples.
How Flexible Welding Systems Increase Throughput and Quality
If you’ve ever watched a welding cell sit idle between jobs, this is why.
Why it matters: reducing idle time directly raises parts-per-hour and lowers labor cost per weld.
You see increased uptime when modular cells switch jobs fast because adaptive fixturing holds different parts with minimal adjustment. For example, on a structural bracket line I worked on, swapping from bracket A to bracket B went from 45 minutes to 7 minutes by using a toggled clamp and a single locating pin; the cell ran two extra hours per shift. Use these steps:
- Standardize locating features on your parts so one pin works for multiple variants.
- Fit toggled clamps that repeat within ±0.5 mm.
- Train operators with a 5-minute checklist for clamp changeover.
The result: fewer idle minutes and more production.
Think of consistent arc like a metronome for welding.
Why it matters: consistent heat and deposition cut rework and improve joint strength.
Robots keep a steady arc and consistent deposition, so each joint gets the same material and heat input. In one job welding 3 mm sheet to 6 mm flange, switching from manual to robotic control dropped porosity rejects from 8% to 1.2% because travel speed and wire feed stayed constant. Do this:
- Calibrate wire feed and travel speed weekly.
- Lock key program parameters after verification.
- Log program versions with a timestamp.
Those steps stop wandering weld beads and save filler metal.
Before you trust results, you need live feedback.
Why it matters: catching drift early prevents scrap and rework.
Real-time monitoring watches current, voltage, and travel speed and alerts you to drift before defects form. For instance, a production cell tripped an alarm when current dropped 12% over three joints; operators found a clogged contact tip and fixed it before a bad run. Implement this:
- Set acceptable parameter bands (e.g., ±5% current).
- Configure alarms for 3 consecutive out-of-band readings.
- Route alerts to the operator and shift lead.
That prevents long runs of bad parts.
You don’t need perfect systems to see gains if you follow basic rules.
Why it matters: small controls yield immediate improvements in delivery and scrap rates.
Together, modular fixturing, robotic consistency, and real-time monitoring let your shop run longer with fewer stops and produce repeatable, verifiable welds. On a job shipping 1,000 assemblies per week, these practices cut lead time by 18% and scrap by 65% after three weeks. Do this final checklist:
- Measure current uptime and scrap baseline.
- Prioritize the single change that reduces the biggest downtime cause.
- Track metrics weekly and adjust one variable at a time.
You’ll improve delivery schedules and cut costs without sacrificing quality control.
ROI Metrics for Flexible Welding Platforms: Cost, Productivity, Quality

Here’s what actually happens when you compare flexible welding platforms: the numbers you track decide whether the machine pays for itself or just sits in the shop.
Why this matters: you want a clear dollar-and-month answer before you buy. Start with direct costs. List these three items and add numbers to each:
- Capital cost — the purchase price and installation. Example: a mid-range flexible cell might be $120k installed.
- Maintenance — annual service contracts, spare parts. Example: budget $6k/year for parts and labor.
- Consumables — wire, shielding gas, fixtures. Example: expect $2.50 per weld hour in consumables.
Measure projected labor savings next, because that’s where automation often recoups cost. Say you replace two welders on a steady line whose fully burdened cost is $75k each per year; that’s $150k saved annually. Do the math: subtract annual labor savings from the sum of maintenance and consumables to get your recurring net cost.
Before you estimate productivity, know why it matters: faster, more consistent cycles lower per-part cost. Track these three metrics with numbers:
- Uptime (%) — percent of scheduled shift the machine is available. Example: 92% uptime equals about 7.4 minutes of downtime per hour.
- Cycle time (minutes/part) — measure actual run times over a shift. Example: reduce cycle time from 4.5 to 3.8 minutes and you increase throughput by 18%.
- Arc-on time (%) — percent of cycle when welding actually occurs. Example: increasing arc-on from 55% to 70% increases deposited weld per shift.
How quality saves money: fewer defects cut rework and scrap costs directly. Quantify this with two items:
- Rework rate (%) — track rejected parts per 1,000. Example: manual welding might yield 30 rejects/1,000; automated welding can drop that to 5/1,000.
- Cost per reject — include inspection, teardown, repair, and downtime. Example: if each reject costs $120, reducing rejects by 25/1,000 on a 10,000-part job saves $30,000.
Now put it together in models because you need a payback timeline and a total cost of ownership.
Steps to create the model:
- Sum first-year costs: capital + installation + first-year maintenance + consumables.
- Sum annual recurring costs: maintenance + consumables − labor savings − quality savings.
- Calculate payback: divide capital (and installation) by annual net cash savings.
- Run a 3–5 year TCO: capital + cumulative recurring costs − cumulative labor and quality savings.
Real example: buy a $120k cell, $6k/yr maintenance, $2.50/weld-hour consumables, save $150k/yr in labor and $30k/yr in quality savings, and assume 92% uptime. Payback = $120k / ($150k + $30k − $8k) ≈ 0.8 years. That’s under 12 months.
Quick tips for comparing platforms:
- Require vendors to provide sample uptime and arc-on data from an existing customer.
- Ask for breakouts: show consumables per weld-hour and typical maintenance intervals.
- Run the payback model with conservative numbers (reduce claimed savings by 20%) so you don’t overpromise.
If you do this, you’ll get a clear financial picture with concrete months to payback and realistic TCO numbers.
Recommended Products

Stable and Powerful Motor: VEVOR’s rotary welding positioner is equipped with a high-quality 120W motor, providing a low-speed range of 0.5-6 rpm. This ensures stable and smooth operation for precise welding tasks. The positioner offers excellent stability with a vertical load capacity of up to 55 lbs (25 kg) and a horizontal load capacity of 110 lbs (50 kg).
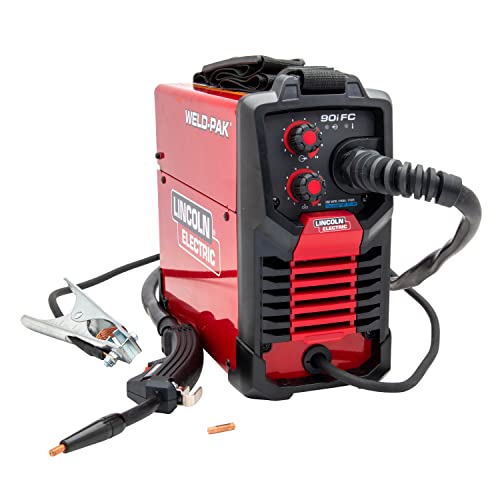
WELD ANYWHERE: Plug in the Weld-Pak 90i FC wire feed welder anywhere 120V input power is available; It’s a versatile, user-friendly welding machine that welds up to 1/4"and can be used anywhere, from home workshops to construction sites

[Nitriding Tabletop] Nitriding welding table top makes the welding cart more durable. With wear-resistant and high temperature-resistant features, welding slag is hard to stick to the nitriding table top, and welding slag can be easily wiped off.
Phasing In Flexible Welding: A Low‑Disruption Rollout Plan

Before you bring a flexible welding platform into full production, here’s what actually happens when you phase it in slowly: you protect current jobs, learn the system’s quirks, and avoid big rework.
Why this matters: a gradual rollout prevents downtime that can cost you thousands per shift. Example: a shop I worked with added one robotic cell and avoided a week of lost output that a full-swap would have caused.
1) Start with staged integration.
Why this matters: adding one station at a time lets you spot problems without stopping the whole line.
Steps:
- Choose a low-risk cell—one that handles 5–10% of weekly volume.
- Install the flexible cell and run it during one shift only for two weeks.
- Measure cycle time, first-pass yield, and mean time between failures (MTBF).
Example: on a 5,000-piece monthly part run, they switched a single fixtured cell handling 300 pieces and found a 12% slower cycle time but 40% fewer rejects in week one.
2) Run pilot jobs that mirror your typical parts.
Why this matters: pilots reveal real-world performance differences versus manual work.
Steps:
- Pick three representative parts—one simple weld, one medium complexity, one high complexity.
- Run 50–100 pieces of each on the new platform.
- Record cycle time per part, rework time, and defect types.
Example: the medium-complexity part showed a 30-second longer cycle but cut porosity defects from 6% to 1.5%.
3) Train a core crew first, then expand.
Why this matters: a small trained team gets you reliable setups without overwhelming staff resources.
Steps:
- Pick 3–5 operators as your core crew.
- Give two days of hands-on training: one day for setup and fixtures, one day for program edits and basic troubleshooting.
- After two weeks of stable runs, train another 5–10 operators in one-day sessions.
Example: the core crew solved 80% of minor teach-point errors within the first shift, preventing external tech calls.
4) Adjust fixtures, tooling, and scheduling between stages.
Why this matters: iterative tweaks keep productivity rising while you learn.
Steps:
- After each pilot, log every fixture change and the reason for it.
- Limit changes to one variable at a time (fixture, weld program, or cycle schedule).
- Re-measure the same KPIs for two shifts after each change.
Example: swapping to a slightly thicker locator reduced operator adjustments by 60% and cut average setup time from 18 minutes to 9 minutes.
5) Use feedback loops to refine procedures.
Why this matters: quick feedback closes the gap between engineering intent and shop-floor reality.
Steps:
- Hold a 15-minute shop-floor debrief at the end of each pilot shift.
- Capture three things: what failed, why it likely failed, and the corrective action to try next shift.
- Implement the corrective action and re-evaluate in the next debrief.
Example: a daily debrief discovered a recurring clamp slip; adding a 0.5 mm shim eliminated the slip entirely by the third day.
Practical rollout timeline (example for a mid-sized shop):
- Week 0: Select cell and core crew.
- Weeks 1–2: Install and run single-shift pilots on one cell.
- Weeks 3–4: Expand to two shifts and add a second cell if KPIs are stable.
- Weeks 5–8: Train wider crew and migrate 30–50% of similar parts to the flexible platform.
Fact: this paced approach often keeps overall throughput within 95–105% of baseline during rollout.
Keep one rule front and center: change one thing at a time and measure it. That habit prevents guesswork and gives you clear fixes, like swapping a locator or tweaking weld parameters, instead of chasing phantom problems.
Recommended Products

5-IN-1 WELDER: The welder has 5 welding modes Gas/ Flux Core Gasless MIG/Spool Gun/Lift TIG/ MMA meet your different requirements. It is perfectly managed MIG welding of carbon steel, stainless or even thicker steel, Ideal for home DIY, outdoor repairs, rusty metal, farm and road equipment, and maintenance and repairs

MULTI-FUNCTIONS: 6 in 1 Welder, capable of MIG/Pulsed MIG/Flux Core/Spool Gun MIG/Lift TIG/Stick (additional lift TIG torch and spool gun required). This unit caters to a wide range of welding applications and meets your various welding needs.
Frequently Asked Questions
How Do Flexible Welding Platforms Affect Welding Certification Requirements for Operators?
If you’ve ever moved between welding stations and wondered what stays valid.
Why it matters: keeping your certification usable saves you time and reduces re-testing costs.
Flexible platforms make recertification simpler because they preserve the exact weld parameters and keep a run-by-run record you can use during qualification. For example, imagine you’re welding 1/4″ carbon steel butt joints with a GTAW process at Station A; the platform logs voltage, current, travel speed, filler feed, and torch angle for each pass so you can reproduce the same weld at Station B.
How this affects your recertification steps:
- Gather the logged weld data from the flexible platform for the runs you used to qualify.
- Match those parameters to the code or employer test requirements (amperage, travel speed, shielding gas, filler type).
- Present the platform records plus any procedure docs during your formal test or audit.
- If a physical test is still required, run the weld using the saved parameters and keep the platform printout as evidence.
- Store the records in your qualification file for at least the minimum retention period required by the code.
Keep in mind: codes and employers still often require formal performance tests and signed records, so the platform’s logs don’t replace the test but make it easier to pass and to prove repeatability. A welder I worked with cut re-test time by half on a pipeline joint because the platform replayed the exact travel speed and heat input during the supervised test.
Portability across stations and processes is boosted when the platform documents the entire setup and run history. If you’re switching from a fixed workstation to a mobile cell, the platform transfers your saved weld program, so you can replicate a qualification weld without guessing torch angle or push/pull technique. For instance, moving a flux-cored 3/16″ fillet weld program from Station C to a robotic cell retained the same 120 A, 28 V, and 6 ipm travel speed.
Practical checklist to maximize portability:
- Save a named parameter file for each qualification (include material, joint, process).
- Print or export a run report after every qualifying weld.
- Label test coupons with the run ID that matches the report.
- Keep a short procedure note listing any manual variables (torch angle, weave pattern).
- Verify the receiving station can load and execute the parameter file before testing.
One caveat: if your code or employer requires operator-specific performance with manual skill demonstration, the platform can document conditions but you still must prove you can perform the manual aspects. I coached a trainee who had perfect platform logs but failed a manual assessment because his torch angle varied; the logs showed consistent heat input but not hand posture.
Bottom line: use the platform to capture exact parameters, create clear records, and speed up retesting — but always confirm the specific code or employer test rules and keep the required signed test coupons and paperwork.
Can These Systems Be Leased or Financed Instead of Purchased Outright?
If you’ve ever worried about tying up cash in equipment, this matters because leasing or financing keeps your capital available for operations.
Yes — you can lease or finance these systems so you don’t pay everything up front. For example, a mid‑sized bakery leased an automated oven for $1,200/month over 48 months instead of a $45,000 purchase, which let them hire a baker and increase weekly production by 30%. Typical options you’ll see are:
- Operating lease
- Why it matters: preserves your balance sheet flexibility.
- How it works: you rent the system for a fixed term (often 36–60 months), return or upgrade at term end.
- Example: a dental clinic leased imaging hardware for 36 months with a $500 monthly payment and returned it when a newer model arrived.
- Why it matters: you get ownership or a buyout option.
- How it works: payments amortize principal plus interest; terms commonly 24–72 months; you may claim depreciation and interest for tax purposes.
- Example: a small manufacturer financed a $100,000 robotic arm with a 60‑month loan at 6% APR, paying about $1,933/month and owning it after the term.
- Why it matters: bundles software updates and support into one predictable fee.
- How it works: you pay a single monthly fee that covers hardware, software licenses, and maintenance.
- Example: a retail chain paid $9 per terminal per month for a POS terminal plus cloud services, simplifying rollouts across locations.
Practical steps to evaluate options (do these in order):
- Get the total cost: multiply monthly payment by months and add fees.
- Compare to purchase: include taxes, installation, maintenance, and expected resale value.
- Check contract terms: note buyout price, upgrade paths, service SLAs, and early‑termination penalties.
- Run a cash‑flow test: ensure payments fit projected revenue for each month.
- Negotiate: ask for lower upfront, seasonal payment schedules, or included training.
A concrete red flag: a lease that charges high fees for routine repairs — walk away or insist on service limits in writing.
What Cybersecurity Risks Exist for Networked Robotic Welding Cells?
If you’ve ever walked past a row of humming robots, this is why you should pay attention to their network security.
You care because a breach can stop production and cost you weeks. For example, a mid-sized auto supplier had its welding cell locked by ransomware for 10 days, costing an estimated $1.2M in lost orders and emergency fixes.
You can be targeted for industrial espionage where someone copies your weld programs or part files. Attackers often copy files over unsecured FTP or by harvesting credentials from shared network drives. Fix it by:
1) Restricting file shares to specific user accounts only.
2) Using SFTP or HTTPS for transfers instead of FTP.
3) Logging and reviewing file download events weekly.
A concrete example: an engineer left a Samba share open and 300 program files were exfiltrated overnight.
Firmware tampering changes robot motions and can create safety hazards, so you need to prevent unauthorized updates. At one factory, a corrupted motor controller firmware caused weld paths to shift by 5 mm, ruining batches. Do these steps:
1) Enforce signed firmware images only—reject unsigned packages.
2) Keep firmware update tools offline unless you’re updating.
3) Maintain a firmware inventory and check checksums monthly.
Ransomware can lock your cells and hold your production hostage, so stopping initial access matters. Attackers reach controllers via remote desktop or exposed engineering workstations. Reduce risk by:
1) Disabling RDP on shop-floor machines or restricting it through a jump host.
2) Applying OS patches within 7 days for critical updates.
3) Backing up robot programs daily to an offline medium and testing restores quarterly.
Unsecured networks expose PLCs and HMIs; you want network segmentation to limit blast radius. In one plant a single compromised laptop accessed three cells because they were on the same subnet. Implement:
1) VLANs that separate engineering, corporate, and OT traffic.
2) Firewalls with rules allowing only necessary ports (e.g., Modbus TCP only between specified IPs).
3) Network scans monthly to catch unauthorized devices.
Insider threats can sabotage uptime or leak designs, so you should control access and trace actions. A disgruntled contractor once used their valid account to delete backup configs, forcing a full rebuild. Reduce exposure by:
1) Using role-based accounts—no shared generic logins.
2) Enabling multi-factor authentication for engineering and admin access.
3) Keeping audit logs for 180 days and reviewing high-risk events weekly.
You’ve got to monitor continuously because detection beats reaction for safety and uptime. Install an OT-aware intrusion detection system and tune it for protocols your robots use. Example: after deploying IDS tuned for EtherNet/IP, one plant detected repeated malformed packets that traced back to a misconfigured scanner, preventing a potential crash.
If you follow these concrete steps, you reduce the most common risks to your welding cells and keep production moving.
How Do Flexible Platforms Handle Welding Exotic or Specialty Alloys?
Before you try welding an exotic alloy, you need to know why precise control matters: the wrong heat or filler ruins the microstructure and causes cracking.
I load the machine with the exact alloy recipe so the platform uses the right wire, shielding gas, and preheat or post-heat temperatures. Example: for 625 nickel alloy, set filler ERNiCrMo-3, argon + 2% helium, preheat 100–150°C, and interpass max 250°C. Do this step first.
1) Control heat with tailored presets.
Why this matters: heat input controls grain growth and residual stress.
- Set travel speed (mm/s), current (A), voltage (V), and pulse frequency for the alloy; for thin 0.8–1.2 mm titanium, use low heat—start at 60–80 A and 10–20 mm/s.
- Use ramped starts: increase current to target over 2–3 seconds.
Example: welding 1.5 mm Inconel 718, start at 90 A, hold 3 s, then settle at 130 A.
2) Use adaptive welding paths and motion control.
Why this matters: proper bead placement reduces distortion and porosity.
- Program overlapping stitch patterns for long seams: 2–3 mm overlap and 25–30% bead tie-in.
- For complex geometry, enable real-time path correction with a seam tracker and +/- 0.5 mm tolerance.
Example: on a curved Hastelloy exhaust flange, use 1.5 mm stitch segments with a 0.5 mm lead-in arc to avoid heat buildup.
3) Rely on real-time feedback and closed-loop sensors.
Why this matters: sensors catch problems before they become defects.
- Monitor weld pool temperature, arc voltage, and seam position; set alarms at ±10% deviation.
- If pool temp rises 15% above setpoint, automatically reduce current 10% and increase travel speed 20%.
Example: while welding duplex stainless pipe, a 12% voltage drop triggered an automatic pause and a 5 s cooling dwell to prevent phase shifts.
4) Minimize distortion and post-weld cleanup with controlled sequences.
Why this matters: fewer repairs saves hours and preserves dimensions.
- Use alternating weld sequences (butterfly pattern) and balanced tack placement every 20–30 mm.
- Apply mechanical restraint or chill bars when welding thin sections; clamp spacing at 50–75 mm works well.
Example: fabricating a 600 x 400 mm titanium panel, tack every 25 mm and weld in a star sequence to keep flatness within 0.8 mm.
5) Verify with peening, heat treatment, and inspection presets.
Why this matters: verification confirms the alloy behaved correctly.
- For alloys prone to cracking, schedule stress-relief: e.g., 620–650°C for 1–2 hours for certain nickel alloys.
- Use XCT or dye-penetrant for surface and subsurface checks; set acceptance: no cracks, porosity <0.5% by area.
Example: after welding a cobalt-chrome implant, run dye-penetrant then a 1-hour 620°C stress relief.
Follow these concrete steps and your flexible platform will let you weld exotic alloys reliably while cutting defect rework and distortion.
Will Adopting These Systems Change Shop Insurance or Liability Considerations?
Before you adopt automation, know how it changes your insurance and liability in one sentence: insurers see different risks and you’ll need proof you managed them.
1) Tell your insurer and update policies — why this matters: failing to notify can void coverage. How to do it:
- Call your broker and email a written summary of the automation equipment, supplier, and installation date.
- Provide a one-page risk assessment and SOPs (standard operating procedures).
- Ask for a policy endorsement that covers automated equipment and cyber-physical incidents.
Example: a small CNC shop added a lights-out cell and avoided claim denial by emailing the machine specs and maintenance plan before going live.
2) Adjust limits and indemnities — why this matters: automated systems can raise the cost of a single loss. How to do it:
- Review your property and E&O/GL limits with your broker.
- Increase property limits if machines are now worth more than your scheduled equipment total.
- Add cyber liability if machines are networked.
Example: a body-shop doubled its equipment limit after installing robotic welders because replacement cost jumped from $40k to $120k.
3) Document safety measures — why this matters: documentation reduces your liability and helps defend claims. How to do it:
- Keep logs of maintenance, inspections, and firmware updates.
- Keep training records for every operator, including dates and curricula.
- Save risk assessments and incident simulations.
Example: a bakery proved monthly maintenance logs and avoided a negligence claim after a robotic depositor jammed.
4) Train staff and change procedures — why this matters: human error shifts with automation and training lowers premium risk. How to do it:
- Create a written training program with modules, pass/fail checks, and refreshers every six months.
- Restrict access with locks, credentials, and clear lockout/tagout steps.
- Run supervised dry-runs before full production.
Example: an electronics shop cut near-miss incidents by 70% after instituting quarterly simulator training and ID badge access.
5) Prepare for supplier and third-party liability — why this matters: blame often moves between you and vendors. How to do it:
- Require suppliers to carry product and installation insurance and get certificates of insurance.
- Add contractual indemnities for design or programming defects.
- Keep a documented acceptance test signed by both parties.
Example: a metal fab shop avoided paying for a software bug by showing the vendor’s signed acceptance test and the vendor’s COI.
Final practical checklist (5 items):
- Notify broker with equipment list and risk summary.
- Increase property and add cyber limits if needed.
- Keep maintenance, firmware, and training logs.
- Put written training, lockout/tagout, and access control in place.
- Get supplier COIs and signed acceptance tests.
If you want, I can draft an email template to notify your insurer and a one-page SOP you can hand to your broker.