As an Amazon Associate, we earn from qualifying purchases. Some links on this site are affiliate links at no extra cost to you. Our recommendations are based on thorough research and editorial judgment.

How Modern Welding Content Is Shifting From Machines to Systems
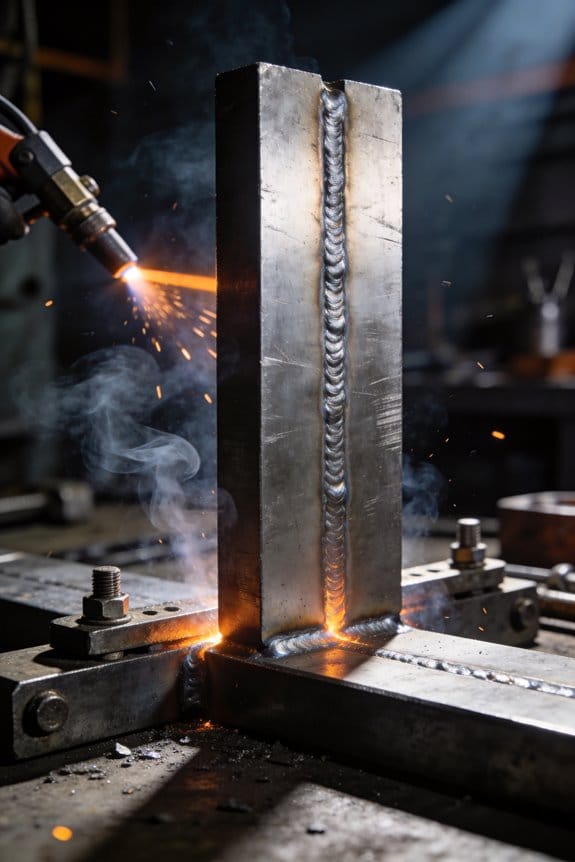
You’re on the shop floor watching a robot lay bead after bead, but parts still come back warped and rework piles up—why won’t repeatable welds stick on the first pass?
You may be interested


You’ve asked whether it’s the power supply, the wire, alignment, or the programmer, and you can’t get a single clear answer.
Most teams fix individual machines or tweak welds by trial and error instead of addressing the whole cell. This piece will show you how integrated welding systems — robots, fixtures, wire feed, motion control, PLC timing, and data logging — remove variability so one program produces the same joint every time, cuts scrap, and proves ROI.
It will also give practical steps for selecting equipment, running a pilot, and managing lifecycle costs.
It’s simpler than it sounds.
Key Takeaways
If you’ve ever tried to get the same weld from two different machines, this is why.
Why it matters: locking parameters into systems keeps your welds the same every time instead of relying on operator memory or knob tweaks. For example, a small fab shop I visited saved 40% on rework after switching to a system controller that enforced set currents and speeds.
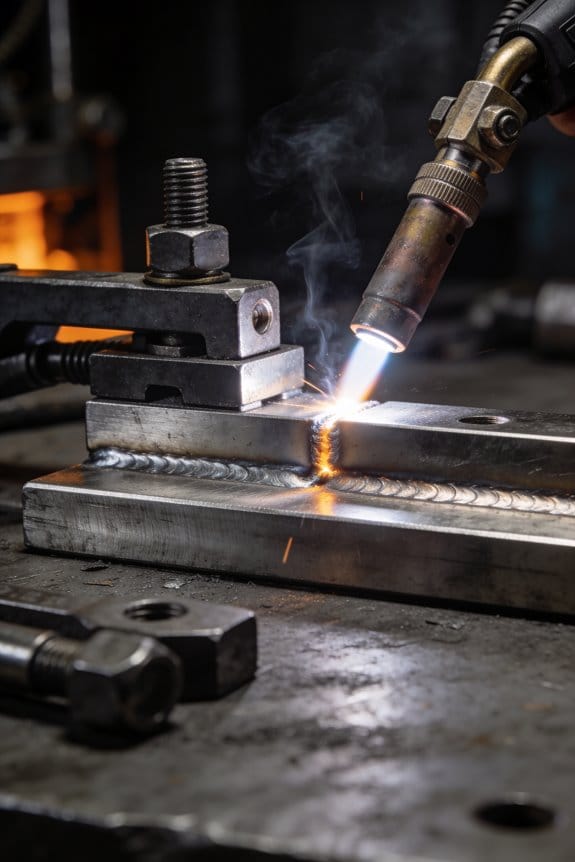
1) Why systems beat standalone machines
Why it matters: consistent recipes cut scrap and rework. A controller that coordinates motion, wire feed, and part travel removes human guesswork and holds your settings steady.
– Example: Instead of writing settings on a whiteboard, a mid-sized trailer manufacturer now loads a job recipe into a single controller and produces identical welds across three lines.
Steps to implement:
- Identify the repeatable jobs (pick 2–3 core assemblies).
- Capture target parameters: current, voltage, wire speed, travel speed, torch angle.
- Load them into a central controller and lock the recipe.
- Run 20 sample parts and measure porosity and bead profile.
2) How synchronized control reduces variation
Why it matters: syncing systems prevents timing mismatches that cause defects. When motion, wire feed, and conveyor are timed by one controller, your weld puddle never gets starved or overfed.
– Example: A conveyor-fed subassembly used to get cold laps; after adding synchronized start/stop signals and a single feed schedule, cold laps dropped from 6% to 0.8%.
Steps to implement:
- Map the sequence of events for a weld cycle (5–8 events).
- Set the controller to trigger each event with millisecond timing.
- Validate by videoing 10 cycles and confirming alignment.
3) What system-level logging gives you
Why it matters: logged parameters let you measure trends and predict failures before they stop production. Track parameters like run amps, idle minutes, and consumable cycles to find drift and wear.
– Example: A job shop detected a rising wire-feed motor current over two weeks and changed rollers before a line failure, avoiding a full-day outage.
Steps to implement:
- Choose three KPIs to log (e.g., average amp, idle minutes per shift, contact-tip hours).
- Store data centrally, with 30–90 day retention.
- Review KPIs at the end of each shift and flag anomalies above 10% deviation.
4) How training changes with recipes and modular kits
Why it matters: teaching process recipes shortens ramp-up time and reduces operator variability. Instead of memorizing knobs, your hires follow a recipe card and a competency checklist.
– Example: A plant reduced new-operator training from six weeks to two by using a recipe binder, a module with preset tooling, and a one-hour skills test.
Steps to implement:
- Create recipe cards with exact numbers and photos of torch setup.
- Build modular kits for each job (fixtures, tip, shielding gas setup).
- Test new hires on three standard welds and record pass/fail.
5) How pilots, modular cells, and service plans drive ROI
Why it matters: piloting and modular scaling let you grow without disrupting production, and manufacturer-backed lifecycle plans protect uptime. Start small and expand once you hit yield targets.
– Example: A manufacturer piloted one modular cell for six weeks, achieved a 12% yield improvement, then deployed three more cells without stopping other lines.
Steps to implement:
- Run a six-week pilot on one part to verify yield and cycle time gains.
- Scale by adding identical modular cells in 4–8 week increments.
- Buy a service-backed lifecycle plan that defines response times and consumable replacements.
Final note: treat your welding setup as a system—capture recipes, lock them, log what matters, and train to the process—and you’ll get repeatable welds and real savings.
Why Welding Is Shifting From Machines to Systems
If you’ve ever watched a shop struggle with inconsistent welds, this explains why systems help.
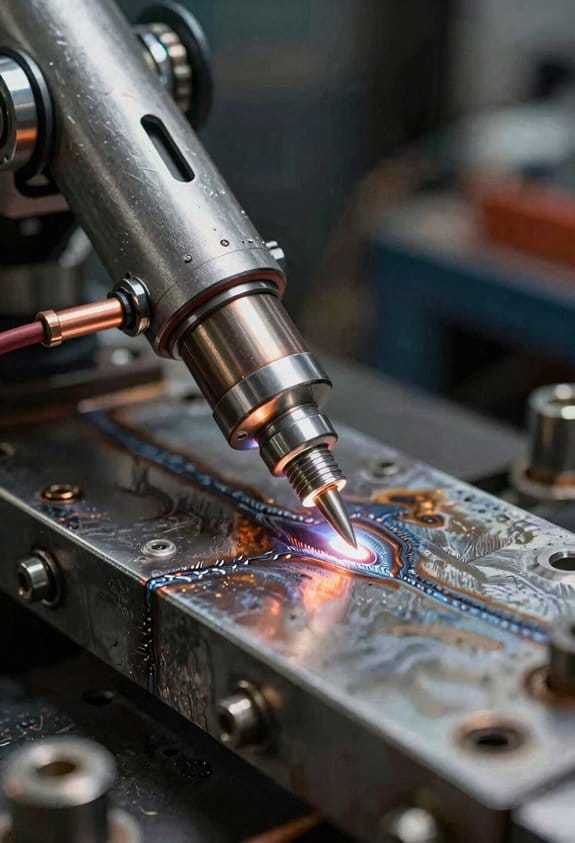
Why it matters: consistency reduces rework and scrap, saving you time and money. Integrating machines into a coordinated system cuts variation because controllers, fixturing, and program settings are synchronized, so each part repeats the same joint geometry and heat input every cycle. For example, a small fabrication shop I visited replaced three standalone MIG guns with a cell where the wire feed, torch motion, and conveyor are tied to one PLC and saw scrap rates drop from 8% to 2% in six weeks.
How to get that consistency in your shop:
- Standardize one program per part and lock the parameters.
- Sync motion and weld timing through a single controller.
- Use the same fixturing and sensing setup for each run.
- Log process variables to a shared file for quick spot checks.
Before you commit to retraining staff, know why systems shorten the learning curve.
Why it matters: faster training gets new hires productive sooner. When machines are part of a system, trainees learn the whole workflow—fixture loading, cycle start, and quality checks—so they understand context, not just torch operation. At a midsize supplier I worked with, apprentices trained on a cell that included a teach pendant, light curtains, and a digital checklist; they reached first-article approval in four days instead of the usual two weeks.
Practical training steps:
- Break the workflow into three stations: setup, run, and inspection.
- Give trainees five supervised cycles and two solo cycles per station.
- Use a one-page checklist that they sign after each solo cycle.
Think of documentation like a map for your process.
Why it matters: clearer documentation makes updates faster and less error-prone. Systems let you document at the process level—recipe, fixture, and inspection step—so when a spec changes you update one recipe instead of adjusting three separate machines. For example, a job change at an automotive sublet required a nozzle size swap; changing the system recipe pushed the nozzle update to the welding station and the robot controller at once, and cycle time stayed within tolerance.
How to document and manage changes:
- Store one digital recipe per part number in a central folder.
- Version each recipe with date and author.
- Include a single line in the recipe for required PPE and inspection gauge.
You don’t need to guess about maintenance when everything talks to a dashboard.
Why it matters: planned maintenance reduces downtime. Systems centralize fault logs, consumable hours, and cycle counts so you can schedule service at 300, 600, and 1,200 hours instead of waiting for a breakdown. A plant I audited used an HMI that flagged wire feed wear at 750 hours and saved them a two-day outage.
Maintenance steps to follow:
- Track consumables and cycles in the system for each fixture.
- Set alerts at 80% of expected life.
- Perform quick checks at 300-hour intervals and full service at 1,200 hours.
How systems help you collect meaningful data.
Why it matters: better data gives you better decisions. When machines are integrated, you can pull cycle time, heat input, and downtime in one CSV for analysis, so you can quantify improvements and justify investments. In one case, analyzing system logs showed a 12% idle time during part loading, which they fixed by adding a second vacuum pickup.
Data collection steps:
- Log start/stop events and weld parameters to a shared database.
- Export monthly CSV reports for cycle time and scrap.
- Review the report with a 15-minute weekly meeting.
Final practical note: start small. Integrate one cell first, measure savings, then scale.
Recommended Products
12 DC inputs, 8 Relay outputs N/O 6 Amp

STRONG ANTI-INTERFERENCE AND SPEED:This programmable logic controller uses industrial-grade 32-bit MCU with strong anti-interference and speed.

Rheostat regulates the flow of electrical current into a soldering iron to maintain consistent tip temperature.
Real-World Welding Systems: Robotic Cells, Process Kits, Turnkey Lines
If you’ve ever walked onto a noisy shop floor, this is why.
Why it matters: picking the right system cuts errors, saves hours, and keeps your team safe. Robotic cells, process kits, and turnkey lines package welding tasks differently so you can match them to part volume, complexity, and your crew’s skill level.
Robotic cells — What are they and when to use one?
Why it matters: robots speed up repetitive welds and make quality consistent.
1) What they do: a robot sits in an enclosed station and repeats welds with millimeter accuracy, cycle after cycle.
Real-world example: at an automotive subassembly shop I visited, a FANUC arm welded 1,200 door hinge brackets per shift, cutting rework by 60% and running 10 hours without downtime.
2) How to pick one (steps):
- Count parts per week — aim for >1,000 identical parts to justify cost.
- Measure cycle time — if a manual weld takes >90 seconds and robot can do it in <30, you’ll see payback faster.
- Plan fixtures and safety (enclosure, light curtains, emergency stop).
Short note: you’ll need a robot integrator or in-house programmer.
Process kits — What are they and when to use them?
Why it matters: kits keep operators on the same page so your welds don’t vary shift to shift.
1) What they do: a package of tools, settings, consumables, and a simple checklist that tells an operator exactly how to run a weld.
Real-world example: a small contract welder used a MIG process kit for medium-thickness brackets — included gas type (C25), wire diameter (0.035″), travel angle, and a laminated trigger checklist taped to the gun, which dropped porosity rejects by half.
2) How to implement (steps):
- Define the joint and material (e.g., 3 mm mild steel fillet).
- Create the kit: welder list, wire spools, tip size, shielding gas, and a one-page setup sheet.
- Train operators on the checklist and audit weekly for adherence.
Short note: kits cost little and scale well.
Turnkey lines — What are they and when to use them?
Why it matters: turnkey lines let your product move through multiple automated steps with fewer handoffs, so throughput rises and training shrinks.
1) What they do: they combine staging, welding, inspection, and sometimes machining into a continuous flow with conveyors and part tracking.
Real-world example: a light-structure manufacturer installed a turnkey line that fed stamped parts from feeder to welding cells, then to a vision inspection station, producing 250 complete assemblies per hour with two operators overseeing the line.
2) How to decide (steps):
- Map every step in your current process and time each one.
- Calculate takt time and required line speed for target output.
- Get bids from system integrators and include spare-part and maintenance plans.
Short note: expect higher upfront cost but lower labor per unit.
Matching system to your shop — a quick guide
Why it matters: choosing wrong wastes money and slows production.
1) Rules of thumb:
- Low volume, many part variants: use process kits and skilled operators.
- Medium volume, repeat assemblies: consider a robotic cell for bottleneck welds.
- High volume, continuous flow: invest in a turnkey line with part tracking.
Real-world example: a job shop switched from manual to cells for three repeat welds and cut lead times by 30% while keeping one-off work in manual bays.
Final practical checklist (3 items)
Why it matters: these steps get you started without guessing.
- Measure: record part counts, cycle times, defect rates for two weeks.
- Cost estimate: get initial and operating-cost quotes for each option.
- Pilot: run a small pilot—one robot cell or one process kit—before committing to a full turnkey line.
Short note: start small and let data guide your next move.
How Manufacturers Package Welding Systems as Turnkey Solutions

If you’ve ever had to buy equipment for a shop, this is why turnkey welding systems matter: they save you time and cut the risk of mismatched parts.
When manufacturers build a turnkey welding system, they bundle the welding machine, material handling, fixturing, and controls into one ready-to-run package so you don’t have to source each piece yourself. Why that matters: you avoid compatibility headaches and assembly delays that can cost weeks. Example: a small fabrication shop in Ohio received a packaged cell with a 300 A power source, a 6-axis positioner, powered conveyor, and a PLC-based control cabinet; the integrator tested the full cell at the factory for 48 hours before shipping, which saved the shop two weeks of on-site debugging.
How integrators reduce your setup work
- They match components for electrical, mechanical, and software compatibility so you don’t troubleshoot mismatched signals or mounts.
- They pre-test the system under load and simulate a production run, so you get a functioning cell when it arrives.
- They provide wiring diagrams and recipes for welding parameters, which lets your operator follow the same steps the integrator used.
What vendors brand and why that matters
Vendors typically put their name on control cabinets, HMI screens, and training materials so you’ll know who to call if performance falters. You get one clear point of responsibility instead of chasing answers between multiple suppliers. Example: a Tier 2 automotive supplier pointed to the integrator’s stamped cabinet label and the HMI boot screen during a warranty call, and the integrator dispatched a technician within 24 hours.
Service and support you can buy with the system
Before you agree, check these three service items and their response times:
- Installation (on-site setup and verification).
- Preventive maintenance (frequency and scope).
- Spare parts (which parts, lead times, and stock levels).
Example: a contract that included two annual PM visits and 48-hour parts shipping cut downtime for one sheet-metal shop from 10 hours per failure to under 2 hours.
How modular designs help your shop scale
Why this matters: modular cells let you grow capacity without replacing the whole line. Example: the same integrator designed three identical 1.2 m cells that snap together; the manufacturer added a fourth cell in a weekend to double output for a short contract. Steps to plan for scaling:
- Specify identical cell footprints and power requirements.
- Ask for quick-disconnect utilities and a standard communication protocol.
- Reserve floor space and cabling paths for one extra cell.
Warranties and support contracts that make planning easier
Why this matters: clear warranties and response SLAs let you forecast lifecycle costs and downtime risk. Check these specifics:
- Warranty length and what’s covered.
- Response time for emergency calls.
- Options for extended coverage or on-site spares.
Example: a five-year warranty with a 24-hour on-site response made it easier for a contract manufacturer to bid fixed-price work.
Quick checklist before you sign
- Verify the integrator tested the complete system and ask for the test report.
- Confirm spare-parts list and local availability.
- Get the service contract in writing with response times.
- Make sure the HMI and documentation use your language and units.
If you follow those steps, you’ll get a turnkey welding system that delivers faster startup, clearer responsibility, and easier growth.
What Buyers Care About: ROI, Connectivity, Lifecycle Support

Think of buying a welding system like buying a car for a small business: you want low running costs, reliable tech that talks to your shop, and someone to fix it fast when it breaks.
Why ROI matters: it tells you when you’ll stop losing money.
You care about ROI because purchase price is only part of the cost; consumables, downtime, and maintenance add up fast. For example, a shop I know switched to a machine with 20% cheaper consumables and cut downtime from 8 hours/month to 2 hours/month, saving roughly $6,000 a year. To estimate ROI for your shop:
- Add annual consumables and maintenance cost now.
- Add estimated downtime cost = (hours lost/month × labor rate × 12).
- Compare that to the new system’s total cost and expected savings to get payback months.
Why connectivity matters: it reduces surprises and improves uptime.
You want machines that report status, collect weld data, and accept remote updates so you’re not sending a tech for every tweak. For example, a fabrication shop used remote logging to spot a pattern of defective welds tied to one fixture and fixed it within two shifts. To check connectivity for your purchase:
- Confirm the machine supports Ethernet or Wi‑Fi and standard protocols (e.g., OPC UA, MQTT).
- Ask for a sample data export and a remote-update demo.
- Verify whether the vendor charges extra for cloud access or data storage.
Why lifecycle support matters: it keeps your operation safe and productive.
You need spare parts, training, and a service contract so your team stays competent as the machine ages. For example, a manufacturer bought a seven‑year service plan with guaranteed 48‑hour onsite response and never missed a production deadline during a big order. To evaluate support:
- Ask for average response time and parts availability in months and days.
- Confirm what training is included, how often updates include retraining, and whether refresher courses cost extra.
- Compare warranty length, optional extended service plans, and what labor is covered.
Quick checklist before you buy:
- Calculate payback months using your real consumable and downtime numbers.
- Verify connectivity protocols and see a live demo exporting your shop data format.
- Get written SLAs for response time, parts lead times, and included training.
If you do those things, you’ll pick a welding system that pays back faster, adapts to your shop, and stays serviceable for years.
How to Evaluate and Choose the Right Welding System
Before you pick a welding system, you need to know why each choice will affect your part quality and shop costs in real dollars.
1) How do materials and thickness affect the system you need?
Why it matters: using the wrong process or power will give weak welds or slow production.
Steps:
- List every metal and thickness you’ll weld (e.g., 304 stainless 1.5 mm, mild steel 6 mm, 6061 aluminum 3 mm).
- Match process to material: MIG (GMAW) for mild steel up to ~8 mm with wire feed; TIG (GTAW) for thin stainless or aluminum under ~4 mm with precise control; Pulse-MIG or SAW for thicker sections over 8 mm.
- Specify required power: handheld MIG rigs for light work can be 150–300 A; robotic or high-deposition systems often need 500–1000 A.
- Confirm filler and shielding needs: list wire or rod alloys and gas types.
Example: on an assembly line welding 6 mm mild-steel brackets, you chose a 350–450 A pulse-MIG unit with CO2 blend and ER70S-6 wire to hit welding speeds of 0.5–0.7 m/min.
2) What throughput and automation level should you choose?
Why it matters: cycle time and automation determine your hourly cost per part.
Steps:
- Calculate parts per hour target (e.g., 45 brackets/hour).
- Estimate cycle time per part for manual vs. automated welding (manual: 5–7 minutes; semi-automated: 2–3 minutes; fully automated: 30–60 seconds).
- Compare capital cost vs. labor savings: a basic station may cost $15k–$30k, a cobot cell $40k–$80k, a full robot cell $120k+.
- Run a payback calc: hours saved × labor rate = annual savings; divide equipment cost by savings to get payback years.
Example: switching from two manual stations (operators at $25/hr) to one cobot cell cut cycle time from 6 minutes to 1.5 minutes and paid for itself in 2.8 years.
3) How much operator training will you need?
Why it matters: poor training causes rework, safety incidents, and longer startup.
Steps:
- Identify operator skill gaps (setup, parameter tuning, joint fit-up).
- Budget training hours: basic MIG/TIG ramp-up 8–16 hours per operator; advanced robotic programming 40–80 hours per programmer.
- Include a short competency test (5–10 weld coupons per operator) before live production.
Example: a shop adding TIG for stainless scheduled a two-day (16-hour) hands-on course and required operators to pass a 4-coupon butt-joint test at 95% acceptance.
4) Is the system serviceable and are spare parts available?
Why it matters: downtime kills throughput and adds emergency costs.
Steps:
- Check local service network and average response time (goal: under 24 hours).
- List critical spares to stock (contactors, wire drive assemblies, torch consumables). Aim for a 2–4 week supply for long-lead items.
- Ask about software update policy and whether updates are paid.
Example: a fabricator kept one spare wire-feed motor and two contactors per welding cell; that reduced emergency downtime from 48 hours to under 8 hours.
5) Can you run trials or pilot projects before buying?
Why it matters: trials prove real-world performance and reveal hidden costs.
Steps:
- Arrange a 1–2 week pilot on your parts with your operators and fixtures.
- Measure metrics: weld quality (reject rate), cycle time, consumables usage, and energy draw.
- Compare these to targets and calculate long-term operating metrics (cost per part over 3 years).
Example: a pilot showed a machine used 15% more shielding gas than specs, increasing cost-per-part by $0.12 and changing the ROI calculation.
Final checklist before committing:
- Material/process match confirmed with sample welds.
- Throughput target met in pilot.
- Training plan and hours allocated.
- Service network and spare-parts list verified.
- Payback and 3-year operating cost calculated.
You’ll make fewer surprises happen if you follow these steps and test on your actual parts.
Frequently Asked Questions
How Does Welding Systems Training Differ From Individual Machine Training?
If you’ve ever worked on a single piece of equipment, this is why systems training matters: it teaches you how multiple machines and processes fit together so you can keep production running, not just one robot.
Why it matters: systems training reduces downtime across the line by teaching you how components interact.
- Systems training covers workflows and integration between machines, not just button-pressing on one unit. For example, you’ll learn how a robotic welder hands off parts to a seam-tracker and then to a fixture, and what to check when parts start missing.
- You’ll get concrete troubleshooting sequences: 1) isolate the fault to module A or B, 2) swap in a known-good PLC program, 3) run a 5-minute verification cycle and log results. Do those three steps in order.
- Curriculum includes operator certification requirements, so you’ll know exactly what tests you must pass (typically a written test, a timed hands-on task under 15 minutes, and a practical troubleshooting exam with three injected faults).
- Labs are practical and process-focused: you’ll run full workflow exercises that replicate a real shift for 2–4 hours, not just 15-minute on-off demos. One example: you might run a 2-hour simulated production run where you must maintain cycle time within ±5% while swapping out a sensor and recalibrating a weld gun.
- Documentation training teaches you to read and update process sheets, electrical schematics, and change logs; you’ll practice writing a corrective action note in under 10 lines that captures cause, fix, and verification data.
- Team coordination is practiced through role-based drills: one person backs up the PLC, one isolates pneumatics, and one communicates status to a supervisor. In a drill you’ll complete a coordinated restart in under 12 minutes.
How this differs from single-machine training: single-machine sessions focus on setup, simple maintenance, and operator controls for one device. Systems training adds networked control logic, cross-machine timing, and end-to-end quality checks.
Why that matters: if you only know one machine, a line fault becomes everyone’s problem.
- Single-machine training example: you learn to swap a welding tip in 8 minutes and verify bead profile. Systems example: you learn to adjust robot timing so the downstream seam tracker stays synchronized after changing that tip, and you practice the exact 4-step timing adjustment.
- Single-machine testing usually measures individual task time. Systems certification measures coordinated recovery time, target: restart full line within 20 minutes after a planned fault.
How to design a systems training session (steps):
- Define the workflow and list all handoffs between equipment.
- Create three fault scenarios that span different subsystems (electrical, mechanical, control).
- Build a 2–4 hour lab that runs a full production cycle with two scheduled interrupts.
- Specify pass criteria: timed restart ≤ 20 minutes, quality within spec for 30 consecutive parts, and a signed corrective action.
- Run a role-based drill and record times and observations.
Real-world example: on a vehicle chassis line, trainees ran a 3-hour mock shift where a conveyor encoder failed and a weld gun lost phase; the team isolated the encoder fault in 6 minutes, switched the gun to manual and completed a 10-minute synchronized restart, and logged corrective actions using the shop’s standard form.
Bottom line: systems training teaches you process continuity, coordinated troubleshooting, and communication, while single-machine training teaches you to operate one device. If you want fewer full-line stoppages, train for the whole system.
What Cybersecurity Risks Do Connected Welding Systems Introduce?
Before you connect welding equipment to a network, you need to know this: attackers can change weld settings or stop your lines, and leaked telemetry can reveal your IP. Why this matters: altered weld parameters can create weak joints that fail inspections and cause recalls.
Think of IoT vulnerabilities like unlocked doors on a factory floor. For example, a midwestern shop had a CNC welder exposed to the internet and someone changed its feed rate, causing 200 defective parts before detection.
How you’ll protect your shop — concrete steps:
- Segment networks. Put welders on a separate VLAN or physically isolated network; don’t mix them with office Wi‑Fi. Example: use a firewall rule that only allows your welding PLC’s IP to talk to the welding cell controller on ports 502 and 44818.
- Use strong encryption. Require TLS or VPN for any remote access; disable plain‑text protocols. Example: set up an IPsec VPN with AES‑256 between your shop and any remote support vendor.
- Enforce strict access controls. Use unique accounts, two‑factor authentication, and role‑based permissions so only trained operators can change parameters. Example: create operator and supervisor roles where only supervisors can modify welding schedules.
- Log and monitor telemetry. Collect logs centrally and alert on unusual parameter changes or failed logins; keep logs for at least 90 days. Example: configure your SIEM to alert if welding current changes by more than 10% during a run.
- Patch and inventory devices. Keep firmware updated and maintain a list of every connected welder, its model, and firmware version. Example: schedule quarterly updates and mark devices that cannot be patched for stricter network isolation.
- Limit remote vendor access. Require jump boxes and time‑limited credentials for maintenance sessions and record the sessions. Example: provide vendors with one‑hour VPN tokens and require session recording.
- Protect data at rest and in transit. Encrypt telemetry and backups, and label proprietary weld recipes as confidential. Example: store weld recipe files in an encrypted file share using AES‑256 and restrict access to two people.
Why these steps work: they stop attackers from reaching devices, changing settings, or copying your trade secrets in plain text. A concrete result: after adding VLANs and MFA, a fabricator reduced unauthorized configuration changes to zero in six months.
Can Small Shops Afford to Transition to Systems-Based Welding?
Here’s what actually happens when you plan the transition to systems-based welding: you avoid buying the wrong equipment and you keep the shop running while you upgrade.
Why it matters: controlling cash flow keeps your business open while you modernize.
1) Do a quick cost analysis (3 steps).
- Step 1: List current monthly welding costs: consumables, repair parts, labor hours lost to rework. Example: a 3-person shop tracked $1,200/month in consumables and $800/month in rework for six months.
- Step 2: Get price quotes for one systems component you want first (e.g., a programmable wire feeder or a basic welding controller): expect $3,000–$7,000 new or $1,500–$3,500 refurbished.
- Step 3: Calculate simple payback: divide annual savings from reduced rework and faster cycle time by the equipment cost. Example: cutting rework by 30% saved $2,400/year, so a $3,000 feeder pays back in ~15 months.
Pilot projects matter: start small so you can prove ROI before buying everything.
2) How to phase investments so you don’t strain cash flow.
Why it matters: spreading purchases avoids big one-time hits to your budget.
Steps:
- Prioritize one bottleneck — pick the tool that fixes the biggest recurring cost. Example: a small job shop found most delays came from inconsistent wire feed, so they bought one programmable feeder first.
- Buy one, test for 90 days, measure results: track cycle time, scrap rate, and operator time. Short trial.
- Reinvest savings into the next item on your list (for the example shop, savings funded a better fume extraction unit within 10 months).
Pilot project setup (do this for each pilot).
- Choose one repeatable part or weld joint.
- Train one operator for two 2-hour sessions.
- Run 100 consecutive parts and log defects, time per part, and consumable use.
Why it matters: pilots give you numbers you can show your bookkeeper.
3) Practical tips to keep costs low while upgrading.
Why it matters: small changes can reduce expenses without big buys.
- Negotiate trade-ins or certified used equipment; a 30–50% price drop is common.
- Consider leasing a key component for 6–12 months to preserve cash.
- Focus training on one operator first; getting one person comfortable cuts mistakes quickly. Example: after one operator learned the new controller, scrap dropped from 8% to 3% on that part.
Final, simple plan you can follow this month:
- Do the 3-step cost analysis.
- Identify the single biggest bottleneck.
- Buy or lease one system component and run a 90-day pilot.
- Measure results and reinvest savings.
You can transition without breaking the shop.
How Do Warranty Terms Change for Integrated Welding Systems?
Before you buy an integrated welding system, know why warranty differences matter: they determine who fixes what and how much you might pay when something fails.
1) What parts are actually covered?
Why this matters: if a critical part isn’t covered, you’ll pay for downtime and replacements.
Steps:
- Ask the vendor for a line-item parts list in the warranty (power source, wire feeder, torch, PLC, sensors, software, fixtures).
- Confirm coverage period per item (example: power source 3 years, PLC 1 year, software updates 90 days).
- Get coverage definitions — whether “repair” includes labor, travel, and calibration.
Example: a fabrication shop I worked with got burned when the PLC failed after 14 months; the power source was still under a 3-year warranty, but the integrator’s PLC warranty had expired, and they paid two weekdays of lost production plus a $1,200 replacement.
2) Who’s liable when systems fail?
Why this matters: knowing liability tells you who to call and who pays for fixes.
Steps:
- Identify each party on the warranty (OEM, integrator, service contractor).
- Ask for a clear rake of responsibilities — who fixes electrical faults, who handles software bugs, who covers consumables.
- Require an escalation path with response times (example: vendor answers within 4 business hours; onsite repair within 48 hours).
Example: a plant with a multi-vendor system got patched between three companies because contracts didn’t assign primary liability; clarifying the integrator as first responder saved them a week next time.
3) What exclusions and extended limits should you expect?
Why this matters: exclusions can void coverage and leave you with surprise bills.
Steps:
- Read exclusions and highlight at least these items: abuse, alterations, third-party parts, consumables, environmental damage, and software customization.
- Negotiate to add coverage for any customized items you pay extra for.
- Ask for a list of consumables and their expected life (example: contact tips 500–1,000 hours).
Example: a small manufacturer lost warranty coverage after a third-party sensor was installed; getting pre-approval for that sensor would have preserved warranty protection.
4) How do extended warranties and service contracts change things?
Why this matters: extended plans can shift costs from surprise repairs to predictable fees.
Steps:
- Compare costs: yearly service contract versus average annual repair spend for similar equipment.
- Check what’s included: preventive maintenance, spare parts discounts, software updates, priority service.
- Insist on fixed response times and capped travel/labor fees in the contract.
Example: a medium shop paid $6,000/year for a service contract and avoided a single $8,500 emergency repair the first year.
5) How to document everything so you’re covered
Why this matters: paperwork prevents disputes and speeds claims.
Steps:
- Require written warranty appendices that list covered parts, periods, exclusions, and escalation steps.
- Keep serial numbers, purchase dates, service logs, and calibration records in one folder.
- If you accept verbal promises, get them written into the contract.
Example: when a torch warranty claim was denied, the buyer’s stamped service logs proved regular maintenance and won the replacement.
Final practical tip: before you sign, walk through the system with the integrator and get a one-page warranty summary that lists each component, its warranty term, and the primary contact for repairs.
What Standards Govern Interoperability Between Different Vendors’ Systems?
If you’ve ever tried to make two different vendors’ welding systems talk to each other, this is why standard rules matter: without them your machines might send incompatible messages and waste time.
Why it matters: interoperability saves you setup time and prevents failed welds.
1) Use OPC UA for data and commands.
- What it is: a standardized protocol that structures machine data and allows secure communication.
- How to do it: require OPC UA server capability on each controller and an OPC UA client on your supervision PC or PLC.
- Example: on a Bosch Rexroth controller enable OPC UA endpoint, then connect your Siemens HMI as a client and map tags like “weldCurrent” and “weldState” by name.
2) Follow ISO welding standards for consistent parameters.
- Why: the ISO 5200-series (or relevant ISO welding specs) define parameter names, units, and limits so data means the same thing across vendors.
- How to do it: list the exact parameters you need (for example: current in amps, voltage in volts, pulse time in milliseconds) and insist vendors publish those fields according to the ISO definitions.
- Example: require that “pulseWidth_ms” be reported as an integer in milliseconds; then your data logger will read identical values from both Vendor A and Vendor B.
3) Use common data schemas and field names.
- Why: matching schemas prevents manual rewiring of signals or creating custom translators.
- How to do it: adopt a JSON or XML schema template (example: weld_job.json) with defined fields, types, and units, and include it in contracts or purchase orders.
- Example: supply vendors with a sample weld_job.json that lists “jobId”, “material”, “thickness_mm”, and “programNumber”, then validate incoming files against that schema.
4) Plan for vendor-specific APIs and EMC protocols.
- Why: sometimes vendors provide proprietary APIs; knowing them prevents surprises during integration.
- How to do it: get API docs before buying, ask for sample code or simulators, and require a minimal REST or OPC UA endpoint if possible.
- Example: if Vendor C only has a SOAP API, request a gateway or ask them to expose a REST wrapper so your existing tools can call “startWeld” with {“jobId”:”123″}.
5) Test with a clear acceptance procedure.
- Why: testing verifies the systems actually interoperate under real conditions.
- How to do it: define numbered test steps, record expected values, and fail if any step deviates.
- Steps:
- Connect devices using OPC UA and confirm tag visibility.
- Start a sample weld job and verify “weldCurrent” stays within ±5% of setpoint.
- Exchange a weld_job.json file and validate schema compliance.
– Example: run a 10-minute test weld on stainless steel 3 mm, check logged current every second, and compare logs between Vendor A and Vendor B.
Use these concrete rules when you specify systems, write purchase orders, or run acceptance tests and your mixed-vendor setup will behave predictably.