As an Amazon Associate, we earn from qualifying purchases. Some links on this site are affiliate links at no extra cost to you. Our recommendations are based on thorough research and editorial judgment.

10 Best Miter Saws for Crown Molding That Pros Rely On
You’re standing over a half-finished crown installation, mitered joints gapped and sanding away more material than you thought possible, while the clock ticks toward a client walk-through.
You may be interested


Or you’re wresting a long nested crown against a tiny fence, cursing the wobble as the blade tears the face grain.
What separates a cutter that delivers tight, repeatable crown joints from one that ruins stock is often overlooked: buyers pick the wrong blade size or tooth count, underestimate motor torque for one‑pass nested cuts, or ignore fence height and support.
This guide reviews 10 top miter saws chosen for blade size, motor power, fence support, and cutting accessories so you’ll know which models make pro-level crown work fast and clean.
Key Takeaways
If you need to cut taller or nested crown profiles without flipping the work, a 12″ dual-bevel sliding miter saw lets you do it in one pass and gives the capacity to handle bigger stock. It saves you time on larger jobs and reduces juggling. Use it when you want fewer setup headaches.
For anyone who works on trim daily and hates burned or ragged edges, prioritize a 15A motor and higher RPM paired with a larger blade so you get cleaner cuts and less tear-out on delicate crown. That combination gives you more power through hardwoods. It keeps cuts smooth when you’re racing the clock.
What makes this blade choice stand out for most homeowners and pros is using a 40–80 tooth carbide blade; pick 60–80 teeth if you do fine trim and want silkier finishes. You’ll trade some speed for a nicer edge, but the results are worth it. Change blades based on the job.
You get repeatable, accurate crown cuts without guesswork when the saw has a tall, flat fence plus positive miter stops and some integrated guides like a laser or LED. Those features make lining up compound angles faster and less frustrating. They help you stay consistent across multiple pieces.
The saw becomes safer and faster when you add crown-specific jigs, a tall fence, quick clamps, and support extensions for long stock. These extras hold the work steady and cut down on sanding later. They also let you work solo on big trim runs.
| 10″ Single-Bevel Sliding Miter Saw with Laser Guide | NOVORIK 10″ Single-Bevel Sliding Miter Saw: Best Budget Sliding | Product Type: Sliding compound miter saw (single bevel) | Compatibility with Crown Molding Work: Designed for woodworking, includes laser guide for precise cuts useful for crown | Material / Blade Type (where applicable): 10″ alloy steel blade, 40T (TCT saw blade included) | VIEW LATEST PRICE | Read Our Analysis | |
| Bosch MS1233 Crown Stop Kit for Miter Saws | Bosch MS1233 Crown Stop Kit: Best Crown Accessory | Product Type: Crown stop kit (miter saw accessory) | Compatibility with Crown Molding Work: Specifically enables nested crown molding cuts on compatible Bosch saws | Material / Blade Type (where applicable): Accessory kit (alloy steel components; blade specs listed in source but accessory has no saw blade) | VIEW LATEST PRICE | Read Our Analysis | |
| Cut N Crown Molding Cutting Jig for Miter Saw | 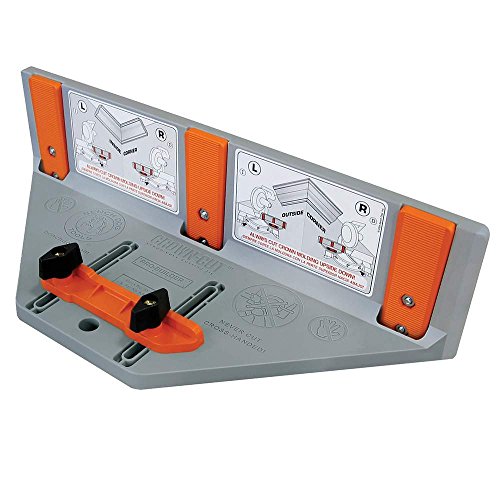 | Cut N Crown Molding Cutting Jig: Best Portable Jig | Product Type: Crown cutting jig (miter saw accessory) | Compatibility with Crown Molding Work: Designed to simplify cutting crown and cove molding; fits 10″ and larger saws | Material / Blade Type (where applicable): Jig (material listed as “down” in source) — accessory (no blade) | VIEW LATEST PRICE | Read Our Analysis |
| Kreg KMA2800 Crown-Pro Crown Molding Tool |  | Kreg KMA2800 Crown-Pro Tool: Best Angle Precision | Product Type: Crown molding tool / jig (accessory) | Compatibility with Crown Molding Work: Crown-Pro tool for crown molding up to 5-1/2″; measures spring angles | Material / Blade Type (where applicable): Polymer tool with aluminum-finish elements — accessory (no blade) | VIEW LATEST PRICE | Read Our Analysis |
| Milescraft Crown45 Crown Molding Miter Saw Jig | 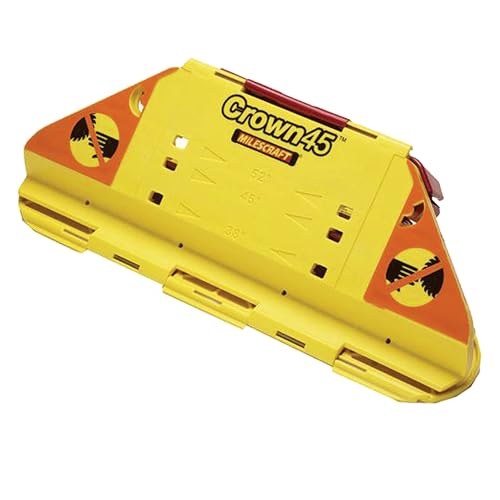 | Milescraft 1405 Crown45 Jig: Best Right-Side-Up | Product Type: Crown molding miter saw jig (accessory) | Compatibility with Crown Molding Work: Right-side-up crown jig for 2″–5-1/2″ molding; supports 38°/45°/52° springs | Material / Blade Type (where applicable): Plastic body; includes high-speed steel blade (4.33″, 5T) for jig use | VIEW LATEST PRICE | Read Our Analysis |
| DOVAMAN 12″ Dual-Bevel Sliding Compound Miter Saw | DOVAMAN 12″ Dual-Bevel Sliding Miter Saw: Best Value Power | Product Type: Sliding compound miter saw (dual-bevel) | Compatibility with Crown Molding Work: Sliding compound saw with laser; supports crown cutting capacities listed | Material / Blade Type (where applicable): 12″ TCT (tungsten carbide tipped) 40T blade (pre-installed) | VIEW LATEST PRICE | Read Our Analysis | |
| 12″ Sliding Compound Miter Saw with Laser Guide |  | HIROHRTV 12″ Sliding Compound Miter Saw: Best Heavy-Duty Option | Product Type: Sliding compound miter saw (dual-bevel) | Compatibility with Crown Molding Work: Dual-bevel sliding saw with laser; listed as suitable for crown/woodwork | Material / Blade Type (where applicable): 12″ steel blade, 80T | VIEW LATEST PRICE | Read Our Analysis |
| SKIL 10″ Dual Bevel Sliding Compound Miter Saw-MS6305-00 | 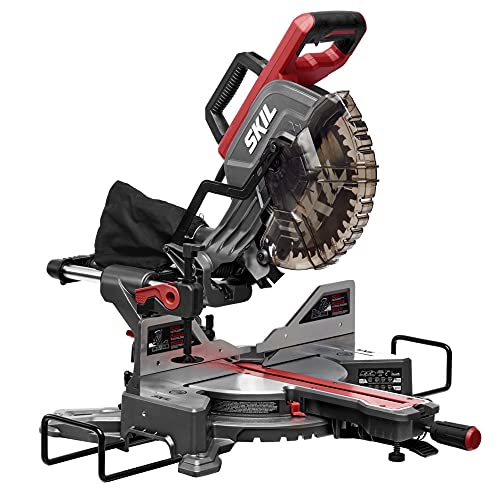 | SKIL 10″ Dual Bevel Sliding Miter Saw: Best User-Friendly | Product Type: Sliding compound miter saw (dual-bevel) | Compatibility with Crown Molding Work: Dual-bevel sliding saw with tall sliding fences supporting crown molding | Material / Blade Type (where applicable): 10″ high-speed steel blade, 40T | VIEW LATEST PRICE | Read Our Analysis |
| Makita LS1019L 10″ Dual-Bevel Sliding Compound Miter Saw with Laser | Makita LS1019L 10″ Dual-Bevel Saw: Professional Grade | Product Type: Sliding compound miter saw (dual-bevel) | Compatibility with Crown Molding Work: Dual-bevel sliding saw with nested crown capacity up to 6-5/8″ | Material / Blade Type (where applicable): 10″ tungsten carbide blade, 60T | VIEW LATEST PRICE | Read Our Analysis | |
| DEWALT 12-Inch Miter Saw 15-Amp Single Bevel Compound (DWS715) | 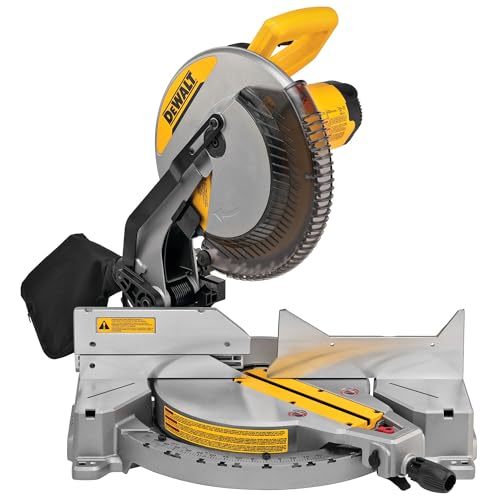 | DEWALT 12″ Single Bevel Miter Saw (DWS715): Best Trusted Brand | Product Type: Compound miter saw (single bevel) | Compatibility with Crown Molding Work: Single-bevel saw with tall fence supporting crown molding vertically nested | Material / Blade Type (where applicable): 12″ carbide-tipped blade, 80T | VIEW LATEST PRICE | Read Our Analysis |
More Details on Our Top Picks
10″ Single-Bevel Sliding Miter Saw with Laser Guide
If you need a compact saw that fits a small workshop but still handles wider crown-molding crosscuts, the sliding action increases cutting capacity without the size or cost of a larger stationary saw. It comes with a 10″ blade that has 40 teeth and a 15 Amp motor to help you power through common trim cuts. Pretty handy.
For anyone who works on DIY trim or occasional trade jobs and hates lugging a big saw around, the single-bevel sliding miter design boosts crosscut width so you can cut larger crown profiles. The bevel tilts 0°–45° for angled cuts, and miter stops let you repeat common angles quickly. A laser guide helps you line up cuts faster for cleaner joints.
- Product Type:Sliding compound miter saw (single bevel)
- Compatibility with Crown Molding Work:Designed for woodworking, includes laser guide for precise cuts useful for crown
- Material / Blade Type (where applicable):10″ alloy steel blade, 40T (TCT saw blade included)
- Power Source / Passive:Corded electric (powered saw)
- Included Components / Accessories:Saw, 10″ TCT blade, clamping device, hex key, 2 side supports, attachments
- Manufacturer / Brand:NOVORIK
- Additional Feature:Laser guide alignment
- Additional Feature:Sliding crosscut capacity
- Additional Feature:ETL listed safety
Bosch MS1233 Crown Stop Kit for Miter Saws
If you cut nested crown molding a lot and want quicker, repeatable setups, the left and right stops attach to compatible Bosch miter saws and let you make miter cuts without tilting the blade. That keeps your angles consistent and cuts down setup time. Fast.
For anyone who wants simple hardware and storage, the kit includes mounting knobs and other installation pieces so you can get going quickly and tuck the stops back over the fence when you’re done. You won’t have to fiddle with complicated parts. Handy.
What makes this crown-stop setup stand out for workshop use is the durable alloy-steel construction, which feels solid under repeated use and should hold alignment well. It’s built to take regular shop wear. Practical.
You get easier, repeatable crown cuts without spending extra time guessing angles, and the flip-back feature saves bench space when you’re not cutting. Check the Bosch saw model list for compatibility before you buy so it fits your saw. Simple.
- Product Type:Crown stop kit (miter saw accessory)
- Compatibility with Crown Molding Work:Specifically enables nested crown molding cuts on compatible Bosch saws
- Material / Blade Type (where applicable):Accessory kit (alloy steel components; blade specs listed in source but accessory has no saw blade)
- Power Source / Passive:Passive accessory (no power; used with corded/other saws)
- Included Components / Accessories:Left/right crown stops, mounting knobs, hardware
- Manufacturer / Brand:Bosch
- Additional Feature:Nested crown support
- Additional Feature:Tool-storable flip stops
- Additional Feature:Includes mounting hardware
Cut N Crown Molding Cutting Jig for Miter Saw
If you struggle to get clean crown and cove corners, this jig gives you repeatable miters so your trim looks professional. For anyone who wants quick setup without mounting hardware, the rectangular silver jig presses against your saw fence and uses an easy index guide to position molding. What makes this cutting jig stand out is that it works on any 10″ or larger miter saw, fixed or sliding, and holds molding up to 6″ wide. You get reliable repeatable cuts without fiddling with clamps or permanent attachments. The Cut N Crown Jig solves the problem of inconsistent angles by letting you make the same cut over and over, which saves time on long runs of trim. Perfect for hobbyists or installers, this lightweight 1.25-pound tool ships as one piece and comes with a limited lifetime warranty. Use it when you need fast, accurate miters for crown or cove molding.
- Product Type:Crown cutting jig (miter saw accessory)
- Compatibility with Crown Molding Work:Designed to simplify cutting crown and cove molding; fits 10″ and larger saws
- Material / Blade Type (where applicable):Jig (material listed as “down” in source) — accessory (no blade)
- Power Source / Passive:Passive jig (no power)
- Included Components / Accessories:Cut N Crown jig with integral setup guide (single piece)
- Manufacturer / Brand:Bench Dog
- Additional Feature:Portable, no-mount use
- Additional Feature:Fits 10″+ saws
- Additional Feature:Holds up to 6″ molding
Kreg KMA2800 Crown-Pro Crown Molding Tool
If you want clean crown-molding joints without wrestling with compound-angle math, the Kreg KMA2800 Crown-Pro helps you make accurate bevel and miter cuts using a standard miter saw. It takes the guesswork out of tricky cuts by measuring inside and outside corner angles and the molding’s spring angle so you set cuts precisely. Short setup.
For anyone who fits wide crown molding, this tool works on profiles up to 5 1/2 inches wide and fits 10- and 12-inch miter saws, so you can tackle common home projects without buying a specialty saw. You’ll appreciate that the adjustable spring base locks between 30° and 60°, which matches the angles most homes use. It’s light too.
What makes this crown-molding tool stand out is how portable it is: the polymer body with aluminum-finish parts weighs about a pound, so you can move it around the workshop easily. You’ll still want to follow Kreg’s guidance for warranty and returns if anything goes wrong. Handy and straightforward.
- Product Type:Crown molding tool / jig (accessory)
- Compatibility with Crown Molding Work:Crown-Pro tool for crown molding up to 5-1/2″; measures spring angles
- Material / Blade Type (where applicable):Polymer tool with aluminum-finish elements — accessory (no blade)
- Power Source / Passive:Passive tool/jig (no power)
- Included Components / Accessories:Kreg Crown-Pro tool (single component)
- Manufacturer / Brand:Kreg
- Additional Feature:Adjustable spring base
- Additional Feature:Measures inside/outside angles
- Additional Feature:Eliminates compound cuts
Milescraft Crown45 Crown Molding Miter Saw Jig
If you struggle getting crown molding cuts to match the way they’ll look on the wall, this jig lets you cut the molding in the same orientation it will be installed so your miters read correctly. It holds the molding right-side-up, which makes visualizing and matching pieces much easier than flipping parts over. The jig lets you set spring angles to 38°, 45°, or 52° using the included angle-finder triangles so you can work with different trim styles and roof pitches. It fits molding from about 2″ to 5.5″, so you can tackle baseboard-sized crown as well as beefier profiles. For anyone who needs to save bench and garage space, it collapses for storage. You’ll also get a small high-speed steel blade included, though you may want a sharper blade for production work. The jig doesn’t mount to the saw, so you hold it steady on a 10″ or larger sliding miter saw and control the piece as you cut. Perfect for DIYers and pros who want fewer mistakes, this setup helps you work faster and spend less time re-cutting.
- Product Type:Crown molding miter saw jig (accessory)
- Compatibility with Crown Molding Work:Right-side-up crown jig for 2″–5-1/2″ molding; supports 38°/45°/52° springs
- Material / Blade Type (where applicable):Plastic body; includes high-speed steel blade (4.33″, 5T) for jig use
- Power Source / Passive:Passive jig (no power; uses miter saw power)
- Included Components / Accessories:Crown jig, spring angle triangles, HSS blade, manual
- Manufacturer / Brand:Milescraft
- Additional Feature:Right-side-up cutting
- Additional Feature:Collapsible for storage
- Additional Feature:Includes angle-setting triangles
DOVAMAN 12″ Dual-Bevel Sliding Compound Miter Saw
If you need clean angled cuts for crown molding or trim, the dual-bevel and sliding action let you cut compound angles and longer stock without switching tools. It has a 12-inch, 40-tooth TCT blade and a 15-Amp (1,800 W) motor that spins up to 3,800 RPM for quick, smooth cuts. Solid choice.
For anyone who works in a small shop or tackles weekend projects, the saw bevels left and right 0–45°, so you can flip cuts without reflipping the workpiece. You also get nine positive miter stops for common angles, which speeds up repeat cuts. Very handy.
What makes this miter saw stand out for casual users is the laser guide and transparent guard that help you line up cuts and watch the blade as it moves. The ambidextrous trigger with a safety lock keeps operation comfortable whether you’re left- or right-handed. Safe and simple.
You get a 4.2 x 13-inch cutting capacity that handles typical trim and stock sizes, so you won’t have to make lots of extra passes. The sliding rail adds reach for wider boards, letting you cut bigger pieces in a single pass. Useful feature.
- Product Type:Sliding compound miter saw (dual-bevel)
- Compatibility with Crown Molding Work:Sliding compound saw with laser; supports crown cutting capacities listed
- Material / Blade Type (where applicable):12″ TCT (tungsten carbide tipped) 40T blade (pre-installed)
- Power Source / Passive:Corded electric (powered saw)
- Included Components / Accessories:Saw, 40T TCT blade, dust bag, clamp, spare carbon brushes, side plates, wrench, manual
- Manufacturer / Brand:DOVAMAN
- Additional Feature:Dual-bevel left/right
- Additional Feature:Replaceable carbon brushes
- Additional Feature:Ambidextrous trigger/switch
12″ Sliding Compound Miter Saw with Laser Guide
If you need to cut wide crown molding or long stock without flipping pieces, the sliding action and dual-bevel 0–45° design give you the reach and angles to get it done. The 12″ sliding compound miter saw increases capacity to about 4.2″ x 13″, so you can handle deep profiles in one pass. It saves you time.
For anyone who wants smooth, consistent cuts for finish work, the 15A copper motor and 12″ 80-tooth blade deliver the power and finish you want. You’ll notice less tear-out on trim and cleaner edges on longer boards. That makes sanding lighter.
What makes this sliding compound miter saw stand out for repeatable cuts is the integrated laser guide that lines up the blade with your pencil mark. You set up faster because you can see the cut before you make it. It’s handy for quick layouts.
You get quick angle setup without hunting through settings because instant angle presets and nine common miter stops speed your workflow. If you’re rushing between repetitive cuts, those presets save precious minutes. The saw hashes through batches efficiently.
The HIROHRTV 12-inch sliding compound miter saw solves the need for a sturdy jobsite tool by pairing a heavy-duty build with compatibility for miter stands. You can mount it and forget about wobble when you’re pushing through longer boards. That stability matters when accuracy counts.
- Product Type:Sliding compound miter saw (dual-bevel)
- Compatibility with Crown Molding Work:Dual-bevel sliding saw with laser; listed as suitable for crown/woodwork
- Material / Blade Type (where applicable):12″ steel blade, 80T
- Power Source / Passive:Corded electric (powered saw)
- Included Components / Accessories:Saw (package lists miter saw; accessories unspecified)
- Manufacturer / Brand:HIROHRTV
- Additional Feature:360° rotating wheels
- Additional Feature:Mountable to stands
- Additional Feature:High-tooth-count blade (80T)
SKIL 10″ Dual Bevel Sliding Compound Miter Saw-MS6305-00
If you need accurate crown-molding cuts without hauling a big saw around, the 15 Amp, 120 V motor gives you the power to get through most trim jobs quickly and cleanly. It spins a 10″ 40-tooth HSS blade at 4,800 RPM, so you can cross-cut up to 2×12 at 90° and 2×8 at 45° with minimal fuss. Nice.
For anyone who works on trim or occasional carpentry for friends and family, the sliding action plus dual bevel makes nested crown and base cuts much easier because you can tilt and slide without flipping the workpiece. You also get LED Shadow Line guidance and a quick clamp to help line up and hold your pieces while you cut. Handy.
What makes this miter saw stand out for people moving between jobsites is that it stays fairly portable at about 39.4 pounds and includes extensions to support longer boards. You won’t need heavy lifting gear to relocate it. The saw comes with a three-year warranty for added peace of mind.
- Product Type:Sliding compound miter saw (dual-bevel)
- Compatibility with Crown Molding Work:Dual-bevel sliding saw with tall sliding fences supporting crown molding
- Material / Blade Type (where applicable):10″ high-speed steel blade, 40T
- Power Source / Passive:Corded electric (powered saw)
- Included Components / Accessories:Saw, extension rods, dust bag, hex key, clamp
- Manufacturer / Brand:SKIL
- Additional Feature:LED Shadow Line guide
- Additional Feature:Tall sliding fences
- Additional Feature:Lightweight carrying handle
Makita LS1019L 10″ Dual-Bevel Sliding Compound Miter Saw with Laser
If you need to cut crown molding tight to the wall, the flush-against-wall sliding design lets you trim close to baseboards without moving the workpiece. It uses a 10″ carbide blade and a 15-amp soft-start motor rated at 3,200 RPM to power through thicker trim, and the direct-drive gearbox gives extra vertical cutting capacity. Short and portable.
For anyone who wants accurate angled cuts for crown and trim, the dual-bevel compound head and single-rail slide make it easy to set and repeat angles while the linear ball bearings help keep cuts true. You get integrated laser alignment for faster setup and an electric brake that stops the blade quickly for safer handling. Good for jobsites and tight spaces.
- Product Type:Sliding compound miter saw (dual-bevel)
- Compatibility with Crown Molding Work:Dual-bevel sliding saw with nested crown capacity up to 6-5/8″
- Material / Blade Type (where applicable):10″ tungsten carbide blade, 60T
- Power Source / Passive:Corded electric (powered saw)
- Included Components / Accessories:Saw, blade, bag, hex wrench, triangular rule, vertical vise
- Manufacturer / Brand:Makita
- Additional Feature:Flush-against-wall slide
- Additional Feature:Soft-start motor
- Additional Feature:Electric brake stop
DEWALT 12-Inch Miter Saw 15-Amp Single Bevel Compound (DWS715)
If you need a portable saw that’s easy to move between job sites, the DWS715’s compact, lightweight body and 15-amp motor give you power without the bulk, so you can carry it and still cut through trim and crown materials. The 12-inch, 80-tooth carbide blade spins around 4,000–4,500 RPM and delivers clean, fast cuts on wood. Works well.
For anyone who does trim and crown molding, the single-bevel design tilts left to 48° for common crown angles, and the tall sliding fence lets you support nested crown vertically so your pieces stay steady while you cut. You also get practical controls like a stainless-steel detent plate with 14 stops and a cam miter lock that make repeated angles quick to set. It’s convenient.
What makes this miter saw stand out for day-to-day jobs is the included vertical clamp, wrench, and dust bag, which help keep your work tidy and reduce cleanup time. The saw’s balance of portability and cutting speed fits DIYers and trade carpenters who need reliable results without hauling a heavy machine. Try it.
- Product Type:Compound miter saw (single bevel)
- Compatibility with Crown Molding Work:Single-bevel saw with tall fence supporting crown molding vertically nested
- Material / Blade Type (where applicable):12″ carbide-tipped blade, 80T
- Power Source / Passive:Corded electric (powered saw)
- Included Components / Accessories:Saw, 12″ carbide blade, wrench, dust bag, vertical clamp
- Manufacturer / Brand:DEWALT
- Additional Feature:Stainless miter detent plate
- Additional Feature:Tall sliding fence support
- Additional Feature:Built-in vertical clamp
Factors to Consider When Choosing a Miter Saw for Crown Molding
If you need clean crown joints without awkward extra cuts, check the saw’s crown spring angle compatibility so your molding sits at the right incline for accurate cuts. That angle setting is what keeps your joints tight when you’re working with common 38° or 45° profiles. Short sentence.
For anyone who struggles with deep or wide trim, look at blade diameter and cutting capacity because larger blades cut deeper and wider profiles in a single pass. A bigger blade helps when you’re tackling tall crown or thick trim pieces. Short sentence.
What makes this miter saw setup matter for messy jobs is fence height and support; a taller fence holds the molding securely and keeps the piece from tipping while you cut. Pair that with outfeed support or clamps and your cuts stay consistent across long runs. Short sentence.
You get the choice between bevel cuts and nested cuts without overcomplicating the workflow by matching the saw’s bevel range and table design to how you like to work. If you prefer nesting crown in the fence, make sure your saw supports that method; if you tilt the blade, confirm the bevel range handles the angle. Short sentence.
The saw solves the problem of forcing multiple passes by offering sufficient reach and cutting capacity so you can handle wide crown profiles and trim widths in one go. Pay attention to left- and right-cut capacity, because reach matters when you’re working across doorways or long baseboards. Short sentence.
Crown Spring Angle Compatibility
If you want clean corners without guesswork when you install crown molding, match the molding’s spring angle to your miter saw or jig so cuts nest correctly and joints are tight. For most jobs you’ll see spring angles around 38°, 45°, and 52°, and picking a saw or jig that lists those settings saves you setup headaches and wasted pieces. Use a tool that supports the width and angle combination you’ll cut because wider profiles at steep spring angles need more vertical capacity or nesting space. Buy an adjustable or indexed saw or jig if you plan to do several profiles; they speed setup and cut fewer pieces wrong. Measure your corners to the nearest degree and use angle-finding accessories so you don’t guess. Decide whether you’ll cut nested or right-side-up, and confirm the tool handles that orientation. Shorter setup time, fewer scrap pieces.
Saw Blade Diameter
If you need to cut taller or nested crown in one pass, pick a larger blade diameter like 12” instead of 10″ so you can handle wider profiles without extra setups, and that saves you time on long jobs. For anyone who wants cleaner finishes on delicate molding, a bigger blade runs a higher peripheral speed at the same RPM, which often gives smoother profiles and reduces tearout. What makes this saw blade choice stand out for weekend DIYers is matching tooth count to diameter; a 40–60 tooth blade on a 10″–12″ saw strikes a good balance between cutting speed and finish. You get cleaner cuts without slowing your work to a crawl. The tradeoff is that larger blades add weight and bulk, so if you carry your saw to jobs or have limited shop space, factor that in. Perfect for users who switch between cabinet trim and crown, check your saw’s fence and nesting capacity so the blade diameter will actually fit your setup. The choice helps your projects look professional while letting you work faster.
Fence Height And Support
If you want clean, accurate crown joints when cutting trim, pick a fence that supports the molding well so it doesn’t wobble and ruin the cut. A taller fence that gives you 5–6 inches of vertical support keeps the crown sitting flat against the face and cuts steady; it makes setup easier and reduces rocking during the cut. Use a fence with a flat, tall face and strong mounting so it resists deflection under pressure and keeps alignment consistent.
For anyone who works with wide profiles and long pieces, look for sliding or extendable supports and removable extension wings to hold the molding’s bottom or back edge when nested. Those extras keep big profiles stable so you don’t have to fight the workpiece mid-cut. Make sure the fence has clear, repeatable reference surfaces so your setups are faster and your cuts match from piece to piece.
Bevel Versus Nested Cuts
If you want clean inside joints on tricky spring angles, tilt the blade and make bevel (compound) cuts so the saw slices both angles at once. Those cuts need careful setup and you’ll be flipping the molding for each corner, but they give very precise fits. Try them when your molding has an unusual spring angle or when you want the tightest seam.
For anyone who prefers faster work and fewer fiddly adjustments, hold the molding nested against a tall fence or a jig and make a single miter cut. This keeps the profile oriented the same way and cuts down setup time. It’s easier for beginners and for projects where speed matters.
What makes this choice stand out is that molding width and spring angle change which method works best, so check those first. If your saw’s fence or a jig can’t support the profile firmly, nested cuts could shift and misalign. If your saw handles a solid bevel angle and you don’t mind extra flips, bevel cuts will give a cleaner result.
You get quicker, simpler cuts without changing the blade tilt when you nest the molding and use a good fence or jig. That’s perfect for repeatable jobs or long runs of trim where you want to keep moving. Be aware: if the fence is too short, you’ll lose control.
The bevel method solves fit problems by tilting the blade to match the spring angle and cutting compound angles in one pass. It takes more setup time and patient measuring, but it helps when perfection matters. Use bevels when the profile is large or the corner tolerances are tight.
Perfect for beginners or anyone short on time, nested cuts keep setup minimal and reduce orientation mistakes. You’ll still want to test a scrap piece to confirm the angle. Small adjustments up front save time and material later.
Cutting Capacity And Reach
If you need clean crown-molding cuts without shifting the workpiece, check cutting capacity and reach first; the blade diameter and sliding action tell you whether one pass will do the job or if you’ll be re‑setting parts. That matters when you’re working with nested crown up to about 6″–6‑5/8″. Measure maximum vertical and horizontal clearances because wider profiles or unusual spring angles can eat into your cutting room. You’ll want a dual‑bevel or sliding saw if you want single‑pass cuts for big pieces, since fixed non‑sliding saws limit reach. For anyone who hangs larger profiles, also verify fence height and slide length for support so the molding doesn’t sag during the cut. Check the angle ranges and stops against the compound cuts your molding and room geometry require. What makes this saw choice stand out for you is that the right specs let you finish jobs faster and with fewer setups. Small mistake? Change blades or reposition once and move on. Perfect for DIYers and pros who swap profiles often, this approach keeps your workflow steady and predictable.
Miter Detent Accuracy
If you want crown joints that meet cleanly every time, pay attention to detent accuracy before you buy a saw, because precise miter stops make repeatable cuts fast and easy. Check how many positive stops there are and where they sit on the scale; more stops—usually nine to fourteen at standard angles—let you dial in common cuts without fiddling. Measure the actual angles with a square or a digital angle finder since the stamped numbers can be off. Short check, big payoff.
For anyone who uses a saw a lot, look at the detent plate material and construction so you don’t end up with a sloppy stop after a few months. Stainless steel or a machined plate lasts longer than soft stamped plates and keeps the stops feeling crisp. Prefer models with replaceable detent plates and clear indexing so you can service the saw down the road. Small choices here save you time and money later.
What makes this feature stand out is a solid cam-lock or positive stop mechanism that removes wobble and keeps your angle steady while you cut. A fine-adjust miter lock is also handy because it lets you take out play and make micro-adjustments when a joint needs to be perfect. These controls help both pros and hobbyists hit tight tolerances. Use them right and your miters close with no gaps.
Dust Collection Efficiency
If you hate chasing sawdust around your shop when mitering crown molding, pick a saw and setup that actually pulls debris away from the blade instead of spraying it into the room. Aim for a dust port placed at the blade’s exit and sized to match common vacuum hoses (1.25–2 inches) so your suction doesn’t leak away and you keep more dust out of the air. That combination matters.
For anyone who wants the simplest hookup, use a saw with a sealed or well-shrouded blade guard and hood so debris is directed straight into the collector rather than becoming airborne, and pair it with a shop vac in the 100–150 CFM range for real capture. Short, straight hoses help keep suction strong. It’ll make cleanup faster.
What makes this setup stand out is how a positive-fit dust bag or a solid adapter prevents wiggle and leaks at the connection, letting your vac do the work and not lose suction through gaps. Clean filters and clear clogs regularly to keep that performance steady. Small maintenance pays off big.
You get cleaner cuts without a dusty mess when you confirm compatibility between the saw’s port and your hose size, because mismatched fittings are where most systems fail. Use adapters only when they fit snugly, and avoid long stretchy hoses that sag. Pick practical gear.
Portability And Weight
If you need to move a saw between jobsites and still cut big crown, pick one with the right weight and capacity so you don’t fight it all day. Heavier saws around 40–70+ lb give you more stability and wider cutting capacity for large crown molding, but they can be a pain to carry between sites. They stay steadier.
For anyone who often works alone or walks up stairs with tools, a lighter saw in the 30–40 lb range makes transport and solo setups much easier, and you won’t need help hauling it. Lighter models can lack vertical capacity and may require clamps or supports for big profiles. Keep that in mind.
What makes this type of saw stand out for jobsite storage is whether it mounts to a stand or bench, because that affects how you load and stow it. Check the saw’s dimensions and mounting options before you buy, since a compact footprint can save space in your truck and shop. Measure your van and storage rack.
You get the cutting width you need without dragging around unnecessary heft when you balance weight against maximum molding width, so match saw mass to the profiles you cut. Consider sliding or dual-bevel features if you need extra cutting flexibility, but remember those features usually add weight. Decide which trade-offs matter more to your workflow.
Frequently Asked Questions
Can I Use a Miter Saw for Baseboards and Trim Besides Crown Molding?
If you’re fitting baseboards and trim and want clean corners, a miter saw gives the angled cuts you need for inside and outside joints. Set precise angles for corners, and you’ll get repeatable, accurate cuts that make installation faster. Try using stop blocks when you’re cutting multiple pieces to the same length. They make the job quicker.
For anyone who hates gaps at corners, you can also do coped joints: cut a square profile on one piece and cope the profile with a coping saw for a tight inside corner. That takes a little practice but gives much better-looking seams than forcing imperfect miters together.
What makes this tool stand out for trim work is how versatile it is—you can handle straight runs, picture-frame returns, and small angled pieces without switching saws. Choose a fine-tooth finish blade so your baseboards and casings come out smooth and ready to paint.
You get safer, cleaner cuts without endless sanding by clamping pieces securely before you cut and checking your measurements twice. Measure twice, cut once.
How Do I Maintain and Sharpen the Saw Blade for Clean Crown Cuts?
If you want clean crown cuts without ragged edges, keep your blade free of pitch and resin so the teeth bite cleanly; a solvent and a rag do most of the work and you’ll see better cuts immediately. For anyone who sees missing or chipped teeth after cleaning, inspect each tooth closely and replace the blade if several teeth are damaged, because a few bad teeth make a mess of molding cuts. What makes this saw blade stand out for regular users is that light filing on a diamond file or a quick run through a professional sharpener restores edge geometry and gets your blade back to cutting like new; do small touch-ups yourself, but send it out if wear is heavy. You get truer, safer cuts without guessing by balancing the blade after sharpening and tightening the arbor bolts; those two small steps reduce wobble and tearout. Perfect for weekend carpenters, this care routine also includes storing blades dry to prevent rust so your teeth stay sharp and the blade stays safe.
Are There Safety Accessories Specifically for Crown Molding Cuts?
If you’re cutting crown molding and worried about the trim slipping or kicking back, use hold-down clamps to keep the workpiece steady so your cuts stay clean and your hands stay safe. For anyone who struggles to hold the molding at the right angle while sawing, a crown molding grip or fence adapter positions the trim correctly and keeps your hands well away from the blade. What makes this setup even better is using push sticks or push blocks when you need to feed short pieces through the saw; they give you control without putting fingers near danger. You get eye and ear protection without slowing your workflow by wearing safety glasses and hearing protection every time you cut, and a dust mask if you’re sensitive to fine particles. The miter saw’s blade guard should be working before you start; if it’s stuck or missing, don’t cut until it’s fixed. Perfect for beginners and pros alike, anti-kickback pawls add another layer of safety by helping prevent sudden backward movement of the wood.
Can I Cut Inside vs. Outside Corners With the Same Setup?
If you need tight corner joints in trim or molding, you can use one setup for both inside and outside corners by just flipping and rotating your pieces, which keeps your workflow simple and fast. For inside corners, cope or miter one piece square to the wall and cut the other with a coping cut or a complementary miter so the joint fits cleanly; test-fit with scrap first. That saves time.
For outside corners, cut both pieces at complementary miters so they meet tightly on the corner, and pay attention to fence angle and workpiece orientation before the final pass. A quick test cut on scrap will show you whether to flip the boards or adjust the angle. That prevents surprises.
What Blade Tooth Count and Material Are Best for Painted Molding?
If you want mirror-smooth edges on painted molding, use a 60–80-tooth carbide-tipped blade because that tooth count gives the finer finish that keeps paint from tearing. The carbide tips stay sharper against paint and primer longer, so you get more clean cuts before swapping blades. Go slow and steady when you feed the molding through.
For anyone who deals with mixed materials or primed trim, pick a triple-chip grind (TCG) blade since it reduces chipping on painted edges and handles filing, fillers, and wrapped surfaces well. TCG sacrifices a little face smoothness compared with alternate top bevel, but it protects the paint job. Practice a test cut first.
What makes alternate top bevel (ATB) useful is the smoother face cut it gives on solid wood and stain-grade molding, so choose ATB when you’re cutting raw or stained pieces where the visible face finish matters most. ATB can be sharper on the face but will be slightly more prone to chipping painted edges. Keep blade RPM matched to your saw and avoid pushing too fast.


